Are you tired of opening and closing heavy kitchen cabinet doors every time you need your favorite mug or dinner plate? Kitchen open shelving has emerged as a game-changing storage solution that’s transforming modern homes with its blend of style and practicality. Beyond just a passing trend, this versatile storage approach has become a staple in contemporary kitchen design, offering both aesthetic appeal and functional benefits that traditional cabinets simply can’t match.

Today’s homeowners are embracing the elegant simplicity of open shelving, creating displays that showcase their personality while keeping everyday items within easy reach. If you’re looking for ways to refresh your kitchen, open shelving offers an affordable and stylish alternative that can dramatically transform your kitchen’s appearance and functionality.
In this comprehensive guide, we’ll explore everything you need to know about implementing and styling kitchen open shelving in your home. We’ll cover the essential aspects that will help you create an organized, beautiful, and functional kitchen space. Let’s dive and unlock the potential of your kitchen space, turning it into a stunning showcase that’s as practical as it is beautiful.
I. Why Choose Kitchen Open Shelving?

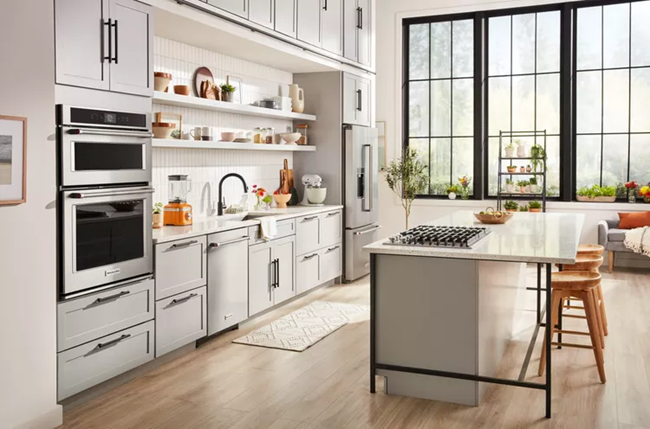
Transforming your kitchen with open shelving isn’t just about following the latest design trend – it’s about reimagining how your kitchen functions and feels. This versatile storage solution has gained popularity for its unique ability to combine practical storage with visual appeal, making it an attractive option for homeowners seeking both style and functionality.
Many homeowners find that kitchen open shelving dramatically transforms their space’s visual dynamics. By removing bulky upper cabinets, your kitchen instantly feels more spacious and airy, creating an inviting atmosphere that makes even compact kitchens appear larger. This optical illusion of added space can be particularly valuable in urban homes or smaller apartments where maximizing visual space is crucial.
Key Benefits of Open Shelving:
- Visual Appeal:
- Creates an airier, more open atmosphere
- Showcases beautiful dishware and collections
- Adds personality and character to your kitchen
- Allows for seasonal styling changes
- Practical Advantages:
- Provides easy access to frequently used items
- Encourages better organization habits
- Simplifies inventory management
- Makes cleaning more straightforward
- Cost Benefits:
- Reduces expenses compared to traditional cabinets
- Offers affordable style transformation
- Allows for DIY installation savings
- Provides flexibility for future updates
Pro Tip: Use open shelving to showcase your favorite dishes and decor while keeping them within reach.
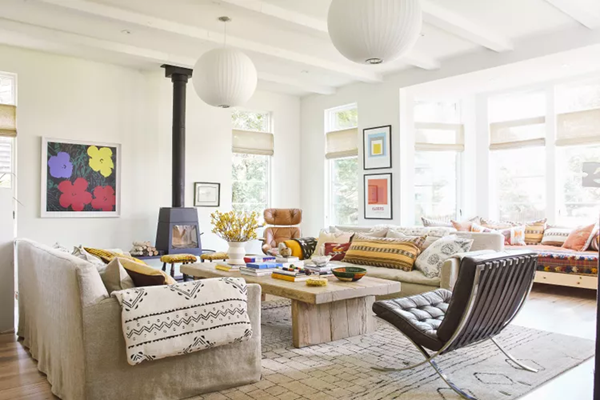
Don’t Miss: Stylish Living Room Makeover on a Budget
II. Planning Your Open Shelving Project
Successful kitchen open shelving starts with thorough planning and careful consideration of your space’s unique characteristics. Taking time to plan properly will help you avoid common pitfalls and ensure your shelving both looks beautiful and functions effectively for your needs.
Begin by conducting a detailed assessment of your kitchen layout. Consider not just the available wall space, but also traffic patterns, work zones, and how you typically move through your kitchen while cooking. This evaluation will help you determine the most practical locations for your open shelves and ensure they enhance rather than hinder your kitchen’s functionality.
Essential Planning Considerations:
- Space Assessment:
- Measure available wall areas carefully
- Consider height requirements for different items
- Plan for adequate spacing between shelves
- Account for existing fixtures and outlets
- Material Selection:
- Solid wood (traditional and warmth)
- Stainless steel (modern and durable)
- Glass (elegant and light)
- Mixed materials (custom look)
- Budget Planning:
- Shelving materials ($50-200 per shelf)
- Installation hardware ($50-150)
- Professional installation if needed ($200-500)
- Storage containers and organizers ($100-300)
Technical Requirements:
- Wall Support:
- Locate and mark wall studs
- Assess wall material strength
- Determine weight capacity needs
- Choose appropriate mounting hardware
Pro Tip: Measure and plan carefully to ensure your shelves are the right size and location for your needs.
Through careful planning and consideration of these elements, you’ll be well-prepared to create an open shelving system that not only looks stunning but also serves your kitchen storage needs effectively. Remember that taking extra time during the planning phase can save you both time and money during implementation.
Don’t Miss: 8 Expert Secrets to Creating a Welcoming Home
III. Installation Guide and Requirements

When it comes to installing kitchen open shelving, proper execution is crucial for both safety and aesthetics. Let’s break down the essential aspects of installation, ensuring you have all the information needed for a successful project.
Before beginning the installation process, gather these essential tools and materials:
- Heavy-duty level and measuring tape
- Stud finder and pencil for marking
- Power drill with appropriate drill bits
- High-quality mounting brackets and screws
- Wall anchors rated for heavy loads
- Safety equipment (goggles, dust mask)
Professional vs. DIY Installation Considerations:
- DIY Installation is suitable if you:
- Have experience with wall mounting
- Own the necessary tools
- Feel confident reading level measurements
- Can identify and work with wall studs
- Professional Installation is recommended when:
- Working with unusual wall materials
- Installing particularly heavy or complex shelving
- Dealing with electrical or plumbing considerations
- Requiring custom bracket fabrication
Step-by-Step Installation Process:
- Mark and verify stud locations using a stud finder
- Draw level lines for bracket placement
- Pre-drill holes for mounting brackets
- Install wall anchors if needed
- Secure brackets to the wall
- Place shelving and verify level
- Add final securing screws through shelf into brackets
Pro Tip: Use a level to ensure your shelves are installed straight and secure them with the appropriate hardware.
Don’t Miss: Best Finishing Touches For A Stunning Home
IV. Open Shelving Ideas for Different Kitchen Styles
Understanding how to adapt open shelving to different kitchen layouts and styles ensures your design complements your existing space perfectly. Let’s explore the most popular kitchen styles!
Modern Kitchen Applications:

- Contemporary Styling:
- Floating shelves with hidden brackets
- Monochromatic color schemes
- Sleek, minimalist accessories
- Glass and metallic elements
- Small Kitchen Solutions:
- Corner shelving utilization
- Vertical storage maximization
- Light-colored shelving to open space
- Multi-functional shelf arrangements
Traditional Kitchen Integration:

- Classic Design Elements:
- Bracket-supported wooden shelves
- Vintage dish displays
- Cookbook collections
- Mixed material textures
- Large Kitchen Features:
- Extended shelf runs
- Multiple shelf tiers
- Display and storage combinations
- Statement piece incorporation
Layout-Specific Solutions:

- Galley Kitchen Ideas:
- Single-wall shelving
- Height variation strategies
- Light-maximizing arrangements
- Space-saving configurations
- Open-Plan Considerations:
- Room divider shelving
- Coordinated living space design
- Flow-maintaining arrangements
- Sight line optimization
Don’t Miss: Apartment Essentials Must-Haves
V. Choosing the Right Shelving

Selecting appropriate shelving materials and styles is crucial for both functionality and aesthetic appeal in your kitchen.
Material Selection Guide:
- Wood Options:
- Solid hardwood for durability
- Reclaimed wood for character
- Bamboo for sustainability
- Treated pine for budget-conscious designs
- Metal Varieties:
- Stainless steel for modern appeal
- Industrial iron for rustic looks
- Powder-coated aluminum for lightness
- Brass for luxury appeal
Shelf Style Considerations:
- Thickness Guidelines:
- 1.5-2 inches for solid wood
- 1 inch for metal shelving
- 0.75 inches for light-duty storage
- 2+ inches for statement pieces
- Length Recommendations:
- 24-36 inches between supports
- Maximum 48 inches for heavy-duty
- 12-18 inches for corner shelving
- Custom cuts for specific spaces
Support System Options:
- Bracket Types:
- Hidden brackets for clean lines
- Decorative brackets as features
- L-brackets for heavy loads
- Floating support systems
- Installation Methods:
- Direct stud mounting
- Cleat systems
- Track-based adjustable systems
- Built-in support structures
Pro Tip: Consider the weight capacity of the shelving unit when selecting it. This is especially important if you plan to store heavy items, such as books or kitchen appliances.
Don’t Miss: 6 Expert Tips To Create Balance and Harmony In Your Home
VI. Styling Your Open Shelves

Creating an aesthetically pleasing and functional arrangement on your kitchen open shelving requires a thoughtful approach to both design and practicality. The key is striking the perfect balance between visual appeal and everyday functionality.
Essential Styling Principles:

- Color Coordination:
- Choose a consistent color palette (3-4 main colors)
- Group similar colored items together
- Use white dishes as a neutral base
- Incorporate pops of color through accessories
Visual Balance Techniques:
- Create varying heights within each shelf
- Balance heavy visual elements with lighter ones
- Use odd numbers for groupings (groups of 3 or 5)
- Maintain some negative space for visual breathing room
Practical Organization Tips:
- Frequently Used Items:
- Place at eye level or slightly below
- Keep within easy reach of prep areas
- Group similar items together
- Decorative Elements:
- Mix in plants or herbs in coordinating planters
- Add vintage kitchen tools as accent pieces
- Incorporate cookbooks with coordinating spines
- Use attractive containers for pantry items
Storage Container Recommendations:
- Clear glass jars for dry goods and spices
- Matching ceramic canisters for coffee and tea
- Woven baskets for less attractive necessities
- Coordinating serving pieces and bowls
- Uniform storage containers for a cohesive look
Pro Tip: Experiment with different arrangements of dishes, decor, and plants to create a visually appealing display.
Don’t Miss: How To Accessories Your Living Room
VII. Design Ideas and Inspiration

Transform your kitchen open shelving into a stunning focal point with these creative design approaches that balance style with functionality.
Popular Style Categories:
- Minimalist Design:
- Clean lines and simple shapes
- Limited color palette
- Carefully curated displays
- Focus on negative space
- Farmhouse Aesthetic:
- Rustic wood materials
- Vintage accessories
- Mixed textures
- Natural elements
Modern Styling Approaches:
- Industrial Elements:
- Metal bracket details
- Raw material finishes
- Exposed hardware
- Contemporary containers
- Mixed Material Combinations:
- Wood and metal pairings
- Glass and ceramic displays
- Natural and manufactured materials
- Textural contrasts
Creative Display Ideas:
- Seasonal Arrangements:
- Rotate decor with seasons
- Adjust color schemes periodically
- Include fresh herbs or plants
- Update accessories quarterly
- Functional Art:
- Beautiful everyday items
- Coordinated collections
- Statement pieces
- Purposeful arrangements
Trending: Dark Boho Decor Tips and Tricks
VIII. Organization and Maintenance Tips

Maintaining beautiful and functional kitchen open shelving requires consistent care and smart organizational strategies. Here’s how to keep your shelves looking pristine while maximizing their practicality.
Daily Maintenance Essentials:
- Quick-Clean Routine:
- Wipe shelves with microfiber cloth daily
- Spot clean spills immediately
- Rotate items during cleaning to prevent dust buildup
- Clean items before returning them to shelves
- Weekly Deep Clean:
- Remove all items from one section at a time
- Clean shelves thoroughly with appropriate cleaner
- Dust and wash displayed items as needed
- Check for any loose brackets or hardware
Smart Organization Strategies:
- Zone Planning:
- Create cooking zones for efficiency
- Group breakfast items together
- Keep cooking oils near the stove
- Store less-used items on higher shelves
- Rotation System:
- Place newer items behind older ones
- Implement a “first in, first out” system
- Regularly assess item usage patterns
- Adjust placement based on seasonal needs
Pro Tip: Regularly dust and clean your open shelves to prevent the accumulation of dirt and grime. You can use a microfiber cloth or duster to do this.
Also: Modern Boho Living Room Decoration Tips
IX. Common Mistakes to Avoid
Understanding and avoiding these frequent pitfalls will help ensure your kitchen open shelving project succeeds both functionally and aesthetically.
Critical Installation Mistakes:
- Structural Issues:
- Ignoring weight limitations
- Skipping stud mounting
- Using inadequate brackets
- Improper leveling techniques
- Design Missteps:
- Overcrowding shelves
- Poor spacing between items
- Inconsistent styling themes
- Neglecting practical access needs
Organization Errors to Avoid:
- Storage Mistakes:
- Storing rarely used items at eye level
- Placing heavy items on upper shelves
- Mixing incompatible items together
- Neglecting to label containers
- Maintenance Oversights:
- Ignoring regular cleaning schedules
- Failing to secure items properly
- Overlooking shelf wear and tear
- Not rotating items frequently
Pro Tip: Regularly clean your shelves with a soft cloth and mild detergent to keep them looking their best.
Most Popular Post:
10 Affordable Home Decor Finds Under $50 to Elevate Your Space
Studio Apartment Decorating Expert Tips: Maximize Your Space and Style
Most Affordable Amazon Home Decor Finds
Best Home Decor Ideas On a Budget
How To Decorate a Desk at Home
Conclusion
Kitchen open shelving represents a perfect blend of form and function, offering a versatile solution for modern homes. By following the guidelines and tips outlined in this comprehensive guide, you can create a beautiful, practical, and organized kitchen space that works for your lifestyle.
Key Takeaways:
- Proper planning ensures successful implementation
- Regular maintenance keeps shelves looking beautiful
- Thoughtful organization maximizes functionality
- Style and practicality can coexist harmoniously
Next Steps:
- Assess your kitchen space
- Plan your shelf layout
- Choose appropriate materials
- Gather necessary supplies
- Begin your transformation
Remember, successful kitchen open shelving is about finding the right balance between display and function, creating a space that’s both beautiful and practical for your daily needs.
FAQs About Kitchen Open Shelving
Let’s address the most common questions homeowners have about implementing and maintaining open shelving in their kitchens.
How often should I clean open shelves?
- Daily light dusting
- Weekly thorough cleaning
- Monthly deep cleaning of all items
What’s the best way to minimize dust?
- Regular rotation of items
- Use of frequently accessed items
- Proper ventilation systems
How much weight can open shelves hold?
- Typically 30-50 pounds per linear foot
- Depends on mounting system
- Varies by material and installation
What’s the ideal shelf depth?
- 10-12 inches for everyday items
- 8-10 inches for smaller items
- 12+ inches for large platters
Professional vs. DIY?
- Average installation costs ($200-500)
- Required skill level
- Time investment (4-8 hours typical)
Maintenance Requirements?
- Weekly cleaning schedule
- Annual hardware checks
- Periodic reorganization needs
Subscribe To the Newsletter!
Subscribe now for an endless feed of inspirational women’s cave decor ideas, pampering rituals, and more tips for curating your ultimate escape. Let’s start making your cozy refuge a reality – you so deserve this!
CATCH THE LATEST IN HOME DECOR TRENDS:
Steal These 16 Expert-Approved Decorating Secrets

How To Accessorize Your Living Room
How to Make a Small Room Appear Bigger
How to Make Your Home Look Expensive
GET CAUGHT UP ON ALL THE INSPIRING DECOR TIPS:
18 Fresh Decorating Ideas To Update Your Fireplace
How to Make a Gallery Wall: The Complete Step-by-Step Guide (Even If You’ve Never Hung a Picture)
