
How to Hang a Gallery Wall
The Designer Blueprint That Actually Works
No more crooked frames. No more decision paralysis. No more Pinterest fails. Just a clear, step-by-step system from the designers who do this every day.
To hang a gallery wall, start with your largest piece centered at 57 inches from the floor (average eye level), then build outward using 2–3 inch gaps between frames. Lay the layout on the floor first, trace paper templates on the wall before hammering a single nail, and maintain a consistent edge — either the top or center line — to keep it from looking chaotic.
This guide covers every step: planning, layout, spacing rules, renter-friendly solutions, and the exact mistakes that make gallery walls look amateur.
You’ve saved 47 gallery wall pins. You’ve bought the frames. You’ve moved them around the floor seventeen times. And now you’re staring at a wall wondering: why does mine look nothing like the ones online?
You’re not alone — and you’re not bad at decorating. You’re just missing a system.

This is the how to hang a gallery wall designer blueprint — the same methodology interior designers use on client projects — translated into steps a normal human can actually follow. By the end of this guide, you’ll know exactly where to hang your first nail, how to group unlike frames so they still look intentional, and how to pull it off even if you’re renting.
Start Here: Plan Your Gallery Wall Digitally First
Every other guide tells you to start on the floor. We’re telling you to start on your phone — because in 2026, there are free AR tools that let you hold up your camera and see your frames on your actual wall before you buy a single piece of hardware. This one step eliminates 90% of the “why doesn’t mine look right?” frustration.
The AR Shortcut: See It Before You Hang It
Two free tools to help you hang a gallery wall are worth knowing about. IKEA Place lets you AR-visualize furniture and some wall pieces in your exact room. Hutch and Roomstyler let you build full room mockups. For frame-specific visualization, try searching “gallery wall AR app” in your app store — several niche tools like MyWallDecorator let you upload your own art, map your wall dimensions, and preview arrangements through your phone camera in real time. It feels like cheating. It isn’t. It’s just smart.
- Take a straight-on photo of your wall first — no angle, level camera. This becomes your planning canvas.
- Screenshot your top 3 layouts from the app before committing to anything physically.
- Use the app to check scale: Many people discover their “large” frame is actually too small for the wall once they see it digitally. Better to know now than after hanging.
Don’t have an AR app? The low-tech version works too: photograph your wall, print it on standard paper, then sketch frame outlines on the printout with a pencil. Old-school, but surprisingly effective for validating scale before touching a wall.
The 3 Go-To Layout Templates
If you’re starting from scratch with no layout in mind, these three templates solve different room problems. Pick the one that matches your wall shape and work from there — don’t try to invent a layout from zero.
Step 1: Plan Before You Touch a Single Nail

The biggest gallery wall mistake isn’t a crooked frame — it’s starting with a hammer. Professional designers plan gallery walls on the floor long before anything goes on the wall. This phase takes 30 minutes and saves you from three weekends of spackle.
Designer Strategy: Define Your Wall Zone First
Your gallery wall needs a boundary. Without one, it either floats in the middle of the wall (underwhelming) or sprawls across too much space (chaotic). The best approach: treat it like a piece of furniture.
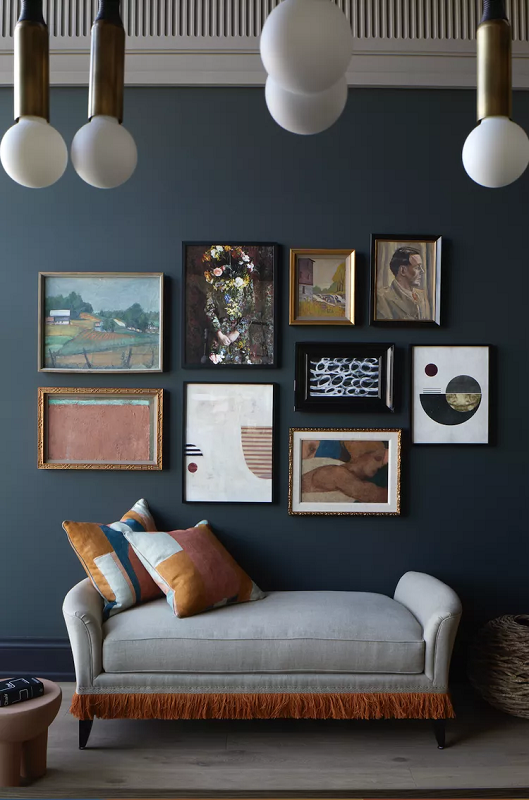
- Above a sofa: The wall arrangement should span ⅔ the width of the sofa — no wider, no narrower. A sofa that’s 84 inches wide calls for a gallery arrangement about 56 inches across.
- Staircase wall: Follow the diagonal angle of the stairs. Your top edge should track the ceiling line; your bottom edge, the stair treads.
- Standalone wall: Leave at least 12 inches of breathing room on each side. A gallery that touches the ceiling or crown molding reads as an afterthought, not a design decision.
- Mark your zone with painter’s tape before you start placing anything. This invisible “frame” is your north star for every decision that follows.
“I always say the gallery wall starts on the floor. Spend 90% of your time arranging before you commit to the wall. The floor is forgiving. Drywall is not.” — Interior designer principle used across high-end residential projects.
Mark Your Zone on the Wall
Use painter’s tape to outline the space. Stand back, squint, and adjust until it feels right in proportion to furniture below it.
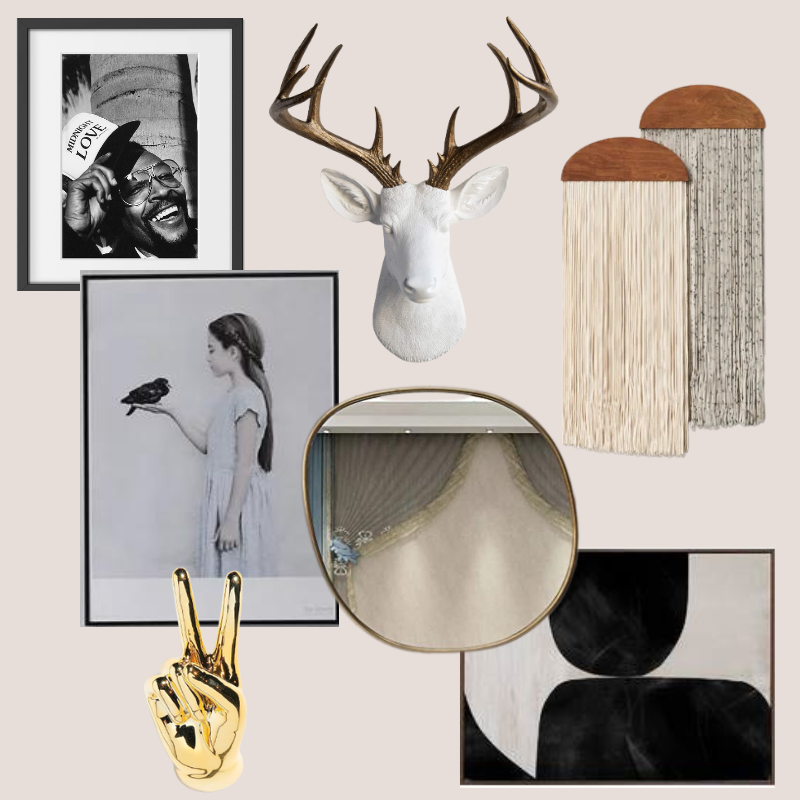
Gather & Sort Your Pieces
Lay everything on the floor inside an equivalent-sized area. Include frames, mirrors, objects, shelves — everything you’re considering.
Build Out From the Anchor Piece
Place your largest or most visually heavy piece just left-of-center. Build outward, alternating large and small, horizontal and vertical.
Trace Paper Templates
Cut paper to match each frame. Tape them to the wall exactly as planned. Step back. Live with it for 24 hours before hammering.
Mark Nail Points Through Paper
Find the hanging hardware location on each frame, transfer that measurement to your paper template, then hammer through the paper. Remove paper, hang frame. Done.
The “Tape & Poke” Method: Paper Templates Done Right
The paper template method is the single best technique to hang a gallery wall with zero wasted nail holes. But most people do it only halfway. Here’s the full version — what designers actually mean when they say “use paper templates.”
Lay kraft paper or newspaper flat, place each frame face-down on top, and trace the outline with a marker. Cut it out. Label it (“large black landscape,” “small oval mirror”) on the front.
Turn the frame over and measure from the top of the frame down to the hanging hardware (keyhole, wire taut, or sawtooth). Mark that exact spot with an X on your paper template. This is where the nail goes.
Arrange your paper templates on the wall exactly as planned on the floor. Use painter’s tape at the corners. Step back and live with it for at least an hour — ideally overnight. You’ll notice things you missed on the floor.
Use a small level (or your phone’s built-in level app) on top of each paper piece. Adjust the tape until every template is perfectly horizontal. This is the step most people skip — and the reason most gallery walls have one slightly crooked frame.
Drive your nail or hook directly through the X marked on the paper. The paper steadies the nail as it goes in. Then tear the paper away from around the nail, hang your frame, and stand back. Nail goes in exactly once, exactly right.
For a wire-hung frame, the nail position shifts depending on how taut you pull the wire. Always measure with the wire pulled taut upward — the way the frame will actually hang — before marking your template. A slack wire can move the nail point up to 2 inches from where you’d expect it.
Step 2: The Spacing & Scale Rules That Actually Matter
Most gallery wall spacing advice is either vague (“leave some room between frames”) or weirdly precise (“use exactly 2.5 inches”). The truth is that spacing depends on your frame sizes — but a few designer rules will save you from the most common disasters.
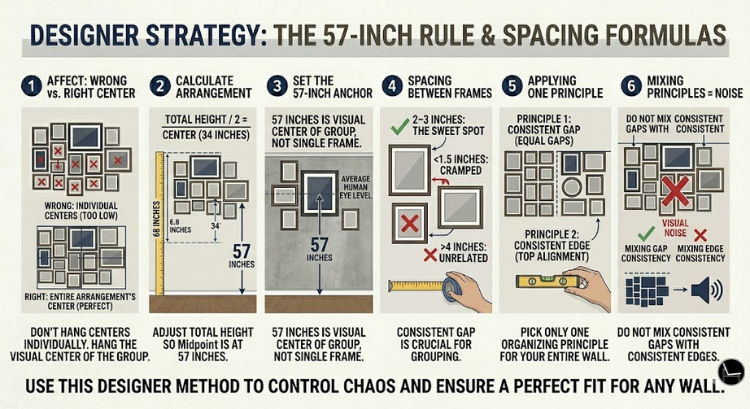
Designer Strategy: The 57-Inch Rule & Spacing Formulas
The 57-inch rule is the single most important measurement to successfully hang a gallery wall. It refers to the height of the center of any piece of art from the floor — the average human eye level. This is why museums hang art this way. This is why it always looks right. When you hang a gallery wall, 57 inches should represent the visual center of your entire arrangement, not of each individual frame.
- Calculate your arrangement’s center: Measure the total height of your layout. Divide by two. That midpoint should land at 57 inches. Adjust your overall height accordingly.
- Spacing between frames: 2–3 inches is the sweet spot for a collected, curated feel. Less than 1.5 inches reads as cramped; more than 4 inches and the pieces stop feeling like a group.
- Consistent gap or consistent edge: Pick one organizing principle. Either keep all gaps equal, or align all pieces to a shared top edge or center axis. Mixing both organizing principles in one arrangement creates visual noise that no amount of beautiful art can fix.
Designer Strategy: Color, Mood & Texture
The reason your gallery wall might look right on the floor and wrong on the wall is usually a color and texture imbalance. When you add the third dimension (the actual wall), visual weight shifts. Dark frames feel heavier. High-contrast art reads louder. You have to plan for this.
- Distribute visual weight: Don’t cluster all your dark-framed pieces in one corner. Treat bold, dark, or high-contrast pieces like spices — spread them across the arrangement so the eye moves around, not to a single corner.
- Choose a unifying element: This could be frame color, mat style, art medium (all photographs, all line drawings), or even subject (all botanicals, all family moments). One throughline is enough — you don’t need everything to match.
- Add one unexpected texture: A small woven wall hanging, a sculptural ceramic piece, or a mirror among flat frames gives the whole arrangement dimension. It’s the thing that makes people say “how did you do that?” when the answer is actually just: texture contrast.
Step 3: Real-Life Fixes for Awkward Spaces

Pinterest galleries exist in rooms with perfect lighting, plain white walls, and no TV in the way. Your home is real. Here’s how to handle and hang a gallery wall the right way!
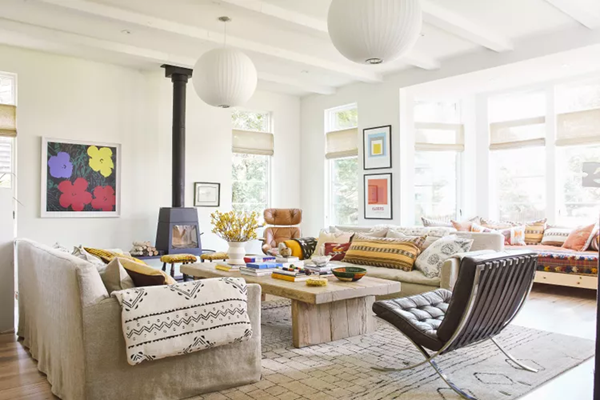
The TV Problem
To hang a gallery wall around a TV is genuinely tricky because the TV wins every visual competition — it’s the brightest, highest-contrast element in the room. Two approaches work:
- Frame the TV intentionally: Build your gallery wall with the TV as the anchor, treating it as an oversized horizontal “frame.” Use tall, narrow frames flanking the sides and a horizontal piece above. Don’t try to compete with the TV — absorb it into the composition.
- Separate the gallery entirely: Keep your gallery wall on a perpendicular wall or the wall opposite the TV. The visual tension between a gallery wall and a TV on the same wall rarely resolves cleanly unless you’re a trained space planner.
The Renter’s Dilemma
The fear of losing your deposit is real and valid. But renter-friendly doesn’t mean you can’t hang a gallery wall — it means smart gallery wall.
- Command strips for lighter frames: 3M Command strips hold reliably up to their stated weight capacity when applied correctly (clean wall with alcohol first, press for 30 seconds, wait 1 hour before hanging). For frames under 4 lbs, they’re genuinely as reliable as nails.
- Picture rail systems: If your apartment has picture rail molding (common in pre-war buildings), a simple picture rail hook system lets you hang heavy pieces with zero wall damage.
- Lean, don’t hang: A leaning ladder shelf, a deep ledge shelf, or even floor-leaning large frames create gallery-like arrangements without touching the wall. Pair with smaller framed pieces propped against books for a casual editorial look.
Renter tip: For a nail-free medium-weight gallery, use Monkey Hooks — small metal hooks that press directly into drywall and hold up to 50 lbs. They create a hole smaller than most nail holes and are technically removable, though results vary by landlord interpretation.
The “Why Does Mine Still Look Off?” Checklist
The Vibe Check: Match Your Layout to Your Personality

The gallery wall you build should feel like you — not like a showroom. Understanding which design personality you’re working with will narrow your layout choices in about 60 seconds and eliminate decision paralysis entirely.
Hanging Hardware Compared: What to Actually Use
Not all walls are equal. Not all frames are equal. Here’s the hardware breakdown that actually matters — no vague “use the right hardware” advice.
| Hardware | Best For | Weight Limit | Wall Damage | Verdict | Where to Buy |
|---|---|---|---|---|---|
| Picture Hooks + Nails | Drywall, plaster, heavy frames | Up to 100 lbs | Small nail hole | Best Overall | Shop on Amazon → |
| 3M Command Strips | Renters, light frames (<4 lbs) | 2–16 lbs | Zero (if removed correctly) | Renter Favorite | Shop on Amazon → |
| Monkey Hooks | Medium frames, drywall only | Up to 50 lbs | Tiny, repairable hole | Great Middle Ground | Shop on Amazon → |
| Drywall Anchors | Heavier pieces, no stud available | Up to 75 lbs | Medium hole (⅜”) | Use When Needed | Shop on Amazon → |
| Stud Screws | Very heavy mirrors, shelves | 100+ lbs | Larger hole, structural | Overkill for Most Frames | Shop on Amazon → |
| Adhesive Strips (Generic) | Temporary decor only | 1–2 lbs | Can strip paint on removal | Avoid for Galleries | Shop on Amazon → |
The Frame Alignment Level — The Thing You Didn’t Know You Needed
A laser level is the difference between spending Sunday afternoon hanging a gallery wall and spending Sunday afternoon re-hanging it. A good 3-line laser level projects horizontal and vertical guides across your entire wall simultaneously — no chalk lines, no measuring tape running across the wall, no “is that straight?” anxiety. You tape your paper templates, align them to the laser guide, and every single frame ends up at the exact same height. It’s the tool professional installers use, available for under $40. Once you own one, you’ll use it for every wall project forever.
Shop Laser Levels on Amazon →Before & After: What the Right Process Changes

The difference between a gallery wall that looks amateur and one that looks designed usually comes down to just a few specific choices. Here’s a direct comparison.
- Started with the smallest frame and worked outward
- Hung everything too high (above 65″)
- Random gaps — some 1″, some 5″
- All frames the same size in an irregular cluster
- Four different frame finishes with no plan
- Art leans toward one side, feels unbalanced
- Hammered 11 nails, removed 7, patched 4 holes
- Anchored the largest piece just left-of-center at 57″
- Arrangement’s visual center sits at eye level
- Consistent 2.5″ spacing throughout
- Mixed sizes: two large, three medium, two small
- Two frame finishes (black + natural wood) only
- Visual weight distributed across the full arrangement
- Three nails total, placed perfectly first time
2026 Gallery Wall Trends Worth Knowing
Trends in gallery walls move slower than fashion — and that’s a good thing. The three directions gaining traction in 2026 are about meaning and materiality, not just aesthetics.
Before you go — don’t miss these
- Interior Design Style Quiz — Find Your Exact Style in 2 Minutes
- Timeless Paint Colors That Never Go Out of Style
- Create Your Perfect Ergonomic Home Office: A Complete Guide
- Must-Have Accessories for Guys: The Secret to a Stylish Space
- Modular Sofas for Small Spaces: Brilliant Solutions for Compact Living
- Bathroom Peel and Stick Wallpaper Ideas: 7 Designer Tricks That Look High-End
Use the paper template method: cut kraft paper or newspaper to match each frame, tape templates to the wall in your planned arrangement, then hammer nails directly through the paper at the hanging point. Remove the paper and hang frames. You nail once, in exactly the right spot, every time.
The visual center of your entire arrangement should sit at 57 inches from the floor — the average eye level. This means your arrangement might start at 40 inches from the floor and extend to 74 inches, with the midpoint landing at 57. Never align the top of the arrangement with 57 inches; find the true midpoint.
The gallery arrangement should span roughly ⅔ the width of your sofa and sit 8–12 inches above the sofa back. An asymmetric layout with a dominant anchor piece and a mix of large and small frames works best for most living rooms because it accommodates different size artwork without requiring perfectly matched frames.
Yes — for frames under 4 lbs, 3M Command strips are a reliable no-nail solution when applied to a clean wall surface. For medium-weight pieces up to 50 lbs in drywall, Monkey Hooks press in without a hammer and leave a tiny hole. For very heavy pieces, some form of wall penetration is still the safest option.
You’ve Got This — Start With One Frame
To hang a gallery wall isn’t a project you complete in one afternoon. The ones that look best were built in stages — an anchor piece, then a second, then a third added six months later when the right piece appeared. The point isn’t to fill the wall. It’s to build something that grows with you.
You now have the same blueprint designers use to hang a gallery wall: define your zone, anchor at 57 inches, maintain consistent spacing, paper-template before nailing, and let one unifying element — frame color, art style, or subject — tie it together.
Start with the anchor piece. Just that. Put it up this weekend and see how the wall changes. The rest will follow.
Not sure what your style actually is?
Take the 2-minute quiz and find your exact interior design style — it’ll make every decor decision easier, including choosing art for your gallery wall.
Take the Style Quiz →CATCH THE LATEST IN HOME DECOR TRENDS:
Steal These 16 Expert-Approved Decorating Secrets

How To Accessorize Your Living Room
How to Make a Small Room Appear Bigger
How to Make Your Home Look Expensive
GET CAUGHT UP ON ALL THE INSPIRING DECOR TIPS:
18 Fresh Decorating Ideas To Update Your Fireplace
How to Make a Gallery Wall: The Complete Step-by-Step Guide (Even If You’ve Never Hung a Picture)
