Bathroom Peel and Stick Wallpaper Ideas: 7 Designer Tricks That Look High-End
The definitive step-by-step guide to choosing, prepping, and applying bathroom peel and stick wallpaper like a professional—from pattern selection to flawless finish.
Bathroom peel and stick wallpaper is a renter-friendly, removable way to transform any bathroom wall in a single afternoon. The key to success is choosing a moisture-resistant or waterproof vinyl formula, prepping a clean dry surface, and working panel-by-panel from a plumb line—no paste, no professional, no problem.
Bathroom peel and stick wallpaper is no longer a “compromise” option—it is the designer’s quiet weapon. Picture this: you walk into your bathroom right now and it looks exactly the same as the day you moved in. Same builder-beige walls. Same uninspired tile. The kind of room that does its job, but absolutely nothing else. You have scrolled Pinterest until your thumbs ache, bookmarked a hundred renovation inspos, and yet the walls stay stubbornly beige. The problem is not your taste. It is the lie you have been told—that a beautiful bathroom requires demolition, a contractor, and a four-figure budget.

Here is the truth that interior designers have known for years: a single roll of the right peel and stick wallpaper can do more for a bathroom’s personality than a $3,000 tile job. It is removable, affordable, and—when you follow the right method—it looks genuinely expensive. This post is your complete blueprint, from picking the perfect moisture-resistant pattern to laying the final panel without a single bubble.
Why Bathroom Peel and Stick Wallpaper Is the Smartest Design Move You Can Make Right Now

Bathroom peel and stick wallpaper is a self-adhesive, removable wall covering specifically engineered for damp environments. The best formulas use a thick vinyl or PVC construction laminated over a pressure-sensitive acrylic adhesive—meaning they resist humidity, repel light splashes, and peel off cleanly when you are ready to move on. This matters because standard fabric-backed wallpaper will blister and peel in a bathroom within months. You need the right product for the right environment.
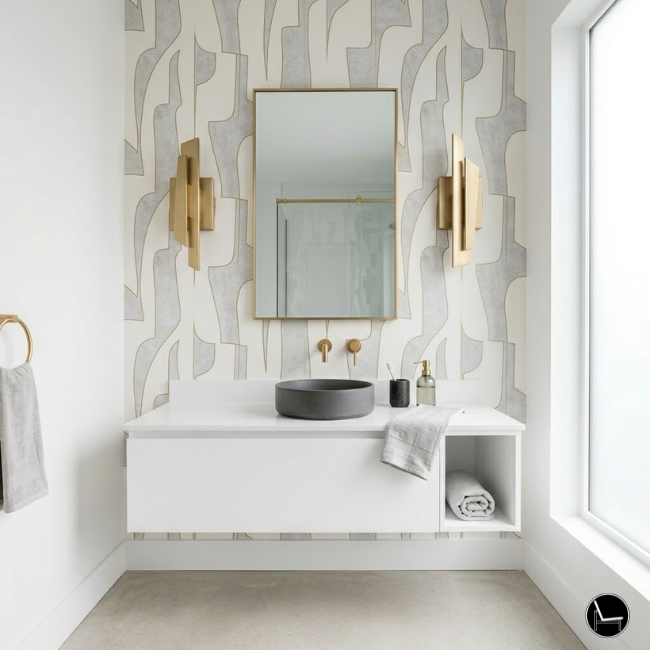
Design-wise, a bathroom is the most personal room in your home and, paradoxically, the most neglected. It is the first room you see each morning and the last at night. A well-chosen pattern—botanical, geometric, maximalist mural, or soft watercolor—creates an emotional reset. This is not a cosmetic upgrade; it is a psychological one.
Spa Sanctuary
Soft botanicals, eucalyptus, neutral watercolors. Promotes calm before the day begins.
Bold Statement
Dark florals, deep moody backgrounds. Makes a small bathroom feel intentional and dramatic.
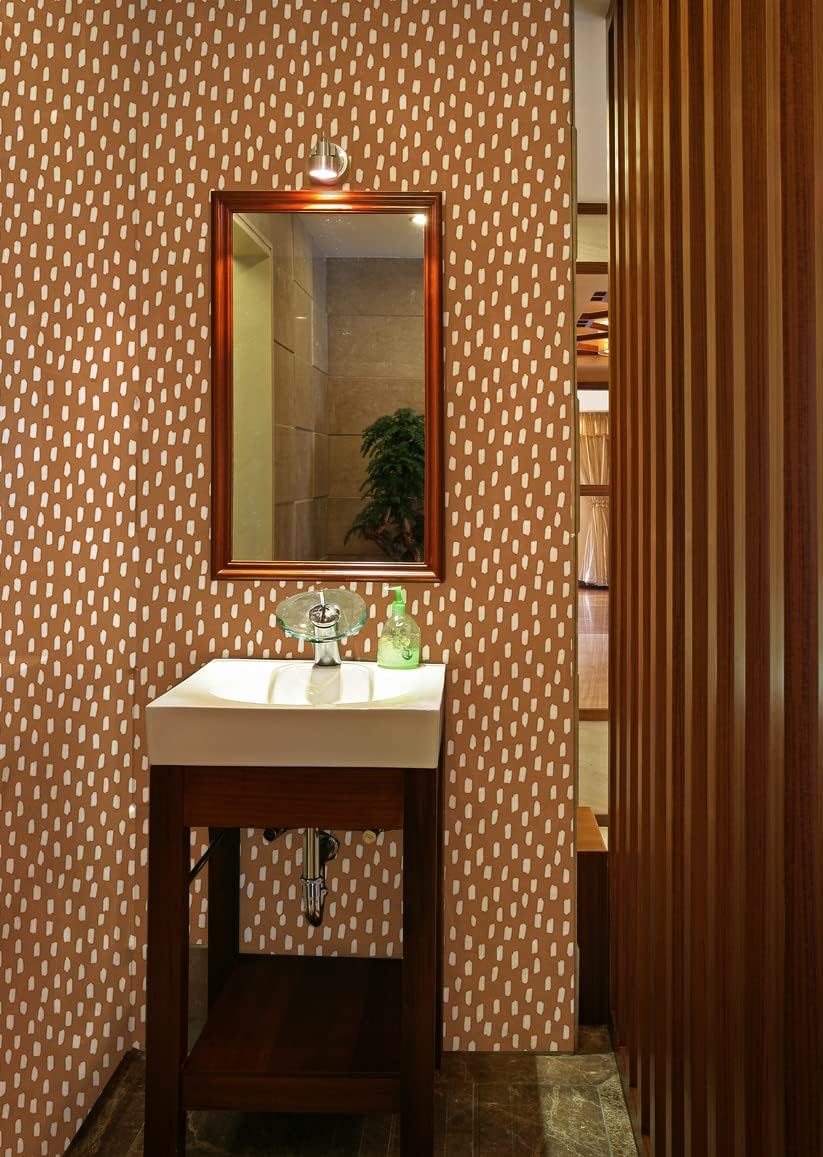
Garden Fresh
Light floral, sage, yellows. Brings outdoor energy into an interior space.
Powder Room Glam
Gold accents, retro dots, boho geometry. Perfect for a guest bathroom statement.
“The bathroom is the one room where a wallpaper pattern can be as bold as you dare—because the room is small, the pattern is contained, and the drama reads as confident rather than chaotic.”— Emily Henderson, Interior Designer & Author of Styled (stylemepretty.com)
Dive deeper with this step-by-step guide on: Renter-Friendly Wall Decor: The $500 Mistake 87% of Renters Make (And How to Avoid It)
How to Choose the Perfect Bathroom Peel and Stick Wallpaper (The No-Fail Formula)
The single biggest mistake buyers make is choosing a wallpaper based on looks alone without checking its moisture rating. In a bathroom, the adhesive and face material must be rated for high-humidity or the paper will bubble, peel at the seams, and fail within weeks. Look for the words “waterproof,” “moisture-resistant,” or “bathroom-safe” explicitly stated in the product description. When in doubt, choose a 100% PVC vinyl formula—it is the most durable option for steamy shower environments.
The 3-Part Selection Framework: Material → Pattern → Scale
Once you have confirmed moisture resistance, move to the design decision. Every good wallpaper choice for a bathroom runs through three filters in this exact order: the material’s durability, then the pattern’s mood, then the scale’s spatial effect. Skipping straight to “I love this pattern” without checking material or scale is how you end up with a beautiful wallpaper in the wrong room.
| Material Type | Humidity Rating | Removability | Best For | Designer Rating |
|---|---|---|---|---|
| Thick PVC Vinyl | Excellent ✓ | Clean Peel ✓ | Full bathroom, near shower | ⭐⭐⭐⭐⭐ |
| Fabric-Backed Vinyl | Good ✓ | May Leave Residue | Powder room / half bath | ⭐⭐⭐⭐ |
| Paper-Faced Peel & Stick | Poor ✗ | Easy Peel ✓ | Dry accent walls only | ⭐⭐ |
| Woven Textile Peel & Stick | Moderate | Moderate | Low-humidity bathrooms | ⭐⭐⭐ |
Pattern Scale: The Designer’s Spatial Trick
Pattern scale is the most underused tool in the amateur decorator’s kit. The right scale can visually expand a cramped bathroom by a third, or ground an awkwardly tall ceiling.
- Small bathroom (under 50 sq ft): Choose small-to-medium scale repeats (under 6″ motif). Oversized prints feel claustrophobic.
- Medium bathroom (50–100 sq ft): Medium to large-scale florals and geometrics both work. Bold prints read as intentional rather than overwhelming.
- Large master bath or ensuite: Go as large as you want. Statement murals and oversized botanicals all work here.
- Low ceilings: Choose vertical stripe patterns or tall elongated motifs to draw the eye upward.
- High ceilings: Wide horizontal patterns will visually bring down the ceiling for a cozier feel.
Source: Wayfair bathroom decor trend data, 2024 category analysis.
Always order a sample panel before committing to full rolls. Bathroom lighting will shift how a colour reads versus on your screen. A caramel-tone boho print can look orange under cool LEDs but warmly golden under incandescent bulbs. Samples save returns.
Keep reading for a designer-approved guide to: The Best Performance Fabric Sofas for Real Life (Kids, Pets & Spills Welcome)
Color Psychology & Pattern Pairing: The Formula for a Magazine-Worthy Bathroom

Stop guessing about color—there is a rule of thumb for every bathroom mood. The color of your wallpaper chemically affects the brain’s stress response. Cool greens and soft blues lower cortisol. Warm terracottas and golds stimulate comfort. Deep, saturated backgrounds create the “jewel box” effect that makes a small powder room feel intentionally luxurious.
| Desired Mood | Color Direction | Pattern Style | Avoid |
|---|---|---|---|
| Spa / Calm | Sage, mist blue, linen | Soft botanicals, watercolor florals | High-contrast geometrics |
| Energised / Bright | Warm yellow, coral, caramel | Boho dots, retro florals | Dark saturated backgrounds |
| Luxe / Glamorous | Charcoal, forest green, navy + gold | Dark botanicals, art deco geometry | Light pastel wash |
| Playful / Eclectic | Multi-colour, primary accents | Maximalist print, bold repeat | Tonal-only palettes |
| Romantic / Feminine | Blush, dusty rose, seaglass | Floral rolls, watercolour blooms | Stark black and white |
- Complementary colors create instant ‘pop’. If your towels are navy, a warm amber or terracotta wallpaper creates a curated complementary contrast.
- Cool tones establish deep, quiet relaxation. Sage green and soft blue-gray are the designer’s go-to for spa-inspired bathrooms that never date.
- Dark backgrounds in small bathrooms make the room feel like a deliberate, intimate jewel box rather than a cramped afterthought.
- Warm whites and creams let your tiles or vanity do the talking—a soft neutral with a subtle texture is the quiet anchor the room needs.
“In a bathroom, you have the license to use color in a way you might never dare in a living room. The smaller the room, the bolder you should go—it’s a controlled environment.”— Nate Berkus, Interior Designer & TV Host (nateberkus.com)
Next, explore this practical guide: How To Style Coffee Table Books That Transforms Your Space
Surface Preparation: The Step Everyone Skips (And Then Regrets)

Surface preparation is responsible for roughly 80% of a peel and stick wallpaper installation’s success or failure. The adhesive is engineered to bond to a clean, smooth, dry surface. Any dust, soap film, moisture, or texture will compromise that bond—and in a bathroom, a compromised bond means bubbles and peeling edges within weeks.
The 6-Step Surface Prep Protocol
Clean the Wall Completely
Wipe with warm water and a small amount of dish soap. Remove all grease, soap scum, hairspray residue, and dust. Even invisible residue will prevent adhesion.
Rinse & Dry Thoroughly
Follow with a clean damp cloth to remove all soap. Allow the wall to dry for a minimum of 24–48 hours. Moisture trapped under the adhesive is the leading cause of premature peeling.
Fill Any Holes or Imperfections
Use lightweight spackle for nail holes or small cracks. Sand smooth once dry. The wallpaper will telegraph every bump through the face material.
Identify Your Surface Type
Peel and stick adheres best to flat or eggshell painted drywall and primed walls. Challenging on high-gloss paint, heavily textured walls, or bare unsealed drywall.
Mark Your Plumb Line
Use a level and pencil to draw a perfectly vertical guideline. No wall corner is perfectly plumb—starting without a guideline guarantees a crooked install.
Temperature Check
Ideal application temperature: 60°F–80°F (15°C–27°C). Cold adhesive bonds poorly; hot humid conditions make it too tacky to reposition. Turn off the shower two hours before installing.
| Surface Type | Adhesion Quality | Extra Prep Needed |
|---|---|---|
| Flat / Eggshell Painted Drywall | Excellent | Clean & dry only |
| Semi-Gloss Painted Wall | Moderate | Lightly sand to scuff; clean |
| High-Gloss Paint | Poor | Sand + primer coat recommended |
| Smooth Ceramic Tile | Good | Degrease thoroughly; dry 48 hrs |
| Heavily Textured Wall | Poor | Skim-coat plaster first |
| Primed MDF / Plywood | Very Good | Clean only |
Dive deeper with this step-by-step guide on: How to Style a Console Table: The Designer’s 3-Step Formula That Actually Works
The Step-by-Step Application Process: From First Panel to Flawless Finish

Application is where most DIYers stumble—not because it is technically difficult, but because they rush. The peel and stick process rewards patience and a methodical approach. Follow this sequence for a finish that looks like a professional installer spent a full day on your bathroom.
Panel-by-Panel: The Designer’s Method
- Measure twice, cut once. Cut each panel 2–3 inches longer than your wall height. Trim excess at ceiling and baseboard after adhering.
- Peel only 6 inches at the top. Never remove the entire backing at once. Work in 6-inch sections peeling as you smooth downward.
- Align to your plumb line, not the corner. Set the panel edge against your vertical guideline and press the top 6 inches firmly before releasing more backing.
- Squeegee from center outward. Work from the center outward and downward to push air bubbles to the edges.
- Butt seams—don’t overlap. Overlapping two adhesive layers creates a visible ridge. Match the pattern and butt edges tightly.
- Trim with a sharp utility knife. Use a metal ruler along ceiling line and baseboard. Change blade every two to three cuts.
- Bubble rescue: Pierce with a fine needle at the center, then press flat. The tiny hole is invisible to the naked eye.

🛠️ The Tool Kit That Makes This Effortless
Every step above—squeegee smoothing to seam pressing—requires the right tools. A proper kit includes a rigid squeegee, seam roller, and paste brush for precision trimming around fixtures. Using a credit card or your hands leaves bubbles and lifts seams prematurely.
➡️ Get the Professional Smoothing Kit on AmazonFor outlets and light switches: hang the panel over the fixture first, then score an “X” across it with a utility knife. Fold triangles back and trim to the fixture edge—this avoids unpredictable tearing from pre-cutting.
Keep reading for a designer-approved guide to: How to Arrange Pillows on a Couch Like a Pro: The Foolproof Step-by-Step Guide
Accent Wall vs. Full Wrap: The Question Every Designer Gets Asked
Most guides recommend either “one wall” or “the whole room” without explaining the design logic. Here is the actual framework: the decision should be driven by the room’s architecture, not personal confidence level.
Feature Wall Only
Ideal for bathrooms with a strong focal point—behind the vanity, opposite the door, or behind a freestanding tub. Creates maximum impact with minimum material cost. Works best with bold, large-scale patterns.
Full Room Wrap
Best for small powder rooms with simple architecture. Using a soft, small-scale pattern prevents the “wallpaper showroom” effect. Requires more precision at seams.
Ceiling Application
A ceiling wrapped in soft botanical or geometric wallpaper is the most unexpected designer trick. It draws the eye upward, feels luxurious, and requires zero moisture concern since ceilings stay dry.
Half-Wall / Dado Panel
Apply wallpaper only to the lower half of the wall. Combines beautifully with plain painted upper walls. Easier to install, easier to replace, and easier to keep clean.
Dive deeper with this step-by-step guide on: Swivel Chairs Ultimate Guide: How to Choose & Style the Perfect One for Your Home
Making It Last (And Removing It Without Drama): The Care Guide

A well-applied bathroom peel and stick wallpaper on a properly prepared surface will last 3–5 years with no maintenance. The two biggest longevity threats are edge lifting (caused by steam wicking under seams) and surface bubbling (caused by residual moisture at installation). Both are preventable.
Longevity Checklist
- Run the bathroom fan during and after every shower to reduce ambient humidity.
- Keep wallpaper at least 6–8 inches away from direct shower spray zones unless explicitly rated for wet areas.
- Press seams firmly with a seam roller immediately after application and again at 24 and 48 hours post-install.
- Clean the surface with a damp cloth only—never abrasive cleaners, bleach, or solvents.
- If an edge begins to lift, use a small amount of seam-repair adhesive to re-bond it immediately.
- Re-press corners and edges at the first sign of lifting—catching it early takes 30 seconds; ignoring it leads to full panel failure.
How to Remove Peel and Stick Wallpaper Without Damaging Walls
- Warm it first. Use a hair dryer on medium heat to soften the adhesive—work in 12-inch sections. Warm adhesive releases cleanly; cold adhesive rips paint.
- Peel at a 45-degree angle. Pull back slowly and close to the wall surface, not straight out. This distributes tension and avoids tearing paint.
- Adhesive residue: Remove with a cloth dampened with rubbing alcohol or commercial adhesive remover. Test in a hidden spot first.
Before installing in a rental, photograph the bare wall and test the wallpaper adhesive on a small hidden area for 48 hours to confirm clean removal from your specific wall’s paint type. Different paint brands and ages behave differently.
Dive deeper with this step-by-step guide on: 5 Washable Area Rug Designer Secrets to Make Any Room Look Custom
Your Designer Shortlist: The Pieces That End the Search
Your bathroom walls are lifeless. Every time you walk in, the space feels unfinished—like a hotel room that never got decorated.
You have scrolled endlessly. Added to cart. Deleted. Added again. Meanwhile, the same bare walls greet you every single morning. That dull space costs you more than money—it costs you daily joy.
The right peel and stick wallpaper—moisture-rated, beautifully designed, perfectly scaled—is the one purchase that changes the entire emotional experience of your bathroom. I have vetted these for you.
Stop scrolling. You have spent enough time searching. As a designer, I have done the vetting: every wallpaper below is moisture-rated, highly reviewed, and chosen specifically to solve the aesthetic problem outlined in this guide. They are available now—but high-demand home decor pieces move fast.


Key Takeaways: You Now Have Everything You Need
You have just completed a designer’s master class in bathroom peel and stick wallpaper. You know how to choose a moisture-resistant formula, how to read pattern scale for your specific room size, how to prep a wall so the adhesive bonds for years—not weeks—and how to work panel by panel for a finish that looks professionally installed.
The most important insight: this project is not about being handy. It is about being decisive. The homeowners and renters who see the most dramatic transformations are the ones who commit to a bold pattern, prepare their surface properly, and take the first afternoon to start. The design confidence is what this guide was built to give you.
You already have the knowledge. The only thing left is the wallpaper.
Your Bathroom Transformation Starts Right Now
Every roll, every pattern, every product recommended in this guide is available today. Choose the one that spoke to you—not the “safe” one, the one that made you feel something. That is the one that will change how you feel about your home every single morning.
✦ Shop the Full Designer Shortlist ✦Frequently Asked Questions
Affiliate Disclosure: This post contains affiliate links. If you purchase through these links, we may earn a small commission at no additional cost to you. All products are independently selected and recommended based on design merit and performance standards.
CATCH THE LATEST IN HOME DECOR TRENDS:
Steal These 16 Expert-Approved Decorating Secrets

How To Accessorize Your Living Room
Small Space? 10 Ways To Make A Room Appear Bigger
Make Your space Look Expensive
GET CAUGHT UP ON ALL THE INSPIRING DECOR TIPS:
18 Fresh Decorating Ideas To Update Your Fireplace
How to Make a Gallery Wall: The Complete Step-by-Step Guide (Even If You’ve Never Hung a Picture)
