
How to Decorate a Dorm Room (Without Losing Your Deposit)
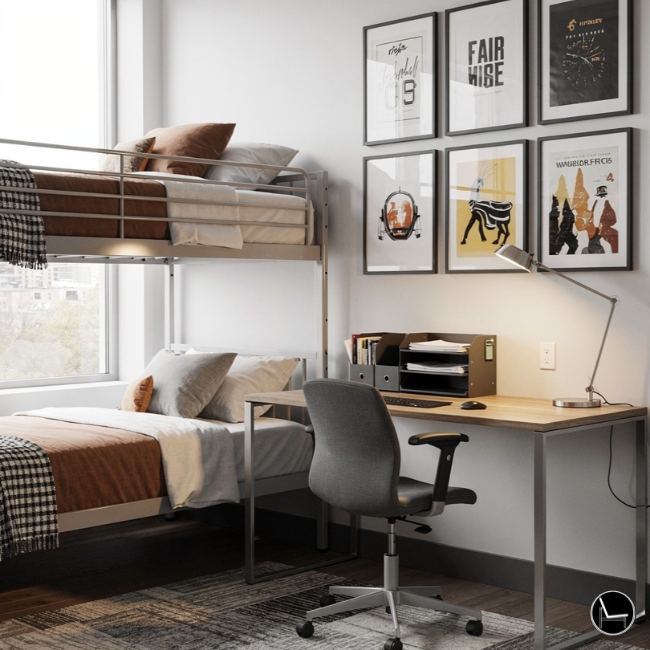
If you’re staring at a blank 12×12 cinder-block box with two Twin XL beds and a roommate’s pile of boxes, you’re not alone — and you don’t need to renovate anything to fix it. Learning how to decorate a dorm room well comes down to three things: picking a style you’ll actually still like in March, using damage-free mechanics on everything, and getting your spatial math right so nothing feels cramped or floats in the middle of nowhere.

To decorate a dorm room without violating housing rules, anchor everything in three steps: choose one aesthetic and a 3-4 color palette before you shop, use only damage-free mounting (Command strips, tension rods, no nails or tape directly on paint), and size your rug, lighting, and storage to the room’s actual footprint instead of guessing. Layer in personal items last — they’re what makes it feel like home instead of a showroom.
- Move-In Day Checklist: What to Bring First
- How Much to Spend Decorating a Dorm Room
- Step 1: Choose Your Aesthetic Before You Shop
- Step 2: Coordinate With Your Roommate First
- Step 3: Know Your Dorm’s Damage-Deposit Rules
- Step 4: Solve the Layout First (Spatial Math)
- Step 5: Dress the Bed — Your Biggest Visual Anchor
- Step 6: Build in Storage Before You Decorate
- Step 7: Decorate the Walls, Damage-Free
- Step 8: Fix the Lighting
- Step 9: Make the Desk Work for You
- Step 10: Layer In the Personal Stuff
- Real Dorm Room: Before and After
- Common Mistakes to Avoid
- Most Popular Posts
- FAQs: How to Decorate a Dorm Room

Move-In Day Checklist: What to Bring First

Before you decorate a dorm room, pack in this order: measuring tape and your housing contract first, then bedding and a mattress topper, then storage, then decor last. Bringing decor before the functional basics means unpacking twice and wasting move-in day.
Move-in day has a brutal time limit — most schools give you a few hours in a loading-zone window before the next family needs your spot. Pack your car in the order you’ll actually need things, not the order that’s most fun to shop for.
- ◆Measuring tape
- ◆Housing contract / decorating rules printout
- ◆Mattress topper + bedding
- ◆Command strips (multiple weight classes)
- ◆Storage bins / rolling cart
- ◆Desk lamp + table lamp
- ◆Surge protector with switch
- ◆Area rug (rolled, not boxed — saves space)
- ◆Wall decor, tapestries, posters
- ◆Throw pillows + blankets
- ◆Personal photos, plants, collections
- ◆Anything fragile (carry separately, not in the trunk)
- ◆Tool-free assembly items only (check before buying)
- ◆Extra Command strips — you will run out
- ◆A printed copy of your room’s exact measurements
- ◆Patience — most rooms take 2-3 weekends to feel finished
Don’t try to finish the room in one day. Get the functional layer (bed, storage, lighting) done on move-in day, then come back to walls and personal styling once you’ve lived in the space for a week and know how you actually move through it.
How Much to Spend Decorating a Dorm Room

A reasonable total budget to decorate a dorm room from scratch is around $500, split roughly as 40% bedding, 30% storage, 20% lighting, and 10% wall art. Bedding gets the largest share because it’s the biggest visual anchor and the piece you’ll notice in comfort every single night.
This split isn’t arbitrary — it mirrors where the visual and functional impact actually lands in a small room. Spend in this order and you’ll feel the difference in the room long before you’ve spent the full budget.
Comforter, sheets, and a mattress topper — the single largest visual block of color in the room and the thing you feel every night.
Under-bed bins and a rolling cart — clutter undoes every other styling choice faster than anything else on this list.
One table lamp and one desk lamp — the cheapest, highest-impact upgrade over harsh dorm overhead lighting.
Smallest share on purpose — Command strips, a few prints, or one tapestry go a long way once the bigger pieces are in place.
Scale this ratio to your own budget rather than the dollar amounts — a $250 budget still follows roughly 40/30/20/10 ($100 / $75 / $50 / $25). The percentages matter more than the total, because they protect you from overspending on wall art before storage is solved.
Common Mistake
- Spending the most on wall decor because it’s the most fun to shop for
- Buying storage last, after the budget for it is already gone
- Skipping the mattress topper to afford more decorative pieces
Better Alternative
- Follow the percentage split, not the most exciting category first
- Lock in storage budget before browsing decor at all
- Treat comfort items (bedding, topper) as non-negotiable, not optional
Step 1: Choose Your Aesthetic Before You Shop
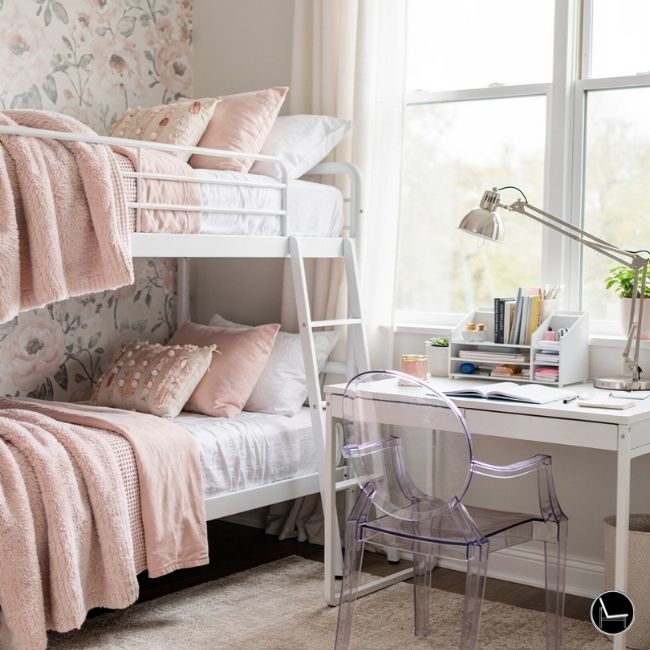
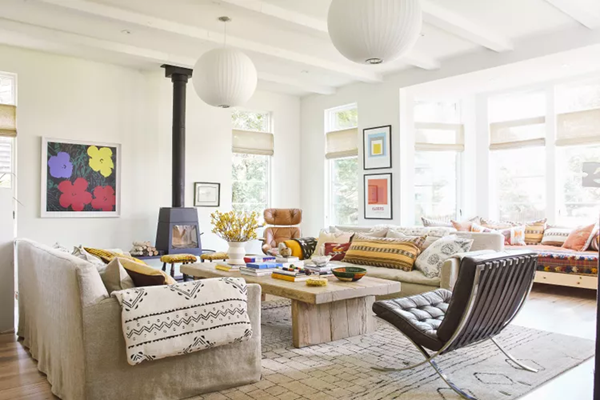
The fastest way to decorate a dorm room well is to pick one aesthetic before buying anything — Warm Boho, Minimalist Modern, Coquette Vintage, or Masculine Industrial are the four that actually hold up in a small shared space. Picking first prevents the single biggest mistake: a room full of cute individual items that don’t read as one cohesive space.
Every item you buy without a style in mind becomes a gamble. Pick the bucket first, then shop only inside it — it’s the difference between a room that looks curated and one that looks like a Pinterest board exploded.
- ◆Rattan, macrame, layered textiles
- ◆Warm neutrals + one jewel tone
- ◆Plants (real or faux), woven textures
- ◆Best for: collectors, plant people
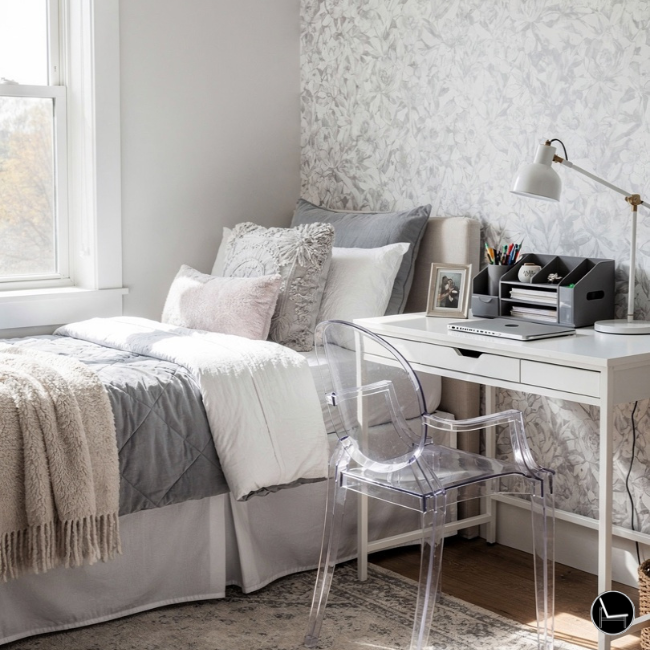
- ◆Clean lines, 2-color max palette
- ◆Negative space is the decor
- ◆Matte black + cream + one accent
- ◆Best for: small rooms, low-clutter people
- ◆Pastels, bows, lace trim, soft curves
- ◆Vintage-look frames and mirrors
- ◆Ruffled bedding, ribbon accents
- ◆Best for: romantic, detail-oriented decorators
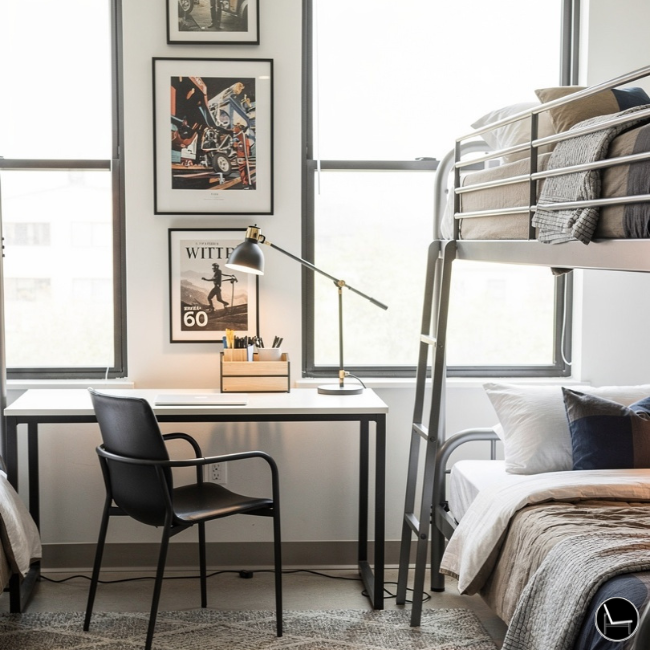
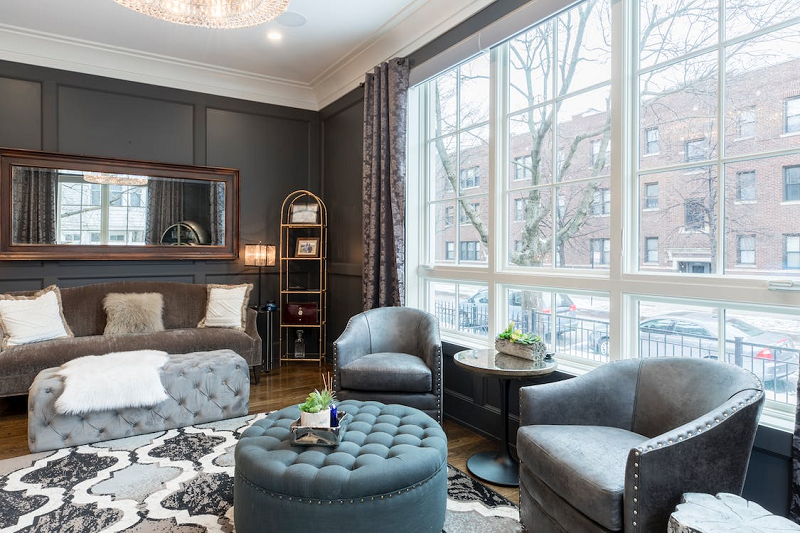
- ◆Charcoal, forest green, raw wood tones
- ◆Metal accents, structured storage
- ◆Fewer, more intentional pieces
- ◆Best for: guys’ rooms, shared masculine spaces
Pick 2-3 main colors and 1-2 neutrals, then write them down before you open Amazon or Wayfair. The single biggest tell of an unplanned dorm room isn’t the budget — it’s a comforter, rug, and curtains that were each chosen in isolation and don’t speak to each other.
Common Mistake
- Buying bedding first, then “matching” everything else to it later
- Choosing items in 4+ unrelated colors because each one was cute alone
- Mixing two aesthetics (boho + minimalist) without a unifying neutral
Better Alternative
- Pick the aesthetic bucket, then the palette, then shop in that order
- Cap your palette at 3-4 colors total, including neutrals
- If sharing a room, agree on one shared neutral both sides repeat
Step 2: Coordinate With Your Roommate First
If you’re sharing a dorm room, agree on a shared neutral color and a few ground rules before either of you buys anything — this single conversation prevents the most common shared-room problem: two unrelated halves that don’t read as one finished space.
This conversation feels awkward to start, but it takes ten minutes and saves weeks of mismatched bedding regret. Treat it as a quick planning call, not a big negotiation.
Pick one shared neutral
White, cream, or charcoal — whatever you both agree on becomes the “connective tissue” color that appears in both halves of the room, even if your individual aesthetics differ.
Decide what’s shared vs. individual
Rugs, mini-fridges, and rolling carts are usually worth splitting the cost on. Bedding, wall decor, and desk accessories stay individual.
Set lights-out and guest expectations early
Not strictly decor, but it affects your lighting choices — if one of you studies late, you’ll want a desk lamp with a low-glare mode instead of relying on the shared overhead light.
Revisit after week one
You’ll both have a clearer sense of what’s actually annoying (whose stuff is creeping into whose space) once you’ve lived in the room for a few days — plan a quick check-in.
“My roommate and I coordinated our color scheme over the summer as a fun way to get to know each other better. We ended up going with two colors we both loved, which made shopping for posters together so much easier.”
Common Roommate Coordination ApproachStep 3: Know Your Dorm’s Damage-Deposit Rules
Before you decorate a dorm room, read your housing contract’s “alterations” or “decorating” clause — most colleges ban nails, screws, and adhesive that removes paint, but allow Command-brand strips, tension rods, and freestanding pieces. Knowing the exact rule before you shop prevents buying things you’ll have to return or get fined for later.
This is the anxiety most dorm guides skip past in one sentence. It deserves more than that, because the fine for wall damage at move-out is real money, and the fix is genuinely simple once you know the categories.
Damage-Free, Almost Always Allowed
- Command strips and hooks (check weight rating on the package)
- Tension rods for curtains or closet dividers — no drilling
- Freestanding furniture: shelves, carts, lamps, rugs
- Removable, low-tack peel-and-stick wallpaper (always check first)
Almost Always Prohibited
- Nails, screws, or wall anchors of any kind
- Duct tape or packing tape directly on painted walls
- Paint, wallpaper paste, or anything not labeled “removable”
- Anything blocking a sprinkler head, smoke detector, or exit path
Command strips are rated by weight for a reason — a frame that’s 2 lbs over the strip’s rating won’t fall immediately, it’ll slowly peel the paint off as it creeps down over weeks. Always round down to the next-lowest weight class and use one extra strip per side as insurance.
If your dorm flags adhesive hooks as a gray area, lean instead of hang. A full-length mirror or a leaning ladder shelf does the same visual job as a wall-mounted piece with zero risk to your deposit — more on that in the wall decor section below.
Step 4: Solve the Layout First (The Spatial Math)

Before adding decor, measure your room and map furniture placement using real dimensions — a standard dorm room runs 12×12 to 12×19 feet with two Twin XL (38″×80″) beds. Getting this spatial math right first prevents buying a rug, cart, or shelf that physically doesn’t fit the gap you have.
This is the step every competing guide skips, and it’s the one that actually prevents returns. A rug that “looked big enough” online but traps under your desk wheels, or a cart that’s 2 inches too wide for the gap between beds — these are avoidable with five minutes of measuring.
Measure the actual footprint
Walls, door swing, window placement, and any built-in furniture you can’t move. Write it down — don’t trust memory once you’re shopping.
Decide bed configuration first
L-shaped (beds at a right angle) maximizes floor space in long narrow rooms; parallel beds work better in wide rooms and let you bridge a single rug between them.
Size the rug to the gap, not the room
A 5×7′ rug is the sweet spot for the floor gap between two parallel Twin XL beds — large enough to anchor the space, small enough to avoid catching under rolling desk chairs.
Keep one 24″ walkway clear
This is the minimum clearance for getting in and out without rearranging furniture daily — non-negotiable in a 12×12 room.
“In a room this size, every piece has to do double duty or it doesn’t belong. If it’s not storage, seating, or genuinely loved, it’s just clutter taking up floor you don’t have.”
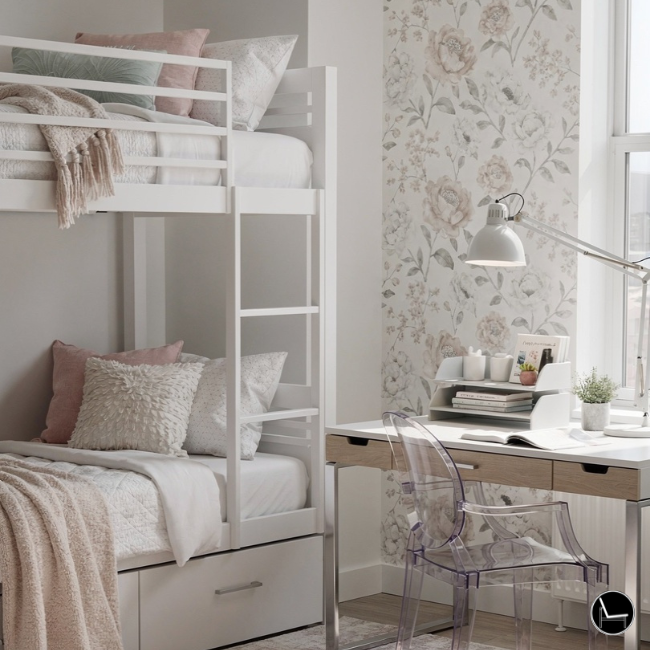
Design Principle — Multifunctional Furniture RuleStep 5: Dress the Bed — Your Biggest Visual Anchor

Your bed takes up roughly a third of the room’s visible floor area, so it sets the tone for the entire space. Start with a Twin XL bedding set in your chosen palette, add a mattress topper for comfort, then layer texture with throw pillows and a folded blanket.
Skip this step and nothing else in the room reads as intentional — the bed is the first thing anyone sees walking in, and it’s the largest single block of color and texture you control. A coordinated Twin XL set plus a real mattress topper solves both the look and the “why does this bed feel like a gym mat” comfort problem in one pass.
Best Twin XL Bedding Sets
We selected these for color range, easy-wash fabric, and true Twin XL fit (regular twin sheets will not fit your dorm mattress).

8-Piece Twin XL Bedding Bundle
Comforter, sheet set, pillow shams, and a laundry bag in one box — solves the “I forgot I needed six different things” problem in a single order.
Best for first-time dorm shoppers who want everything coordinated without comparing six product pages.
Check Current Price
Twin XL Bedding Set
A straightforward, well-reviewed Twin XL set without the bundle markup — good if you already own pillows and just need the core pieces.
Best for students restocking a single worn-out piece instead of starting from zero.
See Current Price
CertiPUR-US Certified Mattress Topper
A removable, washable cover sets this apart — a real plus in a dorm room where spills and dust are inevitable and you can’t exactly dry-clean a fixed topper.
Best for students who want the comfort upgrade without committing to the premium-tier price.
See Current Price3″ Cooling Gel Memory Foam Mattress Topper
Dorm mattresses are notoriously thin and firm. A 3″ gel-infused topper fixes the “sleeping on a gym mat” problem without needing a new bed.
My favorite detail: the cooling gel infusion actually matters in un-air-conditioned dorms during August move-in.
Check Current PriceIf you and your roommate are coordinating colors, agree on the comforter shade before either of you buys one — it’s the hardest piece to return once it’s been washed, and the one most likely to clash if chosen independently.
Step 6: Build in Storage Before You Decorate
Storage is decor in a dorm room — clutter is the single fastest way to undo every styling choice you’ve made. Use the dead space under your bed first, then add one mobile piece like a rolling cart for anything you need access to daily.
Under-bed storage is the most overlooked square footage in the entire room. With a Twin XL raised on its standard frame, that gap typically fits low-profile bins that hold an entire season of clothes or extra bedding — space that otherwise sits empty and collects dust. The right bins and cart below turn that dead space into the storage a tiny closet can’t provide.
Metal Under-Bed Storage Bin
A low-profile metal bin that slides cleanly under a raised Twin XL frame — sturdier than fabric bins and won’t sag once loaded with books or bedding.
Best for reclaiming the single largest unused space in a standard dorm layout.
Check Current Price
Under-Bed Storage Containers (Set)
A multi-pack of stackable bins at a lower price point — ideal if you need to split storage by category (shoes, off-season clothes, extra linens).
Best for students who’d rather buy in bulk than piece storage together over the semester.
See Current Price
Lockable Rolling Storage Cart
Doubles as a nightstand, a snack station, or a bathroom-caddy-on-wheels — and rolls out of the walkway the second you need the floor space back.
My favorite feature: the lock option matters in shared rooms or suites where you don’t fully control who’s in and out.
Check Current Price
3-Tier No-Screw Rolling Utility Cart
Assembles with zero screws or tools — a genuine plus for a no-drilling room — and the three open tiers make everything on it visible and grabbable.
Best for splitting storage by tier: toiletries on top, snacks in the middle, school supplies on the bottom.
Check Current PriceSort before you buy bins — decide what’s “seasonal” (store under bed, access rarely) versus “daily” (rolling cart or open shelf, access constantly). Buying storage before sorting just relocates the clutter instead of solving it.
Free Patio Furniture Style Quiz
Already dreaming about your first apartment patio? Find your outdoor style in 2 minutes.
Take the QuizStep 7: Decorate the Walls, Damage-Free
Walls are the largest visual surface in a dorm room, so they carry the most weight in making it feel finished. Use Command strips for anything under their rated weight, lean mirrors and ladder shelves against the wall for anything heavier, and treat the ceiling as additional decorating real estate most students skip.
This is where the damage-free framework from Step 2 actually gets applied. The goal isn’t fewer wall decorations — it’s the same visual density using only removable mechanics.
Common Mistake
- Hanging a heavy framed mirror on strips rated for half its weight
- Leaving the ceiling completely blank
- Treating the gallery wall as “more is better” with no spacing plan
Better Alternative
- Lean anything over a Command strip’s weight rating instead of hanging it
- String lights or paper lanterns across the ceiling for an instant upgrade
- Plan the gallery wall on the floor first, then transfer with painter’s tape guides
A leaning full-length mirror does three jobs a hung one can’t: it adds light bounce, visually doubles the room’s depth, and needs zero wall hardware. In a room this small, that’s the single highest-impact, lowest-risk piece you can add.
Blank walls are the fastest way for a room to feel unfinished even after everything else is done — and they’re also the easiest, cheapest fix on this entire list. The right wall art solves the “still looks like a hotel room” problem without a single nail.
Best Damage-Free Wall Art
Selected for Command-strip-friendly weight and styles that read as intentional rather than generic dorm-poster filler.

Framed Wall Art Set
A coordinated multi-piece set takes the guesswork out of gallery spacing — hang as a cluster or spread across one long wall, and it reads as curated either way.
Best for filling a large blank wall without buying and matching individual pieces one at a time.
Check Current Price
Motivational Print
Lightweight canvas or print construction stays well under Command strip weight limits — easy to hang directly above the desk where you’ll actually see it during study sessions.
Best for students who want their workspace wall to do double duty as a daily mindset reset.
See Current PricePeel-and-stick wallpaper is worth the splurge on one accent wall if your housing contract allows it — check first, since some dorms classify it as “alteration” even though it’s fully removable. If it’s a gray area, a fabric tapestry pinned with Command hooks gets you 80% of the visual impact with zero approval needed.
Step 8: Fix the Lighting

Overhead fluorescent lighting is the fastest way to make a dorm room feel institutional. Layer in a warm table lamp for ambiance and a dedicated desk lamp for task lighting — the “big light” should be your last resort, not your default.
Lighting is the cheapest, highest-impact change in this entire guide. A single warm-toned lamp can shift a room from “dorm” to “actually mine” faster than almost anything else on this list.

Adjustable Color Temperature Table Lamp
Switches between warm and cool light depending on whether you’re winding down or cramming for a 9am — small footprint, big functional range.
Best for the nightstand or rolling cart top, anywhere you need flexible ambient light.
Check Current Price
Eye-Caring LED Desk Lamp with Charging Port
Adjustable arm, multiple brightness modes, and a built-in USB charger that frees up an outlet — a real upgrade over harsh overhead light for late study sessions.
My favorite feature: the charging port means one less thing competing for your surge protector slots.
See Current Price
Dimmable Standing Floor Lamp
Covers the corners a table or desk lamp can’t reach — a single floor lamp on a dim setting can replace the overhead fluorescent entirely for everyday use.
My favorite feature: the adjustable color temperature means one lamp handles both cozy evening light and brighter daytime tasks.
Check Current PriceCheck your dorm’s policy on string lights specifically — some allow LED only (no incandescent, for fire-safety reasons), and most cap total wattage on any one outlet. A surge protector with a built-in switch lets you kill all your ambient lighting at once without unplugging each piece.
Step 9: Make the Desk Work for You

Your desk does the most work of any single piece in the room — studying, charging devices, sometimes eating — so it needs both function and a finished look. Anchor the floor around it with a rug, then keep the surface itself to three or fewer everyday items.
A desk surrounded by bare floor reads as unfinished even if the desk itself is organized. This is where the rug from your spatial-math plan in Step 3 actually gets placed.

Longwell Oriental Area Rug
A patterned rug that hides traffic wear far better than a solid color — practical for a floor that’s getting walked on daily between bed, desk, and door.
Best for anchoring the gap between two parallel beds without showing every scuff.
Check Current Price
Machine-Washable Dorm Rug
Fully washable — a real consideration in a room with no separate entryway to catch dirt before it hits the floor.
Best for ground-floor dorms or anyone prone to spills near the desk.
See Current PriceKeep the Desk Surface Itself Under Control
The rug handles the floor — these two handle the surface, which is where clutter actually accumulates day to day.

Desk Organizer
Corrals pens, supplies, and small electronics into defined compartments instead of letting them spread across the whole surface.
Best for the “three items max” rule — this is where everything else actually lives.
Check Current Price
Tabletop Charging Station with Surge Protector
Consolidates phone, laptop, and lamp charging into one spot instead of cords running to three different outlets across the desk.
My favorite feature: the built-in surge protector means you’re not also packing a separate power strip.
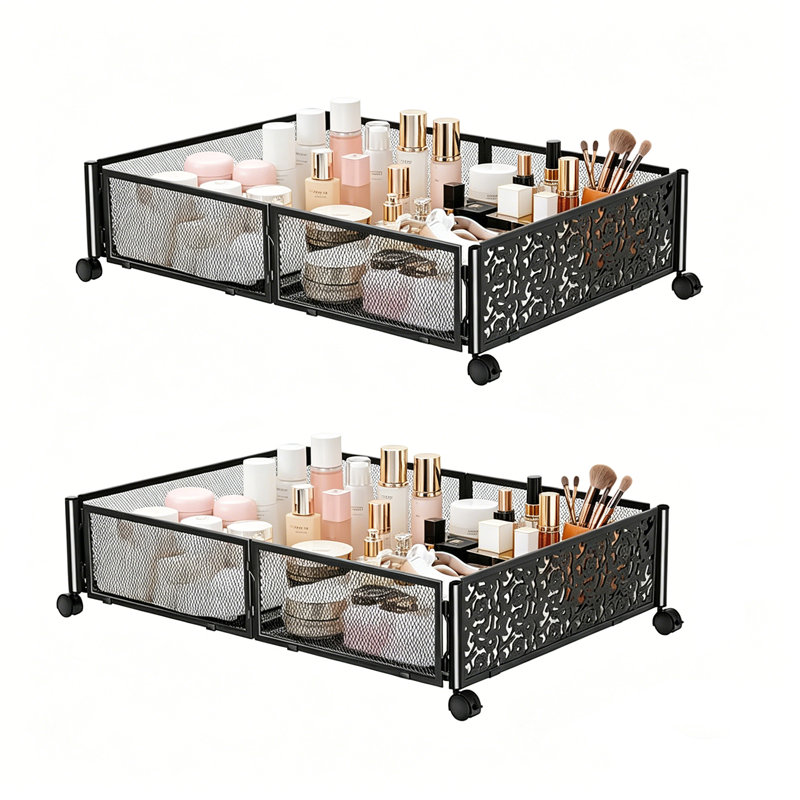
See Current PriceKeep your desk surface to three categories max: what you’re actively using, a lamp, and one personal item. Everything else — chargers, supplies, makeup — belongs in a drawer organizer or desk caddy, not on the visible surface.
Step 10: Layer In the Personal Stuff Last
Personal items — photos, plants, collections, and trinkets — are what make a dorm room feel like home instead of a showroom, but they work best added last, after the foundation (bed, storage, lighting) is already set.
This is the step most students want to start with, and it’s exactly why so many dorm rooms feel cluttered instead of personal. Photos and collectibles read as intentional against a finished backdrop; they read as mess against an unfinished one.
- Display a small collection (records, plants, vintage finds) on open shelving rather than scattered across every surface
- Use a cork board or magnetic board for rotating photos instead of a permanent wall collage
- Pick one “hero” personal piece — a tapestry, a poster, a plant cluster — rather than spreading personality thin across many small items
- A real or faux plant adds life and softens hard dorm-furniture edges better than almost any other single object
“Dorm rooms are an opportunity to express yourself in a small, but impactful way. Don’t be afraid to experiment with color, texture, and unique pieces that showcase your personality.”
General Design Principle — Personalization in Small SpacesReal Dorm Room: Before and After
Following this exact order — aesthetic, roommate coordination, damage-free rules, spatial math, then bed, storage, walls, lighting, desk, and personal touches — turns a default move-in-day dorm room into a finished one without any structural changes or rule violations.
Here’s what the framework above actually looks like applied to a standard 12×12 room with two Twin XL beds.
- Bare mattress, no rug, fluorescent overhead light only
- Boxes and bins scattered across the floor
- Bare cinder-block or painted walls, nothing personal
- Desk cluttered with everything from move-in piled on top
- No clear walkway between bed and desk
- Twin XL bedding in a chosen palette, mattress topper underneath
- Under-bed bins handle off-season storage, rolling cart holds daily items
- Command-strip gallery wall plus one leaning mirror for depth
- Desk lamp + table lamp replace the overhead light entirely
- 5×7′ rug anchors the floor gap, 24″ walkway stays clear
Notice what didn’t change: the room’s actual square footage, the wall color, the furniture provided by housing. Every improvement here came from layout, lighting, and damage-free styling — not renovation.
Common Mistakes to Avoid When You Decorate a Dorm Room
Skip This
- Buying decor before measuring the room or checking housing rules
- Mounting anything over a Command strip’s rated weight limit
- Choosing 5+ unrelated colors because each item was cute alone
- Leaving the floor gap between beds completely bare
Do This Instead
- Measure first, then shop with real dimensions in hand
- Round down on weight ratings and double up on strips for anything heavy
- Cap your palette at 3-4 colors, chosen before you shop
- Anchor the floor with a rug sized to the actual gap, not a guess
Conclusion: Your Dorm Room, Decorated Right
You now have everything you need to decorate a dorm room that actually looks finished — not just decorated. The order matters as much as the items: aesthetic and palette first, damage-deposit rules second, spatial math third, then bed, storage, walls, lighting, desk, and personal touches layered on top of a foundation that already works.
Start with the one step you’ve been avoiding — usually the measuring — and the rest gets noticeably easier.
Still rearranging the same room hoping it’ll click? It won’t — until you know the formula.
Get The Designer’s Cheat SheetFAQs: How to Decorate a Dorm Room
CATCH THE LATEST IN HOME DECOR TRENDS:
Steal These 16 Expert-Approved Decorating Secrets

How To Accessorize Your Living Room
Small Space? 10 Ways To Make A Room Appear Bigger

Make Your space Look Expensive
GET CAUGHT UP ON ALL THE INSPIRING DECOR TIPS:
18 Fresh Decorating Ideas To Update Your Fireplace

How to Make a Gallery Wall: The Complete Step-by-Step Guide (Even If You’ve Never Hung a Picture)
