If you are reading this post you’re probably a first-time homeowner or renter, and with holidays around the corner, you’re probably wondering how to decorate a Christmas tree as a beginner. Decorating your first Christmas tree is a magical experience, filled with the promise of warmth, joy, and cherished memories. If you find yourself standing before a blank canvas of evergreen foliage, wondering where to start, fear not! This guide is your key to unlocking the secrets of transforming a simple tree into a festive masterpiece. In this guide, I’ll walk you through decorating a Christmas tree, no matter how new you are to holiday decorating. Get ready to create a festive masterpiece, step-by-step!
How to Decorate a Christmas Tree for Beginners is more than just a set of instructions; it’s an invitation to embrace the holiday spirit with open arms. Picture the glow of twinkling lights, the delicate rustle of ribbons, and the joyous laughter that echoes through your home. Whether you’re opting for a real tree exuding the nostalgic scent of pine or an artificial one ready to sparkle with your personal touch, this guide is designed to make the process seamless and enjoyable.
So, gather around, as we unwrap the secrets of creating a Christmas tree that not only dazzles the eyes but also warms the heart. Let’s dive into the world of tinsel, baubles, and festive wonder, and together, let’s make this holiday season truly special. Every ornament tells a story, and the joy of decorating knows no bounds. Let the magic begin as we learn how to decorate a Christmas tree as a beginner!
I. Choosing the Right Tree
As we embark on this delightful journey of turning your home into a festive haven, the first and crucial step is selecting the perfect Christmas tree. Let’s begin with finding the evergreen companion that will hold the magic of the season within its branches.

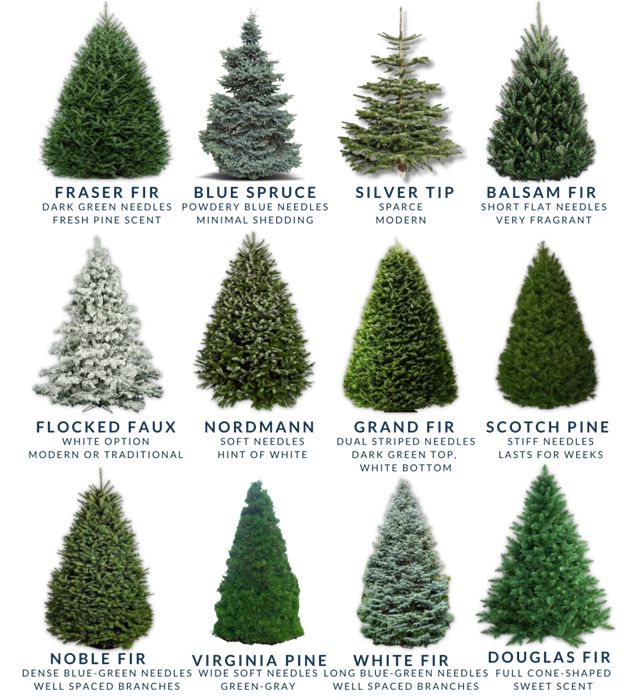
1. Pine, Fir, Spruce Options:
a. Pine Trees:

Overview: Pine trees are renowned for their fragrant needles and quick adaptation to indoor environments. They come in various species, each with its distinctive characteristics. The long-lasting aroma and soft needles make them a popular choice.
b. Fir Trees:

Overview: Known for their dense foliage and rich green hue, fir trees are a classic Christmas favorite. The branches are sturdy, making them ideal for holding ornaments. Additionally, their needles tend to be softer, reducing the risk of pricks.
c. Spruce Trees:

Overview: With their iconic triangular shape and sharp needles, spruce trees exude a traditional Christmas charm. They are known for their robust branches, providing a robust foundation for your festive decorations.
2. Artificial vs. Real Trees:
a. Artificial Trees:


Advantages:
- Reusable: Artificial trees offer the convenience of reuse, making them a practical and eco-friendly choice.
- Low Maintenance: No need to water or worry about needle shedding, providing a hassle-free decorating experience.
- Variety: Available in various sizes and styles, with some pre-lit for added convenience.
Considerations:
- Initial Investment: While cost-effective over time, the initial purchase may be higher than that of a real tree.
- Storage: Requires space for storage during the off-season.
b. Real Trees:
Advantages:
- Authenticity: The natural beauty and aroma of a real tree contribute to a traditional and authentic holiday atmosphere.
- Variety: Choose from a range of species, each offering unique characteristics.
- Environmentally Friendly: Biodegradable and recyclable, real trees are often considered more environmentally friendly.
Considerations:
- Maintenance: Requires watering to keep the tree fresh throughout the holiday season.
- Disposal: Proper disposal methods are needed post-holiday.
As a beginner, consider your preferred balance between fragrance, needle type, and the strength of branches. Embrace the beauty of each type, and remember, there’s no wrong choice – only the one that feels most like home. 🌲✨
“If you are looking for a way to style your space with wall art without breaking your piggy bank, then I recommend reading “10 Surprising Benefits of Printable Wall Art”
3. Size matters: Selecting the perfect tree for your space
Now, let’s talk about the heart of your holiday display – the size of your Christmas tree. Whether you’re envisioning a grand centerpiece or a more modest accent, finding the right size ensures your tree becomes a harmonious part of your festive décor.
Picture a tree that fits seamlessly into your space, neither overpowering nor lost in the background. As a beginner, consider measuring the height and width of the area where your tree will stand. Take into account the distance from the ceiling and nearby furniture to allow your tree to shine without feeling cramped.
There’s a magical feeling that comes with a perfectly sized tree – one that invites you to gather around, exchange gifts, and create cherished memories. So, as you explore the options, let the vision of your ideal holiday scene guide you in choosing the size that brings comfort and joy to your home.
4. Budget-friendly options for tree selection
Holiday joy need not come with a hefty price tag. Decorating your home with a beautiful Christmas tree can be a budget-friendly and heartwarming experience. From local tree farms to affordable artificial options, there are choices that align with your financial comfort.
Embrace the spirit of the season without breaking the bank. Local tree farms often offer a charming experience, allowing you to select and cut your own tree – a festive adventure for the whole family. If an artificial tree is your preference, consider it as a long-term investment. Quality artificial trees can be reused for many years, spreading the cost over multiple holiday seasons.
Remember, the true magic lies in the memories created around your tree, not in the price tag attached to it. So, as you embark on this budget-friendly decorating journey, may the warmth of the season fill your home with comfort and joy. 🌟🎄
II. Fluff and Shape Branches
Unveiling the Elegance: Preparing the Canvas
In the symphony of holiday decorations, your Christmas tree serves as the grand conductor, setting the tone for the festive melody. Before you embark on the embellishing adventure, ensure your tree stands tall and proud with lush, well-shaped branches. In this section on how to decorate a Christmas tree for beginners, we’ll demystify the art of fluffing and shaping, transforming your tree into a captivating centerpiece.
Step-by-Step Guide to Fluffing and Shaping Branches

1. Start at the Bottom:
Begin with the lower branches, gently separating each branch from its compressed state. Work your way around the tree, ensuring that no branch is left unnoticed.
2. Fan Out the Branches:
Imagine your tree as a delicate peacock displaying its plumage. With each branch, fan out the tips to create a full and voluminous appearance. This step enhances the overall visual appeal of your tree.
3. Focus on Symmetry:
As you move up the tree, pay attention to symmetry. Aim for a balanced distribution of branches on each level, creating a harmonious and pleasing silhouette.
4. Mind the Gaps:
Don’t be afraid to adjust the branches to fill any noticeable gaps. Achieving a uniform look ensures that your decorations are showcased beautifully.
5. Check from Different Angles:
Take a step back periodically to view your tree from different angles. This allows you to identify any uneven areas and make necessary adjustments for a well-rounded aesthetic.
6. Fluff Individual Needles:
For artificial trees, take the time to fluff individual needles gently. This small but significant detail adds realism to your tree, making it appear more natural.
7. Create Depth:
Vary the depth of your branches by positioning some closer to the trunk and others slightly extended. This technique provides dimension, making your tree visually dynamic.
8. Ensure Sturdiness:
Confirm that each branch is securely attached to the tree. This not only ensures the longevity of your decorations but also maintains the overall integrity of the tree structure.
By following these steps, you’ll master the delicate balance between fluffing and shaping, transforming your Christmas tree into a canvas ready to embrace the festive magic. With a well-prepared tree, you’re now poised to embark on the exciting journey of thematic decoration in the upcoming sections of this guide. Embrace the joy of crafting a tree that not only captures the spirit of the season but also reflects your unique style and flair. Let’s continue our festive adventure together!
III. Design Around a Theme

Elevate Your Tree: Choosing a Theme for Your Christmas Tree
Now that your tree stands tall, branches fluffed and ready, it’s time to infuse it with personality and purpose. Choosing a theme for your Christmas tree is like selecting the perfect ensemble for a special occasion—it sets the tone and tells a unique story. In this section on how to decorate a Christmas tree for beginners, we’ll explore the delightful world of themes and guide you through the process of turning your tree into a visual masterpiece.
Incorporating Personal Preferences
Before we dive into the plethora of themes available, take a moment to reflect on your personal preferences. Consider the colors, symbols, and styles that resonate with you and your loved ones. Whether you lean towards the timeless elegance of a traditional theme or the whimsical charm of a modern approach, your tree is an extension of your festive spirit.
Step-by-Step Guide to Choosing a Theme

1. Reflect on the Mood:
Consider the atmosphere you want to create. Are you aiming for a cozy and rustic feel or a vibrant and contemporary ambiance? The theme sets the mood for your entire holiday decor.
2. Explore Color Schemes:
Themes often revolve around specific color schemes. Explore options that complement your home decor and evoke the emotions you want to convey. Classic red and green, wintry blues and whites, or a glamorous gold and silver palette—choose what speaks to you.
3. Consider Symbolism:
Infuse meaning into your theme by incorporating symbols that hold significance for you and your family. Whether it’s snowflakes, angels, or a collection of cherished ornaments, these elements add a personal touch.
4. Browse Inspirational Ideas:
Seek inspiration from various sources—magazines, online platforms, or even your favorite holiday movies. Collect ideas that resonate with your vision and adapt them to suit your unique style.
5. Mix and Match Decor:
Don’t feel confined to a single theme; consider mixing and matching elements for a truly customized look. Harmonize different styles to create a tree that reflects the diverse aspects of your holiday spirit.
6. DIY Decorations:
Add a personal touch by creating your own decorations. Engage in simple DIY projects that align with your chosen theme, infusing your tree with handmade warmth and charm.
7. Coordinate Tree Skirt and Topper:
Ensure your tree skirt and topper complement your chosen theme. These often overlooked elements play a crucial role in tying the entire look together.
Now that you’ve chosen a theme, your Christmas tree is poised to become a captivating centerpiece that tells a story close to your heart. In the next section, where we’ll explore the art of selecting the right colors and materials to bring your chosen theme to life. The joy of decorating a Christmas tree for beginners unfolds as we infuse your holiday haven with festive flair and meaningful aesthetics. Let the creative journey continue!
IV. Choose the Right Colors and Materials
Infuse Elegance: Selecting a Color Scheme for Your Christmas Tree
With your theme in mind, it’s time to dive into the delightful world of colors and materials, the artistic palette that will bring your Christmas tree to life. As you decorate a Christmas tree as a beginner, it’s important to understand the importance of a cohesive and visually stunning display. In this section, I’ll guide you through the process of choosing the right colors and materials, ensuring your tree becomes a radiant symbol of holiday cheer.
“Less is more, even at Christmas. Edit your ornaments and focus on quality over quantity.”
Emily Henderson, Interior Designer and Blogger.
Recommended Materials for Ornaments and Decorations
1. Ornament Materials:

Begin by selecting ornaments that align with your chosen theme. Explore a variety of materials such as glass, wood, fabric, and metal. Mixing textures adds depth and visual interest to your tree.
2. Ribbons and Garlands:

Consider the material and texture of ribbons and garlands. Satin, burlap, and metallic options can enhance the overall look. Experiment with different styles to achieve the desired effect, whether it’s classic elegance or rustic charm.
3. Tree Skirt Material:

Your tree skirt contributes to the overall aesthetic. Choose a material that complements your theme, whether it’s a cozy knitted fabric, a luxurious velvet, or a traditional quilted pattern.
4. Tree Topper Material:

The material of your tree topper should harmonize with the rest of your decorations. Whether it’s a classic star in metal or a whimsical angel in fabric, ensure it aligns seamlessly with your chosen theme.
“The top of your tree is like the cherry on top of a sundae. Make it special!”
Martha Stewart, Lifestyle Guru and Founder of Martha Stewart Living Omnimedia.
Tips on Mixing Textures and Finishes

1. Balancing Shiny and Matte:
Achieve a balanced look by mixing shiny and matte finishes. This adds dimension to your tree and prevents it from looking too uniform.
2. Incorporating Sparkle:
Introduce sparkle with metallic accents. Gold, silver, or rose gold ornaments catch the light, creating a festive ambiance.
3. Layering Textures:
Don’t be afraid to layer textures for a rich and inviting display. Combine smooth glass ornaments with textured fabric or rustic wooden accents for a visually dynamic tree.
4. Consistent Color Palette:
While experimenting with materials, maintain a consistent color palette. This ensures a cohesive and polished appearance, allowing each element to contribute to the overall theme.
By carefully selecting materials and paying attention to textures and finishes, you’ll elevate your Christmas tree from a simple decoration to a work of art. In the next segment, I’ll shed light on the importance of starting with lights first, guiding you through the process of creating a mesmerizing glow that sets the stage for the rest of your decorations. Let’s continue our exploration of how to decorate a Christmas tree, uncovering the secrets to a beautifully adorned holiday centerpiece. The magic is in the details, and your tree is about to shine!
V. Start with Lights First

Illuminate the Magic: The Importance of Starting with Lights
As we progress through the enchanting journey of decorating your Christmas tree, we arrive at a pivotal moment – the illumination of magic through lights. How to decorate a Christmas tree for beginners recognizes that lights are the heartbeat of your festive display. In this section, I’ll guide you through the significance of starting with lights first, ensuring your tree radiates a warm and inviting glow.
Guidelines for Evenly Distributing Lights
1. Selecting Lights:
Begin by choosing lights that align with your theme. Opt for classic white lights for a timeless look or colored lights for a vibrant and playful ambiance. Ensure the lights are in good working condition before adorning your tree.
2. Testing the Lights:
Test the lights before placing them on the tree. This prevents the frustration of tangled or malfunctioning lights halfway through the decorating process. Replace any burnt-out bulbs to maintain a consistent glow.
3. Starting at the Base:
Start at the base of the tree, wrapping the lights around the trunk and working your way outward. This technique ensures a seamless and balanced distribution of light.
4. Weaving Through Branches:
Weave the lights through the branches, ensuring they reach the tips. Take the time to position them towards the interior and exterior of the tree for a multidimensional effect.
5. Creating Depth with Layers:
Introduce depth by layering the lights. Start with the first layer close to the trunk, followed by additional layers towards the outer edges. This technique adds dimension to your tree’s luminosity.
6. Avoiding Overloading:
While lights are magical, avoid overloading your tree. Follow the recommended wattage for your tree’s size to prevent overheating and maintain safety.
7. Embracing LED Technology:
Consider using LED lights for energy efficiency and durability. LED lights also offer a vibrant and consistent glow, enhancing the overall visual appeal of your decorated tree.
Choosing Between Colorful or Classic White Lights
1. Classic White Lights:

Timeless and elegant, classic white lights create a sophisticated ambiance. They complement a variety of themes and color schemes, providing a versatile foundation for your decorations.
2. Colorful Lights:
Infuse playfulness and vibrancy with colorful lights. Perfect for whimsical and festive themes, colorful lights add a cheerful touch to your Christmas tree, creating a lively atmosphere.
By starting with lights first, you set the stage for a breathtaking display that will be the focal point of your festive celebrations. In the upcoming sections, we’ll explore the art of balancing decor with large and small ornaments, ensuring your tree is a harmonious blend of elegance and charm. Let’s continue our exploration of how to decorate a Christmas tree, where every step brings you closer to a holiday masterpiece. The glow of your tree is about to enchant all who behold it!
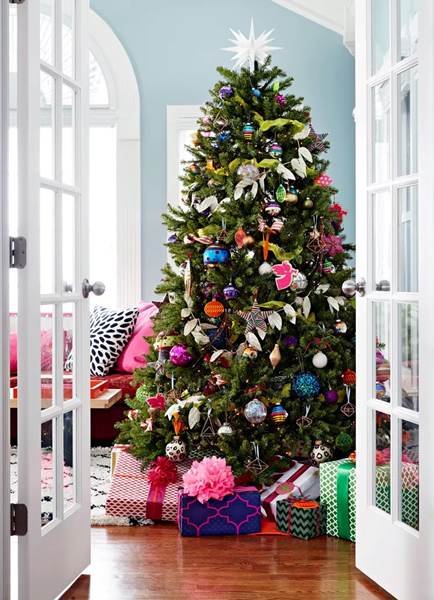
VI. Balance the Decor with Large and Small Ornaments
Harmonize Elegance: Mixing Large and Small Ornaments
As your Christmas tree begins to shimmer with the glow of lights, the next step in our festive journey is to achieve balance through a carefully curated selection of ornaments. Decorating a Christmas tree as a beginner, you must know that creating a visually appealing tree involves harmonizing large and small ornaments. In this section, I’ll guide you through the art of balancing decor, ensuring your tree becomes a symphony of elegance and charm.
Creating Visual Balance on the Tree

1. Placement Strategy:
Begin by strategically placing larger ornaments around the tree. These serve as focal points and anchors for your decorations. Position them evenly to create a balanced visual impact.
2. Filling Gaps with Smaller Ornaments:
Once the larger ornaments are in place, fill the remaining spaces with smaller ornaments. This not only completes the overall look but also adds intricate details to every corner of your tree.
3. Considering Weight Distribution:
Pay attention to the weight of your ornaments. Distribute heavier items evenly to prevent branches from drooping on one side. Achieving a balanced distribution ensures a well-proportioned tree.
Mixing Larger Focal Point Ornaments with Smaller Ones

1. Large Focal Point Ornaments:
Select a few standout pieces as large focal points. These could be statement baubles, themed ornaments, or personalized items that capture attention. Distribute them strategically to draw the eye.
2. Smaller Complementary Ornaments:
Complement the larger ornaments with smaller, coordinating counterparts. This creates a cohesive and unified look, tying the theme together in a visually pleasing manner.
3. Interspersing Different Shapes:
Introduce diversity by incorporating ornaments of various shapes. Mix rounds, teardrops, and novelty shapes for an interesting and dynamic display. This adds visual interest and prevents monotony.
Placement Tips for a Harmonious Look

1. Balancing Colors:
Maintain a balance of colors across large and small ornaments. Even if your theme is vibrant, ensure that colors are distributed evenly for a harmonious and well-blended appearance.
2. Spacing Considerations:
Pay attention to the spacing between ornaments. Avoid clustering them too closely, as this can create a cluttered effect. Aim for a well-spaced arrangement that allows each ornament to shine.
3. Viewing the Tree from Different Angles:
Step back and view your tree from different angles to ensure a balanced look. Adjust ornaments as needed to achieve symmetry and coherence from every perspective.
By masterfully blending large and small ornaments, you’re on your way to creating a Christmas tree that captivates with its visual harmony. In our next segment, we’ll explore the technique of clustering baubles, adding another layer of charm to your festive masterpiece. When decorating a Christmas tree, every detail contributes to a tree that’s not only adorned but truly enchanting. The magic unfolds with each carefully placed ornament!
VII. Cluster Your Baubles

Craft a Symphony: The Art of Clustering Baubles
With the foundation of lights and a harmonious mix of large and small ornaments, your Christmas tree is ready for the next layer of enchantment – the artful arrangement of clustered baubles. When you’re decorating a Christmas tree as a beginner you need to understand that clusters create focal points, adding depth and intricacy to your tree’s design. In this section, I’ll guide you through the steps of clustering baubles, and elevating your tree to a symphony of festive elegance.
Technique of Grouping Ornaments for Impact

1. Selecting Bauble Varieties:
Begin by selecting an assortment of baubles in various sizes, shapes, and colors. This diversity will contribute to the visual interest of your clusters.
2. Coordinating Colors and Textures:
Ensure that the baubles chosen for each cluster coordinate with the overall color scheme and theme of your tree. This cohesiveness enhances the impact of the clusters.
3. Choosing Strategic Locations:
Identify strategic locations on the tree where you want to create visual interest. These could be areas with larger gaps or positions that you want to highlight as focal points.
Creating Visual Interest Through Clustering

1. Building Gradual Layers:
Start with the largest baubles as the foundation of each cluster. Position them at varying depths within the tree, creating a sense of depth and dimension.
2. Adding Medium-Sized Baubles:
Layer in medium-sized baubles, interspersing them among the larger ones. This step builds on the visual complexity of each cluster, adding texture and interest.
3. Incorporating Smaller Baubles:
Complete the clusters with smaller baubles. Nestle them close to the branches to fill any remaining gaps and create a cohesive and textured appearance.
Avoiding Overcrowding for an Elegant Display

1. Maintaining Balance:
While clustering adds depth, it’s crucial to maintain a balance. Avoid overcrowding clusters, ensuring each bauble has enough space to shine independently.
2. Spacing Considerations:
Space out your clusters evenly across the tree. This ensures a balanced distribution of visual interest and prevents any one area from becoming overwhelming.
3. Stepping Back to Assess:
Periodically step back and assess the overall look of your tree. Adjust clusters as needed to achieve a well-balanced and visually pleasing arrangement.
By mastering the art of clustering baubles, you’re adding a layer of sophistication and charm to your Christmas tree. In our upcoming section, we’ll explore the timeless technique of layering with ribbons, infusing your tree with a touch of elegance and movement. As we continue our exploration of how to decorate a Christmas tree as a beginner, where each step brings you closer to a tree that’s not just adorned but a true work of festive art. The magic unfolds with every carefully clustered bauble!
VIII. Layer with Ribbons

Elegance in Motion: The Art of Layering with Ribbons
As your Christmas tree sparkles with lights and baubles, it’s time to introduce a touch of timeless elegance – the layering of ribbons. Ribbons add movement and grace, elevating your tree to a new level of sophistication. In this section, we’ll guide you through the art of layering with ribbons, ensuring your tree becomes a symphony of festive beauty.
Adding Depth and Dimension with Ribbons
1. Choosing Ribbon Styles:
Begin by selecting ribbons that complement your theme and color scheme. Whether it’s satin for a classic look, burlap for rustic charm, or metallic for a touch of glamour, the choice of ribbon sets the tone.
2. Coordinating Ribbon Widths:
Opt for a variety of ribbon widths to add depth to your tree. Mix broader ribbons with narrower ones to create layers and visual interest.
3. Considering Ribbon Texture:
Explore ribbons with different textures. Smooth satin ribbons offer a polished look, while textured or patterned ribbons add a tactile element to your tree.
Different Ribbon Placement Techniques

1. Vertical Cascading:
Start by draping ribbons vertically from the top to the bottom of the tree. This technique adds height and elongates the overall appearance.
2. Horizontal Swags:
Create horizontal swags by weaving ribbons in and out of the branches. This imparts a sense of movement and symmetry to your tree’s design.
3. Crisscross Patterns:
Introduce crisscross patterns by weaving ribbons diagonally across the tree. This technique adds a dynamic and eye-catching element to your tree.
Choosing Complementary Ribbon Styles
1. Classic Elegance:
If your theme leans towards classic elegance, opt for satin or velvet ribbons in rich, deep colors. Ivory or gold ribbons also add a touch of sophistication.
2. Rustic Warmth:
For a rustic or cozy theme, consider burlap or plaid ribbons. These add warmth and texture, creating a charming and inviting atmosphere.
3. Glamorous Sparkle:
If you’re aiming for a glamorous look, metallic or glitter-infused ribbons in silver or gold bring a touch of sparkle and opulence to your tree.
By layering with ribbons, you’re infusing your Christmas tree with a sense of movement and grace. In our next section, we’ll explore the delightful world of scented ornaments, adding a sensory dimension to your festive display. Every step brings you closer to a tree that’s not just adorned but a true masterpiece of holiday splendor. The magic unfolds with the gentle sway of each carefully layered ribbon!
IX. Add Scented Ornaments (For Artificial Trees)
Enchanting Aromas: Elevate Your Tree with Scented Ornaments
As your Christmas tree takes shape with lights, baubles, and ribbons, it’s time to engage the senses on a new level by introducing scented ornaments. As you continue to decorate a Christmas Tree as a beginner, you need to know that scents evoke memories and emotions, creating a truly immersive holiday experience. In this section, I’ll guide you through the art of adding scented ornaments, particularly beneficial for artificial trees, ensuring your tree becomes a delightful sensory masterpiece.
Enhancing the Christmas Tree Experience with Scents

1. Selecting Scented Ornaments:
Begin by choosing scented ornaments that complement your theme. From classic pine and cedar to cinnamon or peppermint, the options are diverse. Select scents that resonate with the ambiance you want to create.
2. Placement Tips:
Strategically place scented ornaments throughout the tree, focusing on areas where their fragrance can disperse effectively. Consider hanging them near the center and lower branches for a subtle yet pervasive aroma.
3. Layering Scents:
Experiment with layering scents to create a nuanced fragrance profile. For example, combine the freshness of pine with the warmth of cinnamon for a well-rounded and inviting aroma.
Types of Scented Ornaments Available
1. Scented Pinecones:

Pinecones infused with delightful scents contribute to the natural charm of your tree. Hang them strategically or tuck them among the branches for a rustic and fragrant touch.
2. Scented Sachets:

Small sachets filled with seasonal scents can be discreetly placed within the tree branches. They add a subtle fragrance that enhances the overall ambiance.
3. Scented Wax Decorations:

Consider scented wax decorations, shaped like festive symbols or ornaments. These not only add fragrance but also serve as decorative elements.
Placement Tips for a Subtle Fragrance
1. Avoid Overpowering:
While scents can be delightful, avoid overpowering the space. Opt for subtle fragrances that enhance the atmosphere without becoming too intense.
2. Regularly Refreshing Scents:
If using scented sachets or wax decorations, consider refreshing them periodically to maintain a consistent and inviting aroma throughout the holiday season.
3. Coordinate with Tree Theme:
Ensure that the scents chosen complement the overall theme and color scheme of your tree. This ensures a harmonious sensory experience.
By adding scented ornaments to your Christmas tree, you’re infusing your holiday space with a sensory delight that goes beyond visual beauty. In our upcoming section, we’ll explore the crowning touch – choosing the right tree topper.
X. Choose the Right Tree Topper
The Crowning Glory: Selecting the Perfect Tree Topper
As your Christmas tree becomes a symphony of lights, ornaments, and scents, it’s time to crown it with the perfect tree topper. The tree topper is the crowning glory, the finishing touch that completes your festive masterpiece. In this section, I’ll guide you through the process of choosing the right tree topper, ensuring your tree stands tall as a beacon of holiday cheer.
Considering Tree Height and Proportions
1. Matching the Scale:
Choose a tree topper that complements the scale of your tree. For taller trees, a larger or more elaborate topper may be suitable, while smaller trees benefit from a more proportionate option.
2. Proportions with the Tree Stand:
Consider the height added by your tree stand when determining the appropriate size for your topper. This ensures a balanced look from the bottom to the very top of your tree.
Exploring Different Types of Tree Toppers
1. Classic Star:
The timeless star tree topper represents the guiding light of the season. Opt for a classic gold or silver star for a traditional touch, or choose a unique design that aligns with your theme.
2. Angel Elegance:

An angel tree topper adds a touch of elegance and serenity to your tree. Choose an angel with delicate wings and a flowing gown to impart a classic and sophisticated feel.
3. Glamorous Finials:

Finial tree toppers, reminiscent of antique ornaments, bring a touch of glamour to your tree. Available in various shapes and sizes, they add a vintage and sophisticated charm.
4. Whimsical Themes:

For themed trees, consider toppers that align with your chosen motif. This could range from a whimsical character to a representation of nature, adding a playful and personalized touch.
Securing the Tree Topper
1. Using a Tree Topper Holder:
Invest in a tree topper holder to secure the topper in place. These holders provide stability, ensuring your chosen topper remains upright throughout the holiday season.
2. Adjusting and Aligning:
When placing the tree topper, ensure it is centered and aligned with the tree’s apex. Make any necessary adjustments to achieve a balanced and visually pleasing appearance.
3. Testing Stability:
Before completing your tree decoration, give the topper a gentle shake to test its stability. This ensures it’s securely in place, ready to shine as the beacon atop your festive creation.
By choosing the right tree topper, you’re adding the final flourish to your Christmas tree, making it a symbol of holiday joy and celebration. In our concluding section, we’ll wrap up our guide on how to decorate a Christmas tree for beginners, summarizing the key steps to ensure your tree becomes a masterpiece of festive delight. As we complete our journey, where every element contributes to a tree that not only dazzles the eyes but also captures the essence of the holiday season. The magic reaches its peak with the perfect tree topper!
Most Popular Post:
10 Surprising Benefits of Printable Wall Art
15 Must-Have Accessories For Styling A Coffee Table
How to Choose the Perfect Interior Color Scheme for Your Home
Expert Guide On How To Buy A Rug For Each Room
XI. Conclusion
As we reach the conclusion of our guide on How to decorate a Christmas tree for beginners, your festive masterpiece is now ready to take center stage in your holiday celebrations. Let’s recap the key steps that have transformed your tree into a dazzling symbol of joy and warmth.
Recap of the Decorating Journey:
1. Choose a Tree:
Begin by selecting the perfect tree that suits your space and preferences, whether it’s artificial or freshly cut.
2. Fluff and Shape Branches:
Master the art of fluffing and shaping branches to create a full and natural-looking tree.
3. Design Around a Theme:
Infuse personality into your tree by choosing a theme that resonates with your festive spirit.
4. Choose the Right Colors and Materials:
Elevate your tree’s visual appeal by carefully selecting colors and materials that complement your chosen theme.
5. Start with Lights First:
Illuminate the magic by starting with lights, creating a warm and inviting glow as the foundation.
6. Balance the Decor with Large and Small Ornaments:
Achieve visual harmony by strategically placing a mix of large and small ornaments.
7. Cluster Your Baubles:
Add depth and intricacy to your tree by artfully clustering baubles in strategic locations.
8. Layer with Ribbons:
Introduce a touch of timeless elegance by layering your tree with carefully selected ribbons.
9. Add Scented Ornaments (For Artificial Trees):
Engage the senses by incorporating scented ornaments, enhancing the holiday experience.
10. Choose the Right Tree Topper:
Crown your tree with the perfect topper, adding the final touch of festive splendor.
The Magic of Your Christmas Tree
Your Christmas tree is now a canvas of holiday magic, a reflection of your unique style and festive spirit. Each carefully chosen ornament, ribbon, and light contributes to a symphony of joy and celebration. As you gather with loved ones around your adorned tree, may the warmth and enchantment of the season fill your hearts.
We hope this guide has made the journey of decorating your Christmas tree both enjoyable and stress-free. Whether you’re a beginner or a seasoned decorator, remember that the true beauty of the season lies in the joy and love shared with family and friends.
How to Decorate a Christmas Tree for Beginners–FAQs
Q1: What type of Christmas tree is best for beginners?
Consider a fir for its classic elegance, a pine for a touch of the outdoors, or a spruce for a regal appearance.
Q2: How do I choose the right size tree for my space?
Measure your space’s height and width, ensuring the tree fits comfortably without overwhelming or getting lost.
Q3: LED lights or traditional string lights – which is better?
It depends on your preference. LED lights are energy-efficient, while traditional string lights offer a classic charm.
Q4: Any tips for creating a balanced ornament display?
Distribute ornaments of various sizes and shapes, and consider creating themed sections on the tree for a cohesive look.
Q5: What’s the best way to secure a wobbly tree?
Stabilize your tree by using a sturdy tree stand, adjusting the positioning, or securing it with additional support.
Q6: How can I make my own Christmas tree decorations?
Get creative! Craft personalized ornaments, make handmade garlands and ribbons, or engage in family-friendly ornament-making activities.
Q7: How do I store my decorations for future use?
Preserve the life of ornaments and lights by storing them in a cool, dry place. Artificial trees should be disassembled and carefully stored.
Q8: What eco-friendly options are available for disposing of a real Christmas tree?
Consider mulching, recycling, or repurposing your tree. Many communities offer environmentally friendly disposal services.
CATCH THE LATEST IN HOME DECOR TRENDS:
Steal These 16 Expert-Approved Decorating Secrets

How To Accessorize Your Living Room

How to Make a Small Room Appear Bigger
How to Make Your Home Look Expensive
GET CAUGHT UP ON ALL THE INSPIRING DECOR TIPS:
18 Fresh Decorating Ideas To Update Your Fireplace

How to Make a Gallery Wall: The Complete Step-by-Step Guide (Even If You’ve Never Hung a Picture)
