TL;DR: Quick Entryway Styling Essentials
- Master the Rule of Three: Use triangulation (high-medium-low elements forming a visual triangle) for professional-looking balance
- Follow the 60/40 Rule: Keep 60% of surface clear for daily function, style the remaining 40%
- Anchor with Impact: Choose a mirror or art that’s 50-75% of your table width
- Layer with Purpose: Combine functional storage (trays, bowls) with decorative height (lamps, vases)
- Light It Right: Add table lamps or sconces—lighting transforms flat surfaces into warm, welcoming focal points
- Apply the 80/20 Capsule: Keep 80% of décor permanent; rotate only 20% seasonally
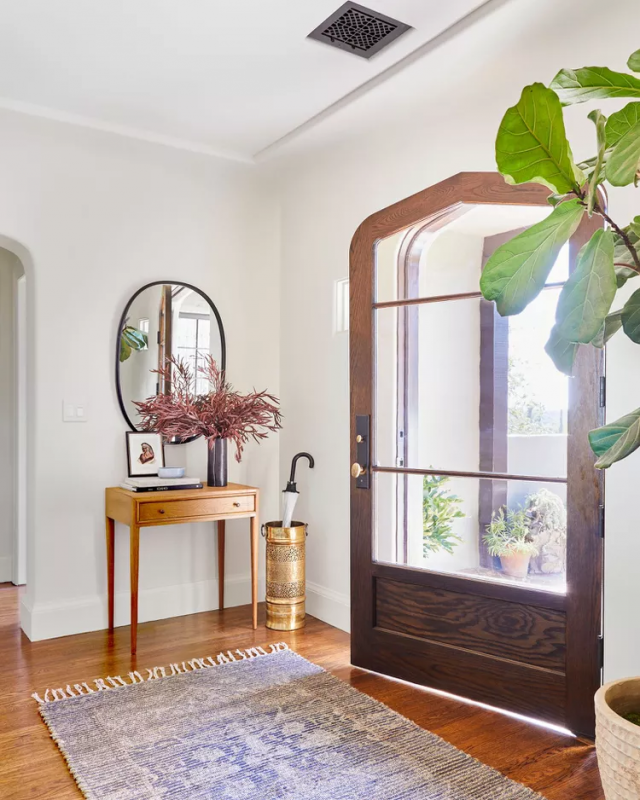
Introduction: Why Your Entryway Table Matters More Than You Think
You walk through your front door after a long day. Your keys hit the table. Your bag drops. And in that split second, your entryway either welcomes you home or reminds you of everything that’s not quite right.
Here’s the truth: learning how to style an entryway table isn’t just about aesthetics—it’s about creating a daily ritual of calm. It’s the difference between chaos and control, between a house and a home that actually feels like yours.
I’ve styled hundreds of entryways, from cramped studio apartments to sprawling suburban homes, and the secret isn’t expensive furniture or designer accessories. It’s understanding a few core principles—including professional techniques like triangulation and the Rule of Three—that transform any table into a functional, beautiful focal point.
If you’ve ever felt stuck staring at your bare entryway table, wondering where to even start, this guide will walk you through everything—from choosing the right table to solving real-world problems like cable management and radiator clearance.
I. Entryway Table Dimensions & Placement Rules
Before you style anything, you need the right foundation. An entryway table that’s too big overwhelms your space; too small, and it looks lost and awkward.
A. The Golden Measurements
- Width: Your table should occupy 50-75% of your available wall space (never wider than the wall itself)
- Height: Standard console tables sit at 30-36 inches—tall enough to be functional without blocking sightlines
- Depth: Narrow entryways need 10-14 inch depths; spacious entries can handle 16-20 inches
Most homeowners make the mistake of going too small, thinking it’ll “save space.” But a table that’s proportionally right actually makes your entryway feel larger and more intentional.
Pro Tip: Stand in your doorway and imagine walking through with groceries, a suitcase, or guests. If your table creates a bottleneck, it’s too deep or poorly placed.
B. Quick Reference: Entryway Table Styling Elements
| Element | Purpose | Ideal Size/Height |
| Anchor Piece | Vertical interest & functionality | 50-75% of table width |
| Tall Element | Visual height & layering | 18-24 inches (lamp/vase) |
| Functional Piece | Daily organization | Low profile (tray/bowl) |
| Organic Element | Texture & life | Varies (plants/stems) |
| Lighting | Ambiance & task lighting | 24-28 inches (table lamp) |
You’ll Also Like: Statement Light Fixture: The Designer’s 5-Step Framework for Choosing the Perfect One
II. The 5-Layer Formula: How to Style an Entryway Table Like a Designer
Here’s the framework professional designers use to style an entryway table. Master this, and you’ll never second-guess your entryway again.
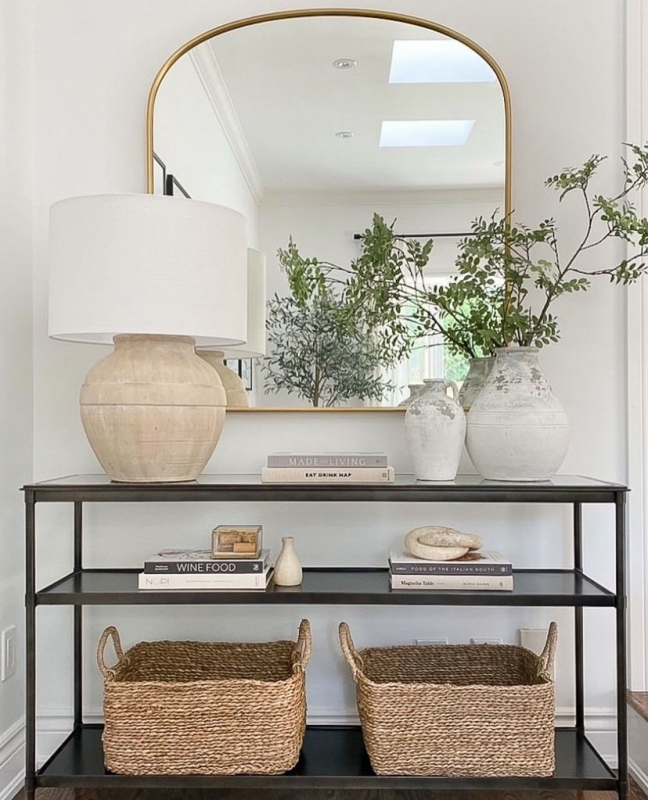
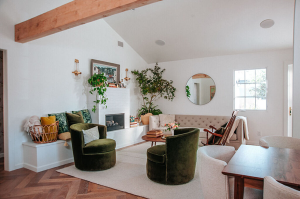
Layer 1: The Anchor Piece (Mirror vs. Art)
Every great entryway starts with one substantial anchor piece—usually a mirror or large-scale artwork. This draws the eye up and creates vertical interest.
Why it works: Mirrors reflect light (making small entries feel bigger) and serve a functional purpose. Artwork adds personality and sets your home’s design tone immediately.
Choosing Your Anchor:
- Mirrors: Hang 6-8 inches above your table; aim for a width that’s 50-75% of the table width
- Art: Lean oversized frames (24×36 inches or larger) against the wall for a relaxed, collected-over-time vibe
- Avoid: Tiny art or mirrors that look like afterthoughts—go bold or go home
Mirror vs. Art Decision Matrix:
| Choose a Mirror If… | Choose Art If… |
| Your entry lacks natural light | You have strong overhead or natural light |
| You want a last-minute appearance check | You want to showcase personal style immediately |
| The space feels cramped | The space is already well-lit and spacious |
| You need to reflect light from windows | You have a bold design statement to make |
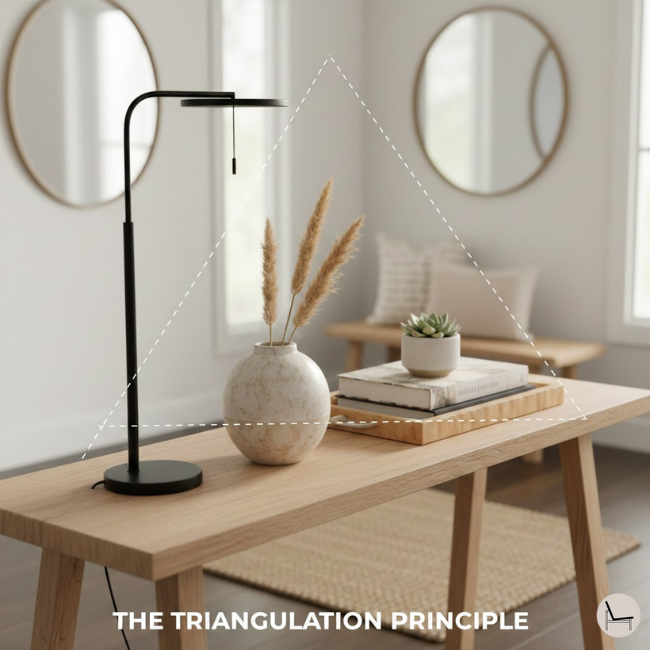
Layer 2: Height Variation & The Power of Triangulation
Flat surfaces are boring. You need varying heights to create visual rhythm—but it’s not random. Professional designers use a technique called triangulation.
The Designer’s Secret: Triangulation & The Rule of Three
When styling an entryway table, your accessories should form an invisible triangle to the viewer’s eye. This creates natural balance and guides the eye around the entire vignette.
How Triangulation Works:
Imagine three points forming a triangle:
- Point 1 (High): Table lamp or tall vase on the left side (18-24 inches)
- Point 2 (Medium): Stacked books or medium vase on the right side (8-12 inches)
- Point 3 (Low): Catchall tray or small decorative object in the center or opposite corner (3-6 inches)
When viewed from your doorway, these three heights create a diagonal flow that feels balanced and intentional—not lined up like soldiers.
Why This Works: The human eye naturally follows triangular compositions. It’s the same principle used in portrait photography and classical painting. By creating this geometric relationship, your styling looks curated rather than cluttered.
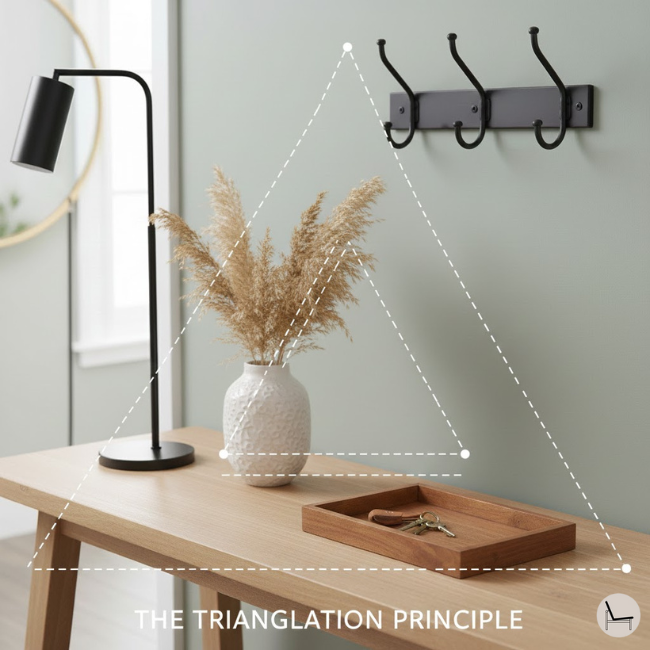
Example Vignette Using Triangulation:
- Left side (High): Tall brass lamp (22 inches) + stacked design books (medium, 9 inches)
- Center: Leaning artwork (anchor piece)
- Right side: Medium ceramic vase with eucalyptus (14 inches) + small catchall tray (4 inches)
The lamp, vase, and tray form your triangle. The anchor (mirror or art) serves as the backdrop, not part of the triangulation.
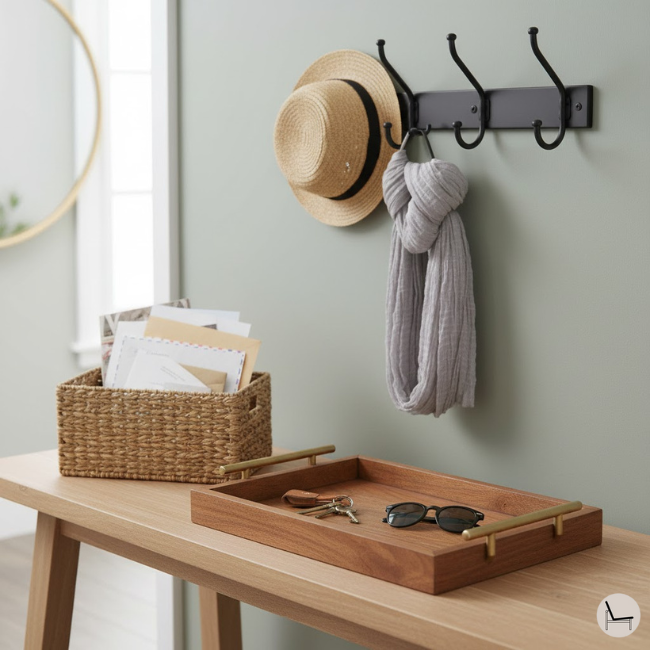
Layer 3: Functional Storage (The Unsung Hero)
An entryway table that doesn’t work for your daily routine will become a clutter magnet within a week.
Must-Have Functional Elements:
- Catchall tray or bowl: Corrals keys, sunglasses, and daily pocket dumps
- Small basket or bin: Hides mail, dog leashes, or reusable shopping bags
- Hooks or wall-mounted organizer nearby: For coats, bags, and hats
The secret is making the function beautiful. A gorgeous ceramic bowl holds keys better than a plastic dish, and it looks intentional.
“The most successful entryways are the ones where function and beauty are indistinguishable. Your tray isn’t just pretty—it’s solving the ‘where did I put my keys?’ problem every single day.” — Emily Henderson, Interior Designer
Layer 4: Lighting (The Game-Changer)
Most people skip lighting, and that’s why their entryway feels flat. Proper illumination transforms a good setup into a showstopper.
Three Lighting Strategies:
| Lighting Type | Best For | Styling Tip |
| Table Lamp | Tables 48+ inches wide | Choose lamps 24-28 inches tall; use warm bulbs (2700K) for a welcoming glow |
| Sconces | Narrow or small tables | Flank your mirror or art; install at 60-66 inches from the floor |
| Overhead Fixture | Grand entryways with high ceilings | Layer with a table lamp or sconces for depth; never rely on overhead alone |
Pro Tip: Lighting isn’t just functional—it’s sculptural. A beautiful brass lamp or modern sconce becomes part of your décor, adding warmth and ambiance the moment you flip the switch.
Layer 5: The Personal Touch (The Soul)
This is where you stop following rules and start telling your story.
Add one item that’s uniquely you:
- Travel souvenir: A ceramic bowl from Portugal, a small sculpture from Japan
- Family photo: In a beautiful frame (keep it tasteful—one photo, not ten)
- Seasonal rotation: Fresh flowers in spring, pinecones in fall, bare branches in winter
- Favorite book: A coffee table book that actually reflects your interests (architecture, fashion, photography)
The goal isn’t to display everything you own—it’s to hint at who lives there.
In Case You Missed It: How to Choose and Style a Mid-Century Wall Unit That Transforms Your Living Space
III. Styling Beyond the Traditional Console Table
Most guides focus exclusively on standard rectangular console tables, but your entryway might call for something different. Here’s how to adapt the 5-layer formula to alternative table types.
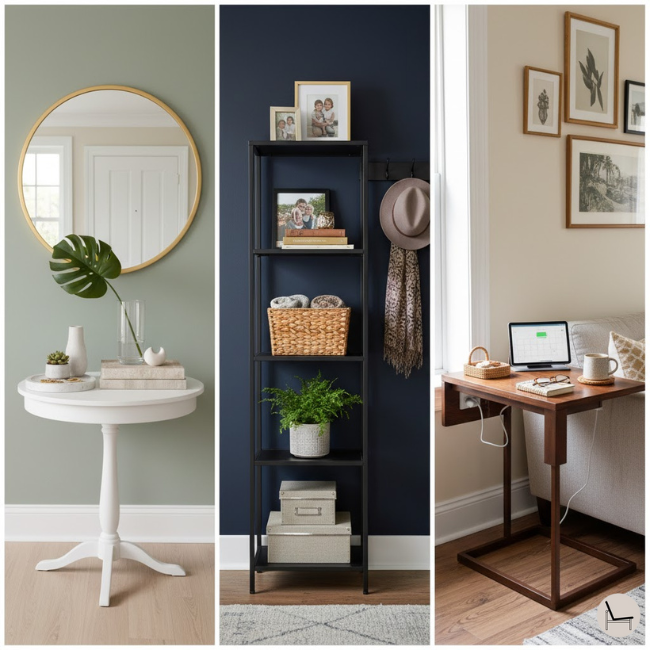
A. The Pedestal or Round Table
When to Use It: Entryways with 360-degree visibility (open-concept homes, center hallways) or spaces that need softer lines.
Styling Strategy:
- Think radially, not linearly: Your vignette should look good from all angles
- Center your tallest element: Place a statement lamp or vase in the center
- Surround with lower accessories: Add books, a tray, and small objects around the perimeter
- Skip the anchor piece: Round tables don’t need wall art—they’re the focal point themselves
Example: Center a brass lamp with a linen shade, surround the base with stacked coffee table books, and add a small bowl for keys on one side.
B. The Tiered or Étagère Table
When to Use It: When you need extra storage or want to display collections without feeling cluttered.
Styling Strategy:
- Ground the bottom shelf: Use “weighty” items like large baskets, oversized art books, or a sculptural vase to anchor visually
- Style the top shelf with triangulation: Apply the high-medium-low formula here
- Leave middle shelves functional: Store bags, shoes, or everyday items here—don’t overcrowd
- Balance weight between shelves: If your top is light and airy, make the bottom substantial
Example: Bottom shelf holds a large woven basket for shoes; top shelf features a small lamp, leaning frame, and catchall tray.
C. The C-Table or Side Table Hack
When to Use It: Ultra-narrow hallways (under 30 inches wide) where even a slim console is too bulky.
Styling Strategy:
- Slide it partially under itself: C-tables tuck under sofas—use this to save space
- Keep styling minimal: One small lamp or vase, one tray maximum
- Use vertical wall space: Hang hooks directly above for bags and coats
- Choose light-colored or transparent materials: Glass or lucite keeps sightlines open
Example: A narrow white C-table holds only a small brass catchall dish and has three hooks mounted on the wall above.
You’ll Also Like: 5 Washable Area Rug Designer Secrets to Make Any Room Look Custom
IV. Solving Common Styling Entryway Problems: The Ugly Realities

Let’s talk about the stuff other guides skip—the real-world problems that make learning how to style an entryway table frustrating. Here’s how to solve them without compromising style.
Problem #1: Cable Management (The Lamp Cord Situation)
You finally add a beautiful table lamp to style your entryway table, but now there’s an ugly black cord snaking down to the outlet, ruining your carefully curated look. Sound familiar?
The good news: you don’t have to choose between lighting and aesthetics. Here are three clever ways to hide those cords while maintaining your design vision.
The Decorative Box Trick
One of the smartest ways to style an entryway table while hiding lamp cords is using a decorative box as functional décor. Find a beautiful wood, woven, or ceramic box that’s 6-8 inches tall. Cut a small hole in the back (or choose one with a natural opening), then tuck your lamp plug and excess cord inside.
The genius part? The box becomes part of your vignette—doubling as both an accessory and a cable management solution. Style it next to your lamp with a few decorative objects on top, and no one will know it’s hiding the mess underneath.
Cord Covers & Raceways
If you want a more permanent solution when you style an entryway table with lighting, paintable cord covers are your best friend. These inexpensive raceways (around $10-15 at any hardware store) mount directly to your wall and can be painted to match your exact wall or trim color.
Run the cord down the back corner of your table, along the baseboard to the outlet, and it virtually disappears. This works especially well in rentals where you can’t hardwire sconces but want that polished, professional look.
Cordless Lamps: The 2026 Solution
Battery-powered LED lamps have improved dramatically in 2026. Brands like IKEA and West Elm now offer rechargeable cordless lamps with 8+ hour battery life and warm, inviting light quality that rivals traditional bulbs.
These are game-changers for anyone learning how to style an entryway table in challenging spaces—perfect for rentals, corners far from outlets, or anywhere traditional lamp cords would be glaringly visible.
Problem #2: The Radiator Dilemma
Your entryway has a radiator or baseboard heater directly beneath where you want to style an entryway table, and standard consoles block critical heat flow into your home. It’s a frustrating design challenge that most guides completely ignore.
The solution isn’t giving up on your styled entryway—it’s choosing the right furniture and configuration for your heating system.
High-Legged Console Tables
When you style an entryway table over a radiator, seek out consoles with legs that are 8-10 inches tall—significantly higher than standard furniture. This elevation allows heat to circulate freely underneath while still providing the full styling surface you need.
Search for terms like:
- “high-legged console”
- “elevated entryway table”
- “hairpin leg console”
These keywords will help you find pieces specifically designed to work with heating elements underneath.
Wall-Mounted Floating Shelves
If floor space above your radiator is completely off-limits, consider installing a floating shelf at standard table height (36-40 inches from the floor). Choose a 10-12 inch depth to give yourself enough space to style an entryway table setup with a tray, small lamp, and accessories.
The heat flows freely underneath, and as a bonus, the floating design creates the illusion of more space in tight entryways. It’s a win-win for both function and aesthetics.
The Custom “Radiator Console”
For a truly custom solution when you style an entryway table over heating elements, build or commission a console with a cut-out back panel. The table sits flush to the wall but features an opening that allows heat to rise naturally without obstruction.
Search Amazon for “radiator console” designs or work with a local woodworker to create a piece that fits your exact radiator dimensions. Yes, it costs more than off-the-shelf options, but it solves the problem permanently and beautifully.
💡 Pro Tip: If you must use a standard table over a radiator, leave at least 3-4 inches of clearance and never place fabrics, baskets, or flammable materials directly on the surface. Heat needs somewhere to go, and blocking it creates both inefficiency and safety hazards.
Problem #3: The Clutter Magnet Syndrome
Here’s the brutal truth: no matter how beautifully you style an entryway table initially, it becomes a dumping ground for mail, Amazon packages, dog leashes, and random junk within days. Your carefully arranged vignette disappears under chaos, and suddenly you’re back where you started.
The problem isn’t your styling—it’s that you haven’t built function into your design. Here’s how to fix it.
The 60/40 Rule (Enforcement Edition)
When you first style an entryway table, physically mark or visualize 60% of your surface as a “clear zone” reserved for daily function. I’m serious—use painter’s tape during your first week to train yourself where styling ends and functional space begins.
Only the remaining 40% “styled zone” gets permanent décor like lamps, vases, and decorative objects. This discipline ensures your table remains both beautiful and usable. Without it, entropy wins every time.
The Nightly Reset Ritual
The secret to maintaining how you style an entryway table isn’t perfection—it’s consistency. Spend just 30 seconds before bed returning everything to its designated spot.
Here’s your micro-routine:
- Keys → Tray
- Mail → Basket
- Bags → Hooks
- Packages → Final destination
This tiny habit prevents the gradual accumulation that turns styled surfaces into chaotic catch-alls. Thirty seconds. That’s it.
The Decoy Basket Strategy
One trick professional organizers use when they style an entryway table is placing a beautiful basket—woven, wire, or leather—on the floor directly next to the table. This becomes your “temporary holding zone” for packages, shoes, or items in transit.
When the basket fills up, you’re forced to deal with its contents, which naturally prevents overflow onto your carefully styled table surface. It’s visual accountability that actually works.
Problem #4: Small Space & No Room for a Table
Your entryway is essentially a 24-inch-wide hallway with no physical space for a traditional console. Does that mean you can’t style an entryway table at all? Absolutely not. You just need to think vertically and creatively.
Here are four proven solutions that work in even the tiniest spaces.
The Floating Shelf Alternative
You can still style an entryway table setup without actual floor space by installing a floating shelf 8-10 inches deep at 36 inches height. This gives you just enough surface to work with—a small tray for keys, one decorative vase or frame, and essential function.
Mount hooks directly underneath for bags and coats, creating a complete entryway solution that takes up zero floor space. It’s the ultimate small-space hack.
The Over-the-Door Organizer (Elevated)
Ditch the plastic shoe organizers and upgrade to a modern over-the-door metal rack with hooks and a small shelf at the top. Spray paint it brass, matte black, or white to match your décor.
Then style the top shelf exactly like you would an entryway table—with a small tray, catchall bowl, and one decorative object. It’s renter-friendly, requires no installation beyond hanging over your door, and gives you that styled entryway moment even in a studio apartment.
The Corner Console Hack
When you can’t style an entryway table along a straight wall due to space constraints, look to corners. Utilize the corner where your entry hallway meets another room with a small corner table (18-24 inches wide).
These triangular or curved pieces take up “dead space” that wouldn’t be usable for walking anyway. You get a styling surface without blocking flow—hidden real estate most people overlook.
The Leaning Ladder Shelf
A decorative leaning ladder is one of the most versatile ways to style an entryway table look in minimal space. Taking up only 12-16 inches of floor depth, these lean against the wall and require no installation—perfect for renters who can’t drill holes.
Style the rungs like horizontal shelves:
- Top rung: Small vase or frame
- Middle rung: Tray for keys
- Bottom rung: Basket for mail
In Case You Missed It: The Interior Design Rule of Thirds: Your Step-by-Step Guide
V. How to Style an Entryway Table by Space Type
Not all entryways are created equal. Here’s how to adapt the 5-layer formula to your specific space.
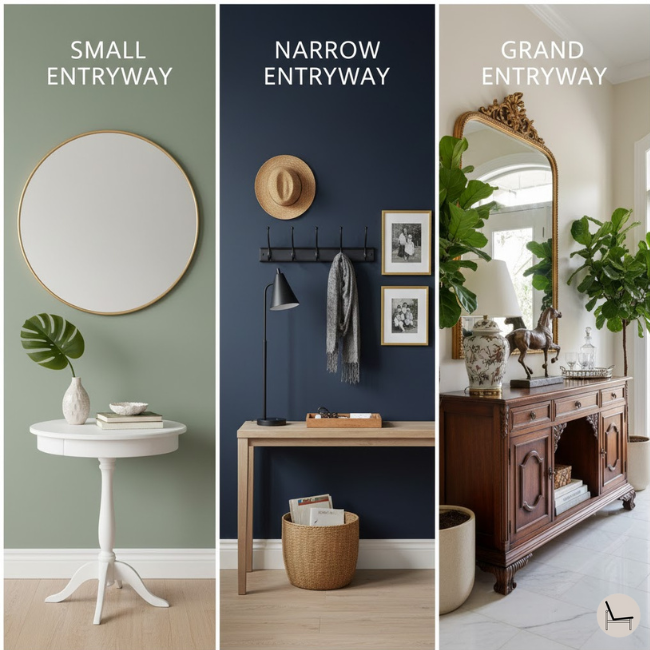
A. Small Entryways (Under 3 Feet Wide)
The Challenge: You’re working with limited square footage and need every inch to count.
The Solution:
- Slim console tables: Look for 10-12 inch depths
- Wall-mounted floating shelves: If a table feels too bulky, a floating shelf (8-10 inches deep) creates surface space without visual weight
- Vertical focus: Hang a tall, narrow mirror to draw the eye up
- Minimal accessories: One table lamp + small catchall tray + wall hooks
Avoid: Oversized mirrors, bulky baskets, or anything that crowds the walkway.
B. Narrow Hallways
The Challenge: You have length but no width—standard consoles block the flow.
The Solution:
- Skinny console tables or wall-mounted ledges: Maximum 12 inches deep
- Leaning ladder shelf: Adds storage without taking floor space
- Mirrors with built-in hooks: Maximizes function in minimal space
- Sconces instead of table lamps: Saves precious surface area
C. Grand Entryways (6+ Feet Wide)
The Challenge: Too much space can feel empty and echoey without substantial furnishings.
The Solution:
- Longer console tables (60+ inches): Or pair two smaller tables
- Symmetrical styling: Matching lamps on each end, centered mirror or art
- Statement bench underneath: Adds seating and visual weight
- Layered accessories: You have room to play—stack books, add sculptural objects, include multiple plants
You’ll Also Like: Modern Organic Interior Design: The Ultimate Guide
VI. The 80/20 Entryway Capsule: Seasonal Styling Without Starting Over
One of the biggest mistakes people make is thinking they need to redecorate their entryway table every season. That’s exhausting, expensive, and unnecessary.
Instead, adopt the 80/20 Capsule Approach.
A. The Concept:
80% of your entryway styling stays the same year-round (your “capsule”):
- Console table
- Mirror or primary artwork
- Table lamp(s)
- Catchall tray or bowl
- Primary vase or decorative object
Only 20% rotates seasonally:
- Greenery/stems in your vase
- Candle scent
- One small seasonal object (pumpkin, pinecone bundle, coral, etc.)
- Possibly a swapped-out tray or bowl if you want variety
B. Why This Works:
- Less overwhelming: You’re not redesigning—just refreshing
- Budget-friendly: You’re buying 1-3 items per season, not a whole new setup
- Maintains cohesion: Your entryway still feels like “you,” just with seasonal touches
- Faster styling: Takes 5 minutes to swap out stems and a candle vs. an hour to restyle everything
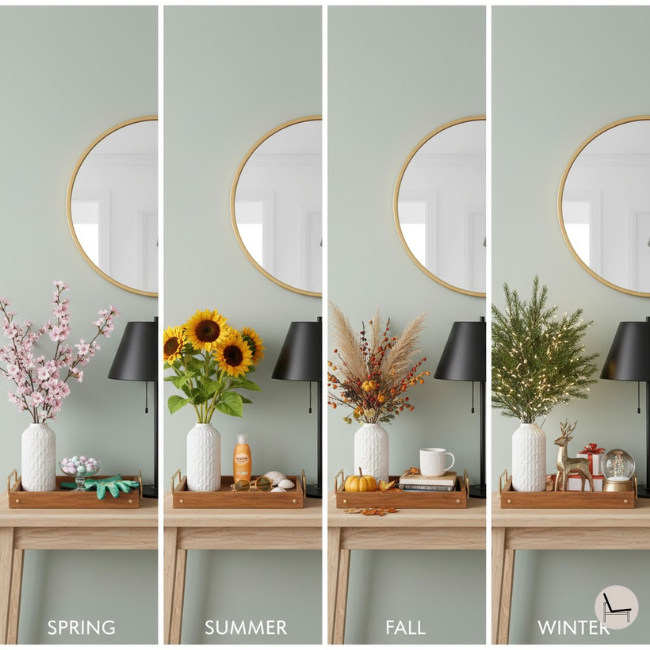
C. The 80/20 Capsule in Action (Four Seasons):
Your 80% Capsule (Permanent):
- White oak console table
- Round brass-framed mirror
- Black ceramic table lamp
- Marble tray for keys
- Clear glass cylinder vase
The 20% Seasonal Swaps:
Spring:
- Fresh tulips or cherry blossoms in the vase
- Light citrus-scented candle
- Small ceramic bird or pastel-colored decorative object
Summer:
- Dried pampas grass or eucalyptus in the vase
- Coconut or sea salt candle
- Small piece of driftwood or coral (real or faux)
Fall:
- Burnt orange dahlias or dried wheat stems
- Pumpkin spice or cinnamon candle
- Mini pumpkin or bundle of pinecones
Winter:
- Evergreen branches or white roses
- Pine or vanilla candle
- Pinecone bundle tied with velvet ribbon or small mercury glass ornament
The Result: Your entryway always feels current and seasonal, but you never have to “start over” or question whether your styling works. The bones stay the same; only the seasonal accents change.
“The key to seasonal styling isn’t overdoing it—one or two swaps make the biggest impact. Change your greenery and maybe your tray or bowl, but leave your anchor pieces (mirror, lamp) untouched.” — Sarah Sherman Samuel, Interior Designer
You’ll Also Like: Coffee Table Styling Tips: Master the Art of Effortless Design
VII. 2026 Entryway Trends: What’s In & What’s Out
Design trends evolve, and 2026 is bringing some fresh perspectives to style an entryway table. Here’s what’s having a moment—and what’s on its way out.
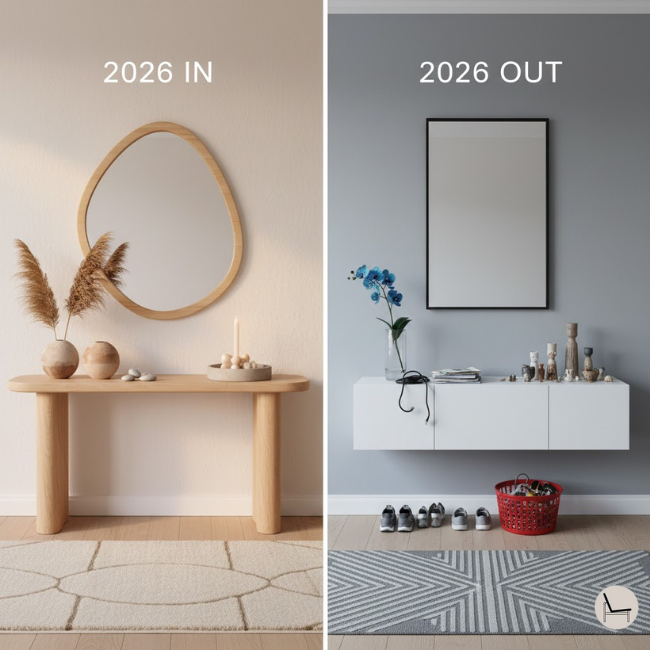
A. What’s IN for 2026:
1. Warm Minimalism
- The Look: Clean lines meet warm, tactile materials—light woods, linen, terracotta
- Color Palette: Creams, taupes, soft terracottas, muted greens
- Why It’s Trending: People are craving calm, uncluttered spaces that still feel inviting (not sterile)
- How to Style It: Pair a simple oak console with a textured ceramic lamp and a woven basket
2. Sculptural, Organic Shapes
- The Look: Rounded mirrors, blob-shaped vases, curved table lamps
- Materials: Handmade ceramics, natural stone (travertine, marble), live-edge wood
- Why It’s Trending: Harsh angles are out—soft, organic forms create a more human-centered space
- How to Style It: Choose a round mirror, pair with a curvy ceramic vase and smooth river stones in your tray
3. Oversized Anchor Pieces
- The Look: Go bigger than you think—40-inch round mirrors, 36-inch leaning artwork
- Why It’s Trending: In a world of maximalist scrolling, one bold statement piece creates impact without clutter
- How to Style It: Let your anchor piece dominate; keep accessories minimal
4. Mixed Metals
- The Look: Brass lamp + silver tray + black iron hooks
- Why It’s Trending: Matchy-matchy feels dated; intentional mixing feels curated
- How to Style It: Stick to warm metals (brass, bronze, copper) OR cool metals (silver, chrome, black) as your primary, then add one accent from the opposite family
5. Biophilic Design (Bringing Nature In)
- The Look: Real or faux greenery, natural wood textures, stone accessories
- Why It’s Trending: Proven to reduce stress and improve mood—we’re craving nature indoors
- How to Style It: Add a pothos plant in a ceramic pot, use a wood tray, incorporate a stone bowl
B. What’s OUT for 2026:
1. Farmhouse Everything
- Distressed wood, “Live Laugh Love” signs, and mason jars are feeling tired
- The Update: If you love farmhouse, modernize it—clean-lined wood, matte black accents, and lose the signage
2. Overly Matched Sets
- Buying a “console table set” with matching mirror, lamps, and tray screams catalog
- The Update: Mix styles, eras, and materials for a collected look
3. Tiny, Cluttered Accessories
- Five small picture frames, seven mini candles, and a dozen little objects = visual noise
- The Update: Edit down to 3-5 substantial pieces using triangulation
4. Cold Minimalism
- All-white, stark, Scandinavian-minimal spaces are softening
- The Update: Add warmth through wood tones, textured textiles, and warm lighting
5. Faux Florals That Look Fake
- Cheap silk flowers are OUT
- The Update: Invest in high-quality faux stems (pampas, eucalyptus, olive branches) or use dried natural elements
In Case You Missed It: Swivel Chairs Ultimate Guide: How to Choose & Style the Perfect One for Your Home
VIII. Budget-Friendly Entryway Table Styling: Where to Splurge vs. Save
You don’t need a designer budget to create a styled entryway. Here’s where to invest and where to cut costs without sacrificing style.
A. Where to Splurge:
1. The Console Table Itself ($150-$400) A quality table is worth the investment. It’s the foundation—get this right, and everything else falls into place.
Why it matters: Cheap tables look cheap. Wobbly construction, peeling veneer, and flimsy legs ruin the entire aesthetic. A solid wood or well-constructed table lasts decades.
2. Lighting ($60-$150) A beautiful lamp or pair of sconces transforms your space. This is where you want craftsmanship and quality.
Why it matters: Lighting is both functional and sculptural—it’s working 24/7 to make your entry feel welcoming. A beautiful lamp becomes a focal point.
B. Where to Save:
1. Accessories (Trays, Bowls, Small Vases) ($10-$30 each) Hit HomeGoods, Target, or thrift stores for these. A $15 ceramic tray looks identical to a $75 designer version.
Where to Shop: Target Threshold collection, HomeGoods, TJ Maxx, local thrift stores
2. Mirrors ($30-$80) You can find affordable mirrors at IKEA, CB2, or even Facebook Marketplace. Focus on size and shape over brand.
Where to Shop: IKEA, Target, Facebook Marketplace, estate sales
3. Greenery ($10-$30) Skip expensive fresh florals and opt for faux stems (pampas, eucalyptus), dried branches, or a low-maintenance potted plant (snake plant, pothos).
Where to Shop: Michaels (use 40% off coupon), Trader Joe’s (real plants), Amazon
C. Budget Styling Formula (Under $500):
| Item | Budget Option | Estimated Cost |
| Console Table | IKEA LIATORP or West Elm sale | $150-$250 |
| Mirror | Target Threshold or IKEA | $40-$80 |
| Table Lamp | Affordable brass or ceramic lamp | $60-$100 |
| Catchall Tray | HomeGoods or thrifted | $10-$20 |
| Vase | Target or Michaels | $15-$25 |
| Greenery | Faux eucalyptus or real pothos | $15-$30 |
| Small Accessories | Books, bowls, candles (thrifted/sale) | $20-$40 |
| TOTAL | $310-$545 |
Pro Tip: The secret to budget styling is quality over quantity. Three well-chosen pieces look infinitely better than ten cheap ones.
Popular Post: Amazon Tiny Home: Your Complete Buying Guide
IX. How to Style an Entryway Table: Step-by-Step Action Plan

Ready to style your entryway table? Here’s your exact roadmap.
Step 1: Clear Everything Off
Start with a blank slate. Remove all clutter, wipe down your table, and assess what you’re working with.
Step 2: Hang Your Anchor Piece
Install your mirror or lean your large-scale artwork. This sets the visual foundation for everything else.
- Mirror: Hang with the bottom edge 6-8 inches above the table
- Art: Lean against the wall (use museum putty to secure if needed)
Step 3: Add Your Tallest Element (Create Point 1 of Your Triangle)
Place a table lamp or tall vase on one side of the table (usually the left, as it’s the first thing you see when entering).
- Height: 18-24 inches
- Placement: Left or right third of the table (not centered)
Step 4: Layer in Medium-Height Accessories (Point 2)
Add stacked books, a medium vase, or decorative box on the opposite side.
- Height: 8-12 inches
- Placement: Opposite side from your tall element
Step 5: Incorporate Functional Storage (Point 3)
Place a tray or bowl for keys and daily essentials in an easy-to-reach spot—this completes your triangulation.
- Height: 3-6 inches (low profile)
- Placement: Center or front of the table, easily accessible
Step 6: Check Your Triangulation
Stand in your doorway. Do your three main elements (tall, medium, low) form a visual triangle? If they’re all lined up in a row, adjust placement.
Step 7: Finish with Personal Touches
Add one meaningful item—a framed photo, small sculpture, or seasonal greenery.
Step 8: Step Back and Edit
Stand in your doorway and look at your table. Does it feel balanced? Is 60% of the surface still clear for function? Remove anything that feels like “too much.”
Remember: Styling isn’t one-and-done. You’ll tweak, adjust, and refine over time. That’s part of making it yours.
Most Popular Post:
Interior Design Style Quiz
Timeless Paint Colors That Never Go Out of Style
Create Your Perfect Ergonomic Home Office: A Complete Guide
Must-Have Accessories for Guys: The Secret to a Stylish Space
Modular Sofas for Small Spaces: Brilliant Solutions for Compact Living

Conclusion: Your Entryway Table Is Your Home’s Handshake
Here’s the truth: learning how to style an entryway table isn’t about perfection—it’s about intention.
It’s about walking through your door and feeling that exhale, that moment when you know you’re home. It’s about guests pausing to admire the thoughtful vignette you’ve created. It’s about keys that have a place, a table that works as hard as it looks good, and a space that sets the tone for everything beyond it.
The difference between a styled entryway and a chaotic one isn’t money or talent—it’s simply knowing the formula. You’ve got it now. The 5-layer framework, the measurements, the styling hacks, the seasonal swaps—everything you need to create an entry that works for your life and reflects your style.
What’s Next?
Start small. This weekend, choose one change:
- Hang that mirror you’ve been meaning to install
- Add a table lamp for warmth and function
- Swap out the clutter for one beautiful catchall tray
- Introduce fresh greenery or a seasonal touch
Your entryway is the first and last thing you see every day. Make it count.
Your perfectly styled entryway is one intentional decision away. What will you change first?
FAQ: Your Entryway Table Styling Questions Answered
Q: What do I put on an entryway table if I don’t have a mirror?
A: A mirror is ideal for function and light-reflection, but it’s not mandatory. Alternatives include a large piece of artwork (leaning or hung), a decorative wall shelf, or even a gallery wall above the table. The key is creating visual interest at eye level. If you skip the mirror, ensure you have strong overhead or natural lighting to compensate.
Q: How wide should an entryway table be?
A: Your table should occupy 50-75% of your available wall space. For example, if your wall is 6 feet (72 inches) wide, your table should be 36-54 inches wide. Never choose a table wider than your wall—it creates visual awkwardness and blocks flow.
Q: Can I style an entryway table without a lamp?
A: Yes, but you’ll need alternative lighting. Install sconces on either side of your mirror or art, or ensure you have strong overhead lighting. Lamps add warmth and sculptural dimension, so if you skip them, compensate with other layered lighting sources. Consider battery-powered cordless lamps if outlets are an issue.
Q: What’s the best height for an entryway table?
A: Standard console tables are 30-36 inches tall. This height is functional for setting down keys and bags while being visually balanced with most mirrors and artwork hung at standard heights (bottom of frame 8-12 inches above the table). If you have a radiator, look for high-legged tables (8-10 inch legs) to allow heat circulation.
Q: How do I keep my entryway table from becoming a clutter magnet?
A: Build function into your styling using the 60/40 rule—keep 60% of your surface clear for daily use. Designate specific homes for daily items: a tray for keys, a basket for mail, hooks for bags. Do a 30-second nightly reset: return everything to its designated spot. Add a “decoy basket” on the floor next to your table for temporary items like packages or shoes.
Q: Can I style an entryway table in a small apartment?
A: Absolutely. Use a narrow console (10-12 inches deep) or even a wall-mounted floating shelf. Focus on vertical styling (tall mirror, wall hooks) to maximize space without crowding walkways.
Subscribe To the Newsletter!
Subscribe now for an endless feed of inspirational women’s cave decor ideas, pampering rituals, and more tips for curating your ultimate escape. Let’s start making your cozy refuge a reality – you so deserve this!
CATCH THE LATEST IN HOME DECOR TRENDS:
Steal These 16 Expert-Approved Decorating Secrets

How To Accessorize Your Living Room
Small Space? 10 Ways To Make A Room Appear Bigger
Make Your space Look Expensive
GET CAUGHT UP ON ALL THE INSPIRING DECOR TIPS:
18 Fresh Decorating Ideas To Update Your Fireplace
How to Make a Gallery Wall: The Complete Step-by-Step Guide (Even If You’ve Never Hung a Picture)


