TL;DR Section: Making a gallery wall doesn’t require design expertise—it requires a simple system. Measure your wall space, arrange frames on the floor first (never directly on the wall!), maintain 2-3 inches between pieces, and start with your largest frame as an anchor. Follow our step-by-step process and you’ll create a professionally curated look in one afternoon without wasting money on mistakes or extra nail holes.
Introduction: Why Your Blank Wall Deserves Better
You’ve been staring at that empty wall for months now.
Maybe it’s the massive expanse above your sofa, or the awkward hallway that connects your living spaces, and you’ve decided to make a gallery wall to finally fill that empty space. You know exactly what it needs—a gallery wall that makes guests stop mid-conversation to say, “Where did you get all of this?” But every time you think about actually making one, something stops you. The fear of crooked frames. The anxiety about too many nail holes. The overwhelming question of where to even begin.
Here’s what nobody tells you: making a gallery wall isn’t about having perfect design instincts or an expensive art collection. It’s about following a proven system that eliminates guesswork. In this guide, you’ll learn exactly how to make a gallery wall that transforms your space from generic to genuinely you—without hiring a designer, without advanced DIY skills, and without the trial-and-error that wastes both time and money.
Whether you’re decorating your first apartment or finally tackling that project you’ve postponed for years, this is your permission slip to make a gallery wall happen. Let’s turn that intimidating blank wall into your home’s new favorite feature.
I. What Is a Gallery Wall? (And Why Every Home Needs One)
A gallery wall is a curated collection of framed art, photographs, and decorative objects arranged together on a single wall to create visual impact and tell a personal story.
Think of it as your home’s autobiography in visual form. Unlike a single statement piece, gallery walls let you showcase multiple memories, artistic tastes, and meaningful objects in one cohesive display. You might include family vacation photos alongside vintage botanical prints, a mirror that catches natural light, and that abstract painting you found at a local art fair.
The beauty of learning how to make a gallery wall lies in its flexibility. There are no rigid rules about what “counts” as gallery wall art. Float-mounted concert tickets sit beautifully next to professional photographs. Your grandmother’s embroidered handkerchief deserves space alongside modern typography prints. The goal isn’t perfection—it’s creating a display that genuinely reflects who you are.
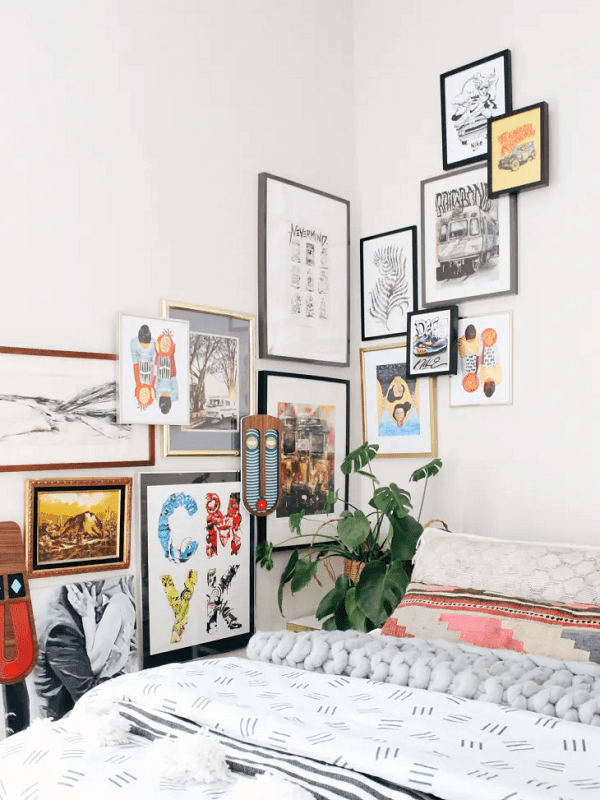
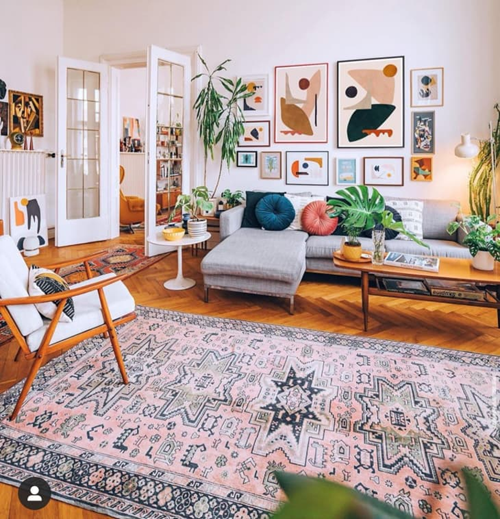
Gallery walls work in any room and any style. A minimalist might create a gallery wall with black frames and black-and-white photography arranged in perfect symmetry. A maximalist might mix ornate gold frames with colorful abstracts in organic, asymmetrical arrangements. Both approaches create gallery walls that enhance their respective spaces.
💡 Pro Tip: If you’re worried about commitment, start small. A mini gallery wall with 3-5 pieces lets you practice the technique before scaling up to larger installations.
You’ll Also Like: Bold Wall Art: The Complete Guide to Transforming Your Space with Statement Pieces
II. How to Make a Gallery Wall: Essential Planning Steps
Before you hammer a single nail, proper planning prevents the expensive mistakes that leave walls looking cluttered instead of curated.
Choose Your Wall Space Strategically
The location you select dramatically impacts your gallery wall’s success. You need adequate square footage (minimum 24″ x 36″ for smaller collections), good natural or artificial lighting, and a viewing distance that lets you appreciate the full arrangement.
Ideal locations include:
- Above sofas or beds: The gallery wall fills vertical space while anchoring furniture below
- Staircase walls: The ascending layout naturally guides eyes upward as you climb
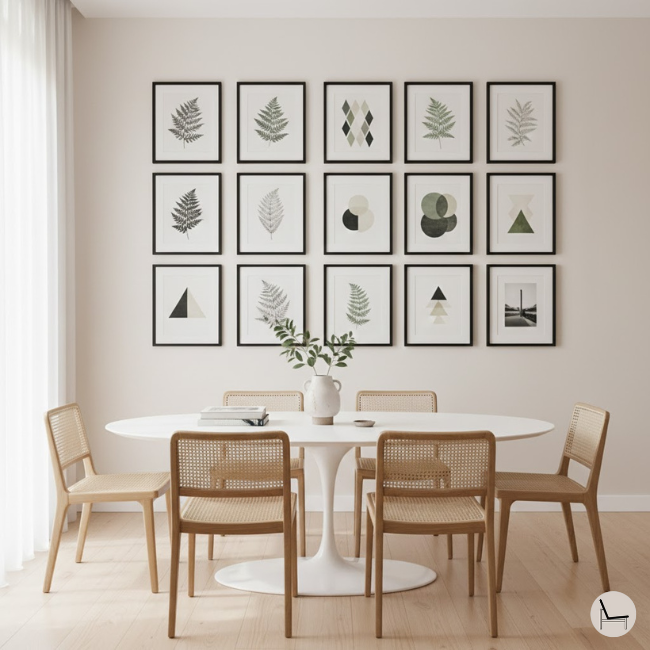
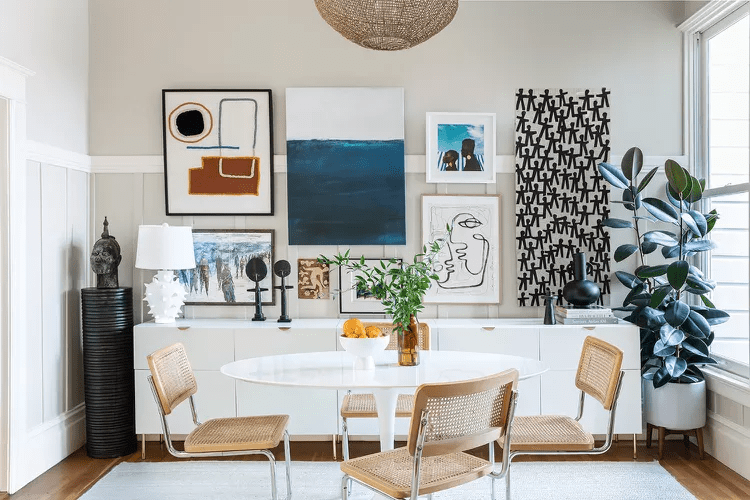
- Dining room walls: Creates conversation starters during meals and entertaining
- Hallways: Transforms transitional spaces into engaging galleries
- Home office walls: Surrounds your workspace with inspiration and personality
Avoid placing gallery walls where they compete with architectural features (like fireplaces or large windows), in high-moisture areas (bathrooms without proper ventilation), or where furniture would block significant portions of your display.
Measure Everything (Seriously, Everything)
This step feels tedious but saves hours of frustration later. You’ll need three key measurements:
- Total wall dimensions: Measure the full height and width of your available wall space
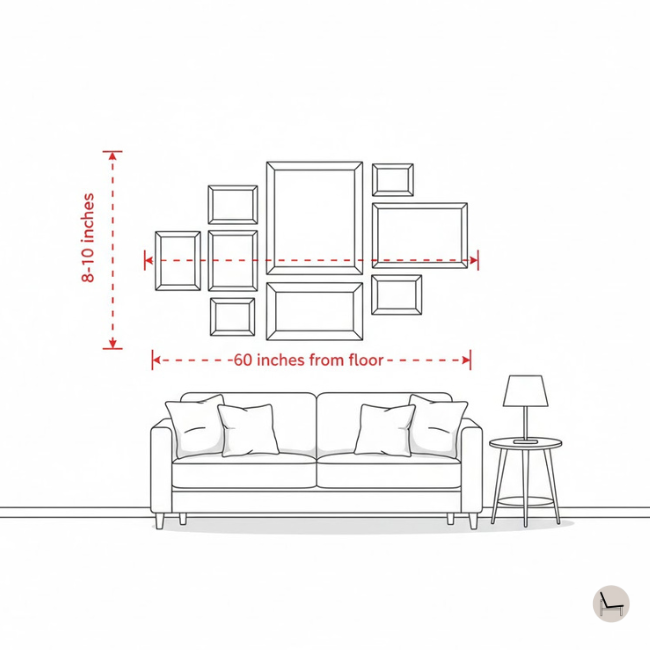
- Furniture clearance: Measure from the floor to the top of any furniture below (aim for 8-10 inches above furniture for visual breathing room)
- Desired gallery wall size: Based on your wall and furniture, determine the maximum dimensions your gallery wall should fill (typically 60-75% of the width above furniture)
Write these measurements down. Tape them to your wall. You’ll reference them constantly throughout the planning process.
💡 Pro Tip: Take photos of your empty wall from multiple angles. These reference photos help you visualize how your gallery wall will look in the actual space.
In Case You Missed It: How to Choose The Right TV Size to Decorate Your Living Room
III. Selecting Art & Frames: Creating Visual Cohesion

The secret to making a gallery wall look intentionally curated instead of randomly assembled lies in thoughtful selection across three dimensions: color, style, and scale.
Building Your Art Collection
You don’t need expensive original art to create a gallery wall worth admiring. Mix and match from these sources:
- Personal photographs: Family moments, travel memories, or even well-composed phone photos printed at professional quality
- Digital art prints: Affordable downloads from Etsy, Society6, or independent artists let you access stunning work for $5-30 per print
- Thrifted finds: Vintage frames, botanical illustrations, and retro photography from estate sales add character at fraction of retail costs
- DIY creations: Your own paintings, pressed flowers, or fabric swatches in shadow boxes prove you don’t need professional art credentials
- Meaningful objects: Float-mount concert tickets, handwritten recipes, vintage postcards, or children’s artwork for deeply personal touches
The key is variety within cohesion. If you’re making a gallery wall with all black-and-white photography, vary the subjects and frame styles. If mixing color palettes, ensure they share similar tones (all jewel tones, all pastels, all earthy neutrals).
Frame Selection Strategy
Your frames either unify or fragment your gallery wall. Three approaches work reliably:
Option 1 – Uniform Frames: All matching frames (same color, same style) with varied mat board treatments create clean, gallery-like sophistication. This approach works beautifully when your art itself provides visual variety.
Option 2 – Limited Variety: Choose 2-3 frame styles maximum—perhaps white frames, natural wood frames, and one metallic accent. This balanced approach feels curated without becoming chaotic.
Option 3 – Eclectic Mix: Multiple frame styles, colors, and finishes work together when unified by consistent spacing and a cohesive color story in the art itself. This creates the “collected over time” aesthetic many people desire when learning how to make a gallery wall.

Frame Mixing Guidelines Table:
| Wall Size | Maximum Frame Styles | Recommended Approach | Visual Weight |
|---|---|---|---|
| Small (under 4 ft) | 2 styles | Uniform frames, varied mats | Minimal contrast |
| Medium (4-7 ft) | 3 styles | Matching finish family (all wood tones) | Moderate variety |
| Large (7+ ft) | 4-5 styles | Eclectic mix with color anchor | High visual interest |
💡 Pro Tip: When mixing frame styles, maintain consistency in one element—either all the same finish (like “all black”) or all the same material (like “all wood”) to create visual harmony.
You’ll Also Like: How To Create a Dining Room Gallery Wall
IV. Gallery Wall Layout Techniques: From Template to Wall

The difference between gallery walls that look professionally designed versus haphazardly arranged comes down to layout planning—and you must complete this before touching your wall.
The Floor Template Method (Your Foolproof System)

This technique eliminates guesswork and prevents the dreaded “I hate it after I’ve already hung everything” scenario.
Step 1: Mark Your Space
Using painter’s tape, mark out the exact dimensions of your intended gallery wall directly on your floor. If you measured a 72″ wide by 48″ tall space, tape those precise measurements on the floor where you have room to arrange frames.
Step 2: Arrange Your Frames
Place all your frames face-up within your taped boundary. Start with the largest piece—this becomes your anchor. Position it slightly off-center (either top-left, top-right, bottom-left, or bottom-right of your layout area). Off-center anchors create more visual interest than perfectly centered focal points.
Step 3: Build Around Your Anchor
Add your second-largest piece diagonally from your anchor—either directly adjacent or across the layout. Now you have two reference points. Fill remaining space with medium and small pieces, maintaining roughly 2-3 inches between all frames.
Step 4: Refine Your Arrangement
Step back. Take photos. Move pieces around. Ask yourself:
- Does my eye travel naturally across the arrangement?
- Is visual weight distributed evenly (no one corner feels “heavy”)?
- Do colors and styles feel balanced throughout?
- Can each individual piece be appreciated or does anything get lost?
Step 5: Document Everything
Once satisfied, take multiple photos from directly above your floor layout. Take close-ups showing frame relationships. Number each frame with removable tape and sketch a simple map. You’ll reference these constantly during installation.
Alternative Layout Styles to Consider
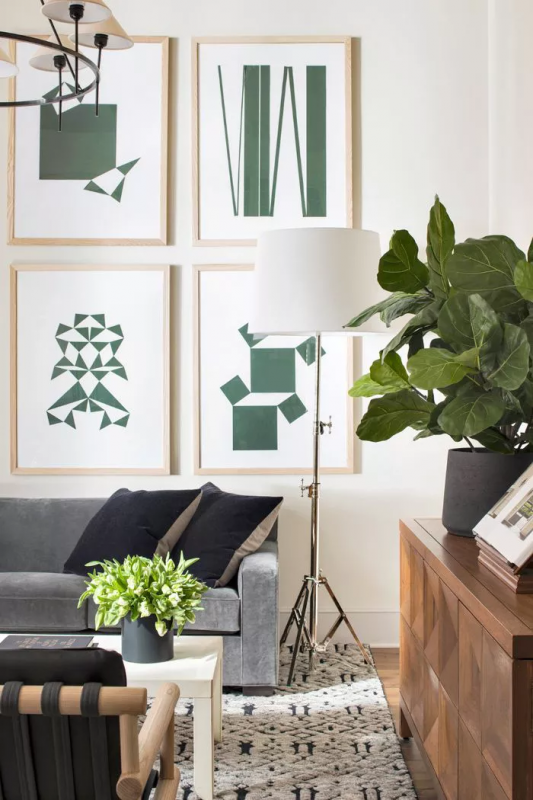
Grid Layout: Frames of uniform size arranged in perfect rows and columns. Creates clean, modern gallery walls ideal for matching prints or a photo series. Easiest for beginners making a gallery wall for the first time.

Salon-Style: Organic, asymmetrical arrangement from floor to near ceiling. Maximizes wall coverage and creates museum-quality impact. Best for large collections (15+ pieces) when making a gallery wall in spacious rooms.

Horizontal Line: All frames align along an imaginary horizontal line (either tops, middles, or bottoms). Creates visual calm while allowing size variation. Perfect for gallery walls above long furniture like sofas or credenzas.
Symmetrical Pairs: Matching frames in mirrored arrangements create formal balance. Works beautifully flanking architectural elements or in traditional décor when making a gallery wall with classic appeal.
💡 Pro Tip: Don’t limit yourself to rectangular frames. Circular mirrors, hexagonal shelves, or even sculptural wall art add dimensional interest to your gallery wall layout.
In case You Missed It: Types of Wall Art: A Room-by-Room Expert Guide
V. The 57-Inch Rule & Essential Spacing Guidelines
Professional gallery curators use mathematical precision to create installations that feel effortlessly balanced—and you can steal their exact formula.
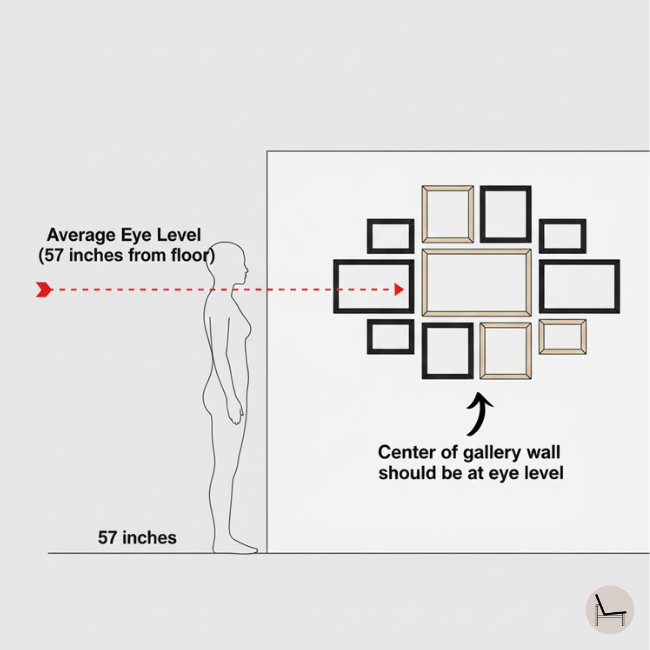
Understanding the 57-Inch Rule
Art galleries worldwide hang pieces with centers at 57 inches from the floor because this represents average human eye level. When you make a gallery wall using this standard, your installation feels naturally comfortable to view.
For single large pieces: Measure 57 inches from the floor, mark lightly with pencil. This mark represents the vertical center of your frame.
For gallery wall collections: Calculate the vertical center of your entire arrangement (halfway between the top of your highest frame and bottom of your lowest frame). This center point should hit approximately 57 inches.
Exception: When creating gallery walls above furniture, adjust upward. The bottom of your lowest frame should sit 8-10 inches above furniture, which may push your center higher than 57 inches—and that’s okay. The furniture relationship takes priority.
Spacing Between Frames
Consistent spacing is non-negotiable for polished gallery walls. Professional installers maintain 2-3 inches between all pieces, creating invisible grid lines that guide the eye comfortably across the arrangement.
Spacing Guidelines:
- Small frames (5×7 to 8×10): 2 inches apart prevents overcrowding
- Medium frames (11×14 to 16×20): 2.5 inches creates breathing room
- Large frames (18×24 and larger): 3 inches maintains visual balance
- Mixed sizes: Use 2.5 inches as your standard—it works across most size combinations
To maintain spacing during installation, cut small cardboard spacers to your chosen measurement. Hold these between frames as you mark nail positions for consistent results.
💡 Pro Tip: If your gallery wall includes dimensional objects (like floating shelves or sculptural elements), treat these as frames when calculating spacing—measure from the furthest protruding point.
You’ll Also Like: How to Choose and Display Living Room Wall Art
VI. Step-by-Step: How to Hang Your Gallery Wall

With planning complete, installation becomes straightforward when you follow a systematic approach that builds confidence with each successfully hung frame.
Tools & Materials You’ll Need
Essential tools:
- Hammer
- Level (or level app on smartphone)
- Measuring tape
- Pencil
- Picture-hanging nails or appropriate hardware for your wall type
Optional but helpful:
- Stud finder for heavier pieces
- Painter’s tape for marking positions
- Small cardboard spacers for consistent gaps
- Command strips for rental-friendly installations
The Installation Process

Step 1: Identify Your Starting Point
Never start in the middle. Begin with a frame that establishes your alignment reference—either a bottom-aligned piece if you’re building upward, or a top-corner frame if working diagonally.
Step 2: Mark Your First Position
Measure from your floor to where the bottom of your first frame should sit (accounting for furniture clearance if applicable). Use your level to ensure your mark is horizontally straight. Measure up from this bottom mark to where your hanger needs to be (accounting for the frame’s hanging hardware position).
Step 3: Hang and Verify
Hammer your nail, hang your frame, and double-check with your level. This first frame must be perfect—everything else builds from here.
Step 4: Work Systematically
Using your floor template photos, hang adjacent frames one at a time. Measure from existing frames rather than remeasuring from the floor each time. Hang one frame, verify it’s level, then move to the next. Resist the urge to put multiple nails in at once—if you make a measurement error, you’ll only need to fix one hole instead of several.
Step 5: Final Adjustments
Step back frequently. View your gallery wall from the room’s main seating areas. Minor adjustments are normal—don’t hesitate to reposition a frame if something feels off.
Installation Comparison Table:
| Method | Difficulty | Time Investment | Best For | Damage Level |
|---|---|---|---|---|
| Traditional nails | Beginner | 1-3 hours | Permanent homes, all frame weights | Small nail holes |
| Command strips | Beginner | 30-90 minutes | Rentals, temporary displays | Minimal (adhesive only) |
| French cleats | Intermediate | 2-4 hours | Very heavy frames | Moderate (requires screws) |
| Picture rail hooks | Beginner | 1-2 hours | Existing picture rails | None (no wall damage) |
💡 Pro Tip: If you’re making a gallery wall in a rental, photograph your installation process from multiple angles. These reference photos make reinstallation in your next home significantly faster.
You’ll Also Like: 10 Surprising Benefits of Printable Wall Art
VII. Common Gallery Wall Mistakes (And How to Avoid Them)

Even following a careful process, these frequent missteps sabotage otherwise beautiful installations—here’s how to sidestep each one.
Mistake #1: Hanging Everything Too High
The problem: Floating gallery walls that sit 12+ inches above furniture feel disconnected from the room and strain necks to view.
The solution: Maintain 8-10 inches between furniture tops and your gallery wall’s lowest frame. This creates visual connection while providing adequate breathing room.
Mistake #2: Inconsistent Spacing
The problem: Random gaps between frames (3 inches here, 1.5 inches there) create visual chaos that reads as unintentional.
The solution: Use cardboard spacers cut to your chosen measurement (2-3 inches). Place them between frames as you mark positions to guarantee consistency.
Mistake #3: Ignoring Visual Weight
The problem: Clustering all dark or large frames on one side creates imbalance that makes the gallery wall feel “heavy” on one side.
The solution: Distribute visual weight evenly. If you have three black frames, position them in a triangular pattern across your layout—not lined up together. Same principle applies to large frames, bright colors, or busy patterns.
Mistake #4: Overcrowding the Wall
The problem: Filling every inch of wall space leaves no negative space for eyes to rest, creating visual exhaustion.
The solution: Your gallery wall should fill 60-75% of your designated wall area. Allow empty space at edges—this negative space actually makes your arrangement feel more intentional.
Mistake #5: Using Inadequate Hardware
The problem: Standard picture hangers fail under weight, leading to frames crashing down and damaged art.
The solution: Match hardware to frame weight. Picture-hanging nails work for frames under 10 pounds. Use wall anchors for 10-25 pounds. Anything heavier requires hanging into wall studs with appropriate screws.
💡 Pro Tip: Write the frame weight on the back of each frame with a pencil before starting installation. This quick reference prevents hardware mismatches.
In Case You Missed It: Warm Neutral Paint Colors: Designer Secrets Revealed
VIII. Budget-Friendly Gallery Wall Solutions

Creating a gallery wall doesn’t require hundreds of dollars—strategic shopping and DIY approaches deliver professional results at any price point.
Smart Shopping Strategies
Digital prints over original art: Platforms like Etsy, Society6, and independent artist websites offer downloadable art for $5-20. Print at local photo labs (Walgreens, CVS, Costco Photo Center) for $0.30-10 per print depending on size.
Thrift store gold mines: Estate sales, Goodwill, and vintage shops stock frames at 70-90% below retail. Buy for the frames (paint or refinish as needed), not the existing art. Budget $2-8 per frame versus $30-80 new.
IKEA’s RIBBA frames: Consistently sized, affordable ($10-30 depending on size), and available in black or white. The uniform sizing simplifies layout planning when making a gallery wall on a budget.
Printable art collections: Many designers offer pre-curated gallery wall sets (8-12 digital prints designed to work together) for $25-50—significantly less expensive than purchasing individual pieces.
Gallery Wall Budget Breakdown Table
| Budget Level | Total Cost | Frame Strategy | Art Strategy | Best For |
|---|---|---|---|---|
| Budget-Friendly | $50-150 | Uniform IKEA or thrifted frames, DIY refinishing | Digital prints, personal photos, printable art sets | First-time homeowners, renters, small walls |
| Mid-Range | $150-400 | Mix of IKEA staples with 2-3 specialty frames | Combination of prints, personal photos, 1-2 small originals | Permanent homes, medium-large walls, more ambitious collections |
| Investment | $400-1,000+ | Custom framing, specialty finishes, unique vintage finds | Original art, custom photography, professional framing services | Statement walls, high-end aesthetics, heirloom displays |
DIY Frame Refinishing:
Spray paint transforms cheap or outdated frames into cohesive collections. Sand lightly, apply primer, then 2-3 thin coats of spray paint in your chosen finish. Matte black and satin gold consistently deliver upscale results. Budget $15-25 for supplies to refinish 8-12 frames.
💡 Pro Tip: Check Facebook Marketplace and Nextdoor for people moving who are selling entire gallery wall collections. You’ll often find complete sets (frames, art, hardware) for 50-70% less than building from scratch.
In Case You Missed It: The One Paint Color That Designers Are Too Afraid to Tell You Works in Every Room
IX. Rental-Friendly Gallery Wall Techniques
Security deposits and gallery walls can coexist—these damage-free approaches let you make a gallery wall without forfeiting hundreds of dollars when you move.
Command Strip Systems
3M Command Picture Hanging Strips support surprising weight (up to 16 pounds for heavy-duty versions) without permanent damage. Follow package instructions exactly:
- Clean wall surface with rubbing alcohol
- Press adhesive strips firmly for 30 seconds
- Wait one hour before hanging frames
- To remove: pull tab straight down slowly—never out from the wall
Command strip limitations: Weight restrictions apply. Textured walls reduce adhesion effectiveness. Works best on painted drywall or smooth painted surfaces.
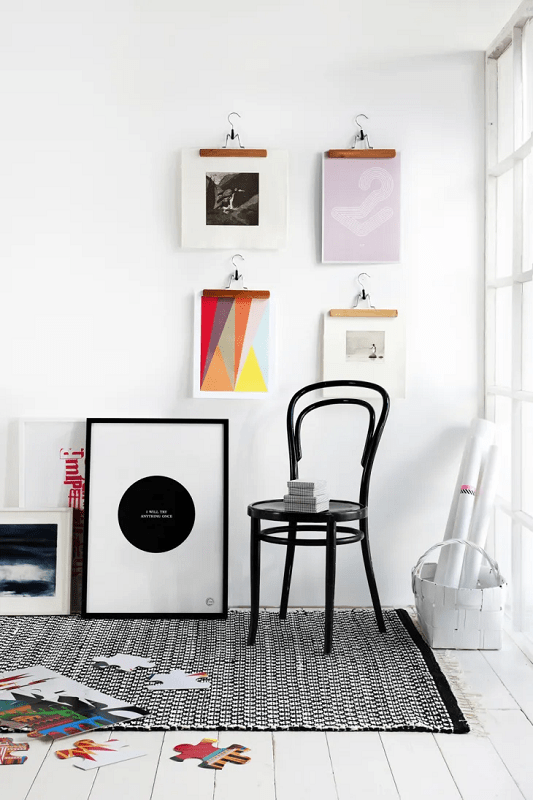
Picture Rail Systems
If your rental includes picture rails (molding near the ceiling designed for hanging art), invest in adjustable picture hanging cables ($3-5 per cable). These drop from the rail, allowing you to make a gallery wall that moves with you entirely.
Freestanding Gallery Ledges
IKEA picture ledges or floating shelves lean gallery walls against walls without nails. While technically not “hung,” this approach creates layered, changeable displays perfect for renters. Secure ledges to walls with museum putty (removable, leaves no marks) for stability.
Removable Adhesive Hooks
Brands like Monkey Hooks or VELCRO brand removable hooks work for lighter frames (under 5 pounds). Less reliable than Command strips but useful for smaller pieces in your gallery wall collection.
💡 Pro Tip: Take detailed photos of your walls before installation with timestamps. This documentation protects you if landlords later claim your removal caused “pre-existing damage.”
Most Popular Post:
Interior Design Style Quiz
Timeless Paint Colors That Never Go Out of Style
Create Your Perfect Ergonomic Home Office: A Complete Guide
Must-Have Accessories for Guys: The Secret to a Stylish Space
Modular Sofas for Small Spaces: Brilliant Solutions for Compact Living

X. Transform Your Space: Your Gallery Wall Awaits
You started this guide staring at an intimidating blank wall, paralyzed by the fear of making permanent mistakes. Now you have a complete system for how to make a gallery wall that reflects your personality, fits your budget, and creates the professionally curated look you’ve admired in design magazines.
The difference between homes that feel generic and homes that feel genuinely personal often comes down to these details—the collections we display, the memories we choose to highlight, the artistic choices that transform walls into stories. Your gallery wall won’t just fill empty space. It will anchor your room, start conversations, and remind you daily of the experiences and aesthetics that matter to you.
Your next step is simple: Grab your measuring tape right now. Measure that blank wall. Mark those dimensions on your floor. Gather the frames you’ve been storing in closets and the photos you’ve been meaning to print. Set aside one weekend afternoon.
You know how to make a gallery wall now. The only thing standing between your current blank wall and your dream installation is the decision to start. Your transformed space is waiting.
Call to Action: Pin this guide for easy reference when you begin your gallery wall project. Share it with friends who’ve been asking for your design secrets. And when you finish, tag us on Instagram—we want to celebrate your newly transformed space with you!
Frequently Asked Questions About Making Gallery Walls
Q: How many pictures do I need to make a gallery wall?
A: Gallery walls work with as few as 3 pieces or as many as 30+. Start with 5-9 pieces for your first project—enough variety to create interesting layouts without becoming overwhelming. Odd numbers (5, 7, 9) tend to create more visually pleasing arrangements than even numbers.
Q: Should all my frames match when making a gallery wall?
A: Not necessarily. Matching frames create clean, cohesive gallery walls ideal for modern or minimalist aesthetics. Mixed frames work beautifully when you limit variety to 2-3 frame styles or maintain consistency in one element (like “all black finishes” or “all wood tones”). The key is intentional selection, not randomness.
Q: What’s the minimum wall size for a gallery wall?
A: You can make a gallery wall in spaces as small as 24″ x 36″ using 3-5 smaller frames. Narrow hallways, small dining areas, and spaces above desks work beautifully for mini gallery walls. Scale your frame sizes to your available space—don’t try to fill a small wall with oversized frames.
Q: How do I make a gallery wall look cohesive with different art styles?
A: Create cohesion through consistent framing, unified color palettes, or similar artistic mediums. A gallery wall mixing photography, abstracts, and vintage prints can feel cohesive when all pieces share a neutral color story or when all frames match. Alternatively, keep art styles similar (all photography or all botanical prints) while varying frame styles.
Q: Can I add to my gallery wall later?
A: Absolutely! Gallery walls should evolve as you discover new art, collect memories, or refine your aesthetic. When planning your initial installation, consider leaving strategic open space at edges where expansion feels natural. Photograph your current layout before adding pieces so you can recreate it if needed.
Q: What if I don’t have enough art or photos for a gallery wall?
A: Mix what you have with affordable solutions: digital art prints ($5-20 from Etsy), thrifted vintage frames with interesting subjects, DIY abstract art (canvas + acrylic paint costs under $30), or meaningful objects like pressed flowers, vintage postcards, or framed fabric swatches. Gallery walls celebrate personality—not expensive collections.
Subscribe To the Newsletter!
Subscribe now for an endless feed of inspirational women’s cave decor ideas, pampering rituals, and more tips for curating your ultimate escape. Let’s start making your cozy refuge a reality – you so deserve this!
CATCH THE LATEST IN HOME DECOR TRENDS:
Steal These 16 Expert-Approved Decorating Secrets

How To Accessorize Your Living Room
Small Space? 10 Ways To Make A Room Appear Bigger
Make Your space Look Expensive
GET CAUGHT UP ON ALL THE INSPIRING DECOR TIPS:
18 Fresh Decorating Ideas To Update Your Fireplace
How to Make a Gallery Wall: The Complete Step-by-Step Guide (Even If You’ve Never Hung a Picture)


