TL;DR Section: A decorating plan is a strategic roadmap that eliminates costly mistakes by guiding you through three phases: auditing your space and defining style (Prep), creating a cohesive material palette and layout (Design), and implementing purchases in the right sequence (Execute). This approach saves thousands in returns and ensures every purchase builds toward a cohesive, intentional home.
Introduction: The $2,347 Wake-Up Call
You’ve been there. Standing in your living room on a Sunday afternoon, surrounded by shopping bags from three different stores, realizing none of it works together. The throw pillows clash with the rug you bought last month. The wall art is too small for the space. The lamp you thought was “perfect” makes everything look yellow.
This is what happens when you decorate without a plan.
I learned this the expensive way. In my first home, I spent $2,347 in six months on furniture and decor – and had to return or replace 60% of it. The problem wasn’t my taste. It was my approach. I was designing by impulse, not by intention.
Here’s what changed everything: I stopped buying and started planning. I created a decorating plan – a simple, three-phase system that interior designers have used for decades. The result? My second home came together in half the time, cost $1,200 less, and actually looks like the vision I had in my head.You don’t need a design degree.
You need a decorating plan that takes you from overwhelmed to executing with confidence. This guide will show you the exact framework: Prep → Design → Execute. By the end, you’ll know precisely what to buy, when to buy it, and why – so every dollar works toward the home you’ve been dreaming about
I. What Is a Decorating Plan? (And Why “Winging It” Costs You Thousands)
A decorating plan is a documented strategy that defines your style, establishes a cohesive material palette, maps your layout, and sequences your purchases to avoid costly mistakes and buyer’s remorse.
Most people think a decorating plan is just a Pinterest board or a mood board taped to the wall. Wrong. Those are inspiration, not plans. A real decorating plan answers four critical questions before you spend a single dollar:
- What’s my defined aesthetic? (Not “I like everything” – an actual style framework)
- What stays, what goes, and what gets upgraded? (The Keep/Kill/Upgrade audit)
- What’s my material palette? (The specific colors, textures, and finishes that will appear in the space)
- What’s my purchasing sequence? (The order of operations that prevents do-overs)
Without this roadmap, you’re making isolated decisions that don’t build on each other. You buy a sofa because it’s on sale, then realize it doesn’t fit the vibe. You paint the walls, then find art that clashes, and spend money solving problems you created by not planning.
The cost of winging it:
- Average American spends $1,800/year on home decor (Statista, 2024)
- 40% of furniture purchases are returned or regretted (National Retail Federation)
- The average room redesign takes 18 months when done reactively vs. 6 months with a plan
A decorating plan compresses decision-making, eliminates regret, and ensures every purchase has a why behind it.
Don’t Miss: A Guide to Selecting Statement Furniture Pieces for Your Home
II. The 3-Phase Decorating Plan Framework: Prep → Design → Execute
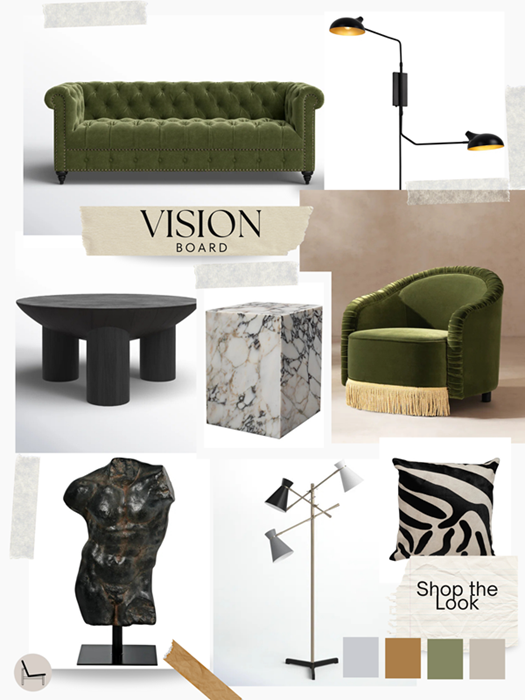
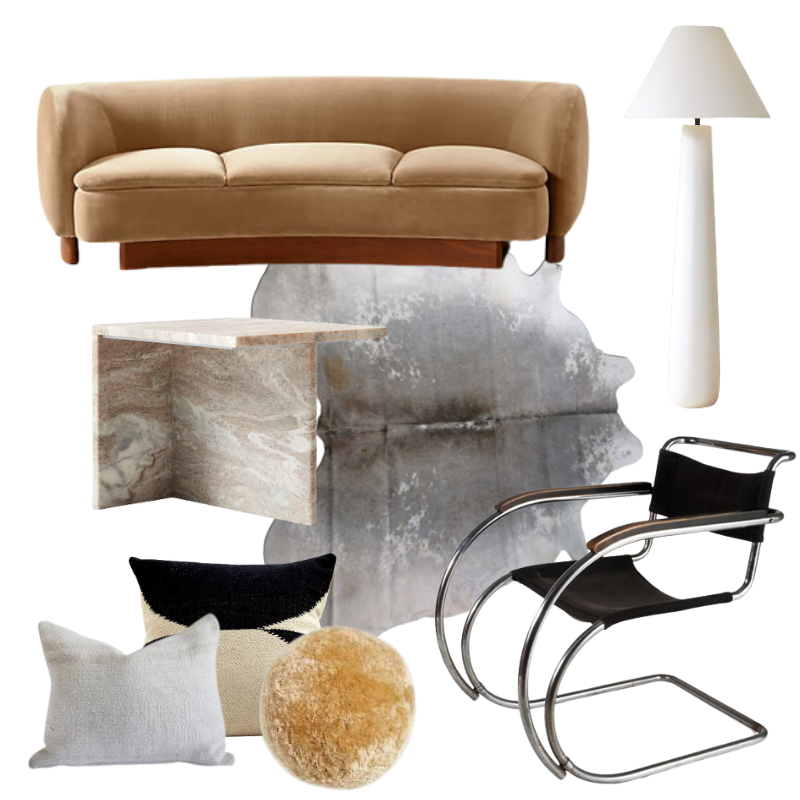
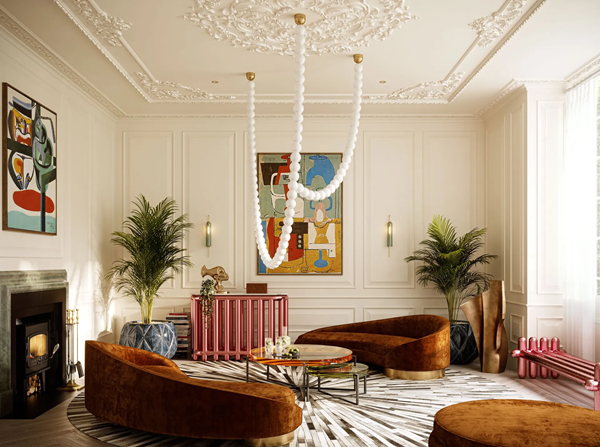
Shop The Look


The Prep → Design → Execute framework breaks decorating into three sequential phases: auditing your space and crystallizing your style (Prep), creating your visual blueprint and material palette (Design), and implementing purchases in the correct order (Execute).
This isn’t arbitrary. This is how professional interior designers work – and it’s the exact process I now use for every room in my home.
Why the sequence matters:
- Prep prevents you from designing for someone else’s home. You need to understand your space’s limitations and assets first.
- Design prevents you from buying things that don’t work together. You need to visualize the end result before shopping.
- Execute prevents costly sequencing mistakes. You need to know what comes first (hint: it’s not the decorative accessories).
Let’s break down each phase.
You’ll Also Like: Renter-Friendly Wall Decor: The $500 Mistake 87% of Renters Make (And How to Avoid It)
III. Phase 1 – The Foundation: Auditing Your Space & Defining Your Style
Phase 1 establishes what you’re working with (space audit) and where you’re going (style definition) so every subsequent decision has context and direction.
Step 1A: Prep (Auditing & Style) The Honest Space Audit
Before you can plan where you’re going, you need to know where you are. Grab a notebook and answer these questions for each room:
Fixed Elements (Can’t Change):
- What are your wall colors, flooring, trim, and countertops?
- What’s the lighting situation? (Natural light direction, existing fixtures)
- What are your architectural features? (Crown molding, ceiling height, window size)
Existing Furniture & Decor (Can Change, But at a Cost):
- What pieces do you love and want to keep?
- What pieces are functional but not ideal?
- What pieces make you wince every time you see them?
This is where the Keep/Kill/Upgrade Matrix comes in:
| Category | Keep | Upgrade | Kill |
| Criteria | Fits future vision, good condition, functional | Functional but doesn’t fit aesthetic; can be refreshed | Damaged, wrong scale, actively ruins the vibe |
| Action | Integrate into plan | Budget for replacement in Phase 3 | Sell/donate before you start buying |
| Example | Quality hardwood dining table | Beige sofa that could be reupholstered | Particle board bookshelf that’s falling apart |
Pro Tip: Take photos of your fixed elements (floor samples, paint chips, existing furniture). You’ll reference these constantly during Phase 2.
Step 1B: Crystallizing Your Style
This is where most people get stuck. You have 247 Pinterest saves, but they range from maximalist boho to stark minimalism. You don’t have a style – you have a wish list.
Here’s the fix: The Rule of Three for Style Definition.
- Choose 3 Style Words: Not “modern” or “cozy” – specific descriptors. Examples: “Warm Minimalist,” “Organic Modern,” “Moody Traditional.”
- Find 3 Inspiration Rooms: Not 300 – THREE. These are your north star images. They should all share visual DNA.
- Identify 3 Non-Negotiables: These are your deal-breakers. Examples: “Must have natural textures,” “No all-white kitchens,” “Must accommodate a large sectional.”
Why this works: Constraint creates clarity. When you can articulate your style in three words and three images, shopping becomes dramatically easier.
Trending post: How To Make An Interior Design Mood Board: Step-By-Step Guide
IV. Phase 2 – The Blueprint: Creating Your Material Palette & Layout Plan
Phase 2 transforms inspiration into a concrete visual blueprint by establishing your color palette (including critical undertones), material selections, and spatial layout before any purchasing begins.
This is the phase that separates “pretty Pinterest boards” from “actionable decorating plans.”
Step 2A: Design (Palette & Layout) Building Your Material Palette (The Foundation of Cohesion)
A material palette is your curated selection of colors, textures, and finishes that will appear throughout the space. This is not “I like navy and gold.” This is:
- 3 Neutral Base Colors (walls, large furniture, flooring)
- 1-2 Accent Colors (pillows, art, smaller furniture)
- 3-4 Texture/Material Choices (linen, brass, oak, marble)
The 60-30-10 Rule for Color Distribution:
- 60% = Dominant neutral (walls, large furniture)
- 30% = Secondary color (area rug, curtains, accent chairs)
- 10% = Accent color (pillows, art, accessories)
But here’s where everyone screws up: undertones.
The Undertone Decoder: Why Your “Neutral” Looks Yellow
Undertones are the subtle color biases in neutrals. A “white” wall can read pink, yellow, blue, or green depending on its undertone. If you don’t account for this, your carefully chosen palette will clash with your fixed elements.
The 48-Hour Paint Test Protocol:
- Buy Samplize peel-and-stick samples (not tiny paint chips – actual 12×12″ swatches you can move around)
- Test in three locations: Where natural light hits, in shadow, under artificial light
- Test at three times: Morning, midday, evening
- Compare against your fixed elements: Hold swatches next to your floor, trim, and existing furniture
Specific Undertone Guidance for Popular Neutrals:
| Paint Color | Undertone | Best For | Avoid If |
| Benjamin Moore White Dove | Warm (slight yellow) | Spaces with cool gray floors, north-facing rooms | You have golden oak floors (too yellow) |
| Sherwin Williams Alabaster | Warm (cream) | Traditional homes, spaces with warm wood | Modern spaces with cool metals |
| Benjamin Moore Chantilly Lace | Cool (crisp white) | Modern aesthetics, south-facing rooms | Spaces with warm beige tones (will look stark) |
| Sherwin Williams Repose Gray | Cool (slight blue) | Contemporary spaces, pairs with navy/charcoal | Rooms with yellow lighting (will look purple) |
Designer Insight from Maria Killam, color expert: “The #1 mistake I see is choosing paint in the store under fluorescent lights. Paint reads completely different in your home. Always test on your actual walls, in your actual lighting, for at least 48 hours.”
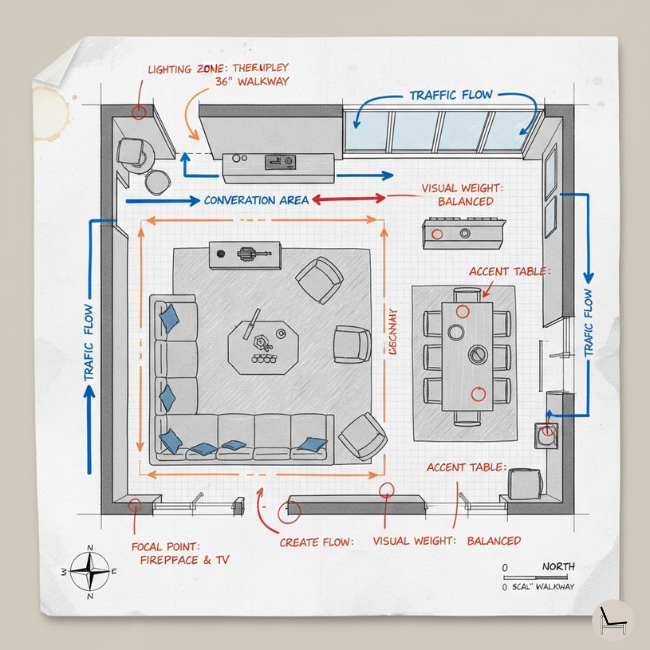
Step 2B: The Layout Plan (Spatial Intelligence)
Now that you know your materials, you need to know where they’re going. This prevents the “I bought a sofa that doesn’t fit” crisis.
The Three Layout Questions:
- What’s the focal point? (Fireplace, TV, window view – pick ONE)
- What’s the traffic flow? (Can you walk through the room without dodging furniture?)
- What’s the visual weight distribution? (Is one side of the room heavy and the other empty?)
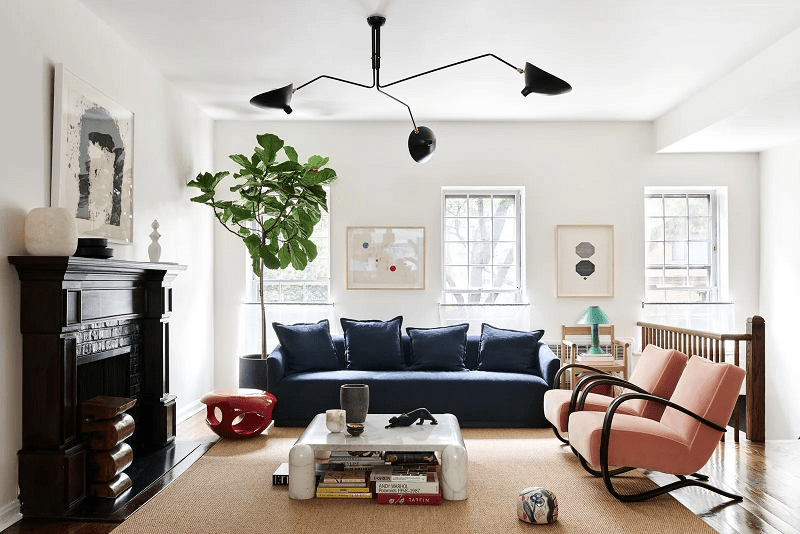
Achieving Visual Balance: The Designer’s Secret to Rooms That Feel ‘Right’
Visual weight is why some rooms feel “off” even when technically functional. A heavy, dark sofa on one wall needs to be balanced by substantial elements on the opposite side (large art, tall bookshelf, substantial lighting).
The Visual Weight Checklist:
- Dark colors have more weight than light colors
- Large pieces have more weight than small pieces
- Busy patterns have more weight than solid colors
Pro Tip: Use free tools like Roomstyler or SketchUp to map your layout digitally. Measure twice, buy once.
You’ll Also Like: The Best Performance Fabric Sofas for Real Life (Kids, Pets & Spills Welcome)
V. Phase 3 – The Transformation: Strategic Purchasing & Implementation Timeline
Phase 3 executes your plan through sequenced purchasing that prioritizes structural elements first, statement pieces second, and decorative details last – preventing the costly mistake of decorating around the wrong foundation.
This is where the rubber meets the road. You have your plan. Now you need to buy and install in the right order.
Step 3: Execute (Purchasing & Timing) The 7 Costly Sequencing Mistakes (And How to Avoid Them)
Most people decorate in reverse. They buy the fun stuff first (pillows, art, candles) and then realize their foundation is wrong. Here’s the correct sequence:
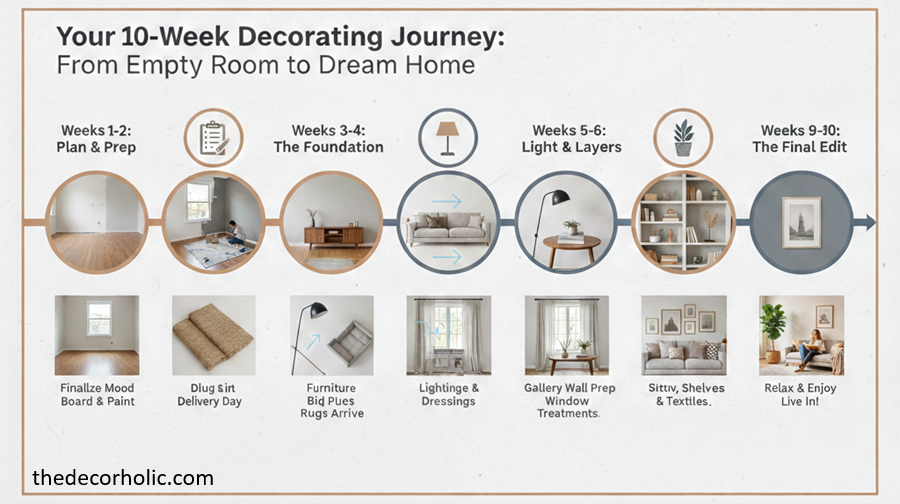
The Decorating Plan Implementation Hierarchy:
- Structural/Architectural (Week 1-2): Paint, flooring (if changing), lighting fixtures
- Bones/Large Furniture (Week 3-4): Sofa, dining table, bed frame
- Layering Elements (Week 5-6): Area rugs, curtains, secondary seating
- Functional Accessories (Week 7-8): Lamps, mirrors, storage solutions
- Decorative Details (Week 9-10): Art, pillows, plants, styling objects
Why this order matters:
- You can’t choose a rug until you know where your sofa is going
- You can’t choose art until you know your wall color
- You can’t choose pillow colors until you see the rug and sofa together in the actual light
Real Case Study: I once bought the “perfect” abstract painting for my dining room – before I painted the walls. When I finally painted (three months later), the painting’s undertones clashed completely. I had to sell it at a loss and start over. Sequencing mistake cost: $340.
The Budget Allocation Framework: Where to Splurge vs. Save
Not all purchases deserve equal investment. Here’s the strategic breakdown:
The $500 vs. $5,000 Decorating Plan
| Category | Budget Plan ($500) | Investment Plan ($5,000) | Why It Matters |
| Paint | $150 (2 gallons premium) | $400 (professional painter) | DIY paint is fine; pro finish elevates |
| Sofa | $0 (keep existing, add slipcover $80) | $2,200 (quality upholstered) | Sofas are high-use; cheap ones die in 3 years |
| Lighting | $100 (new lampshades + bulbs) | $800 (statement pendant + sconces) | Lighting transforms a space more than any other single element |
| Rug | $120 (washable, patterned to hide wear) | $900 (wool, hand-tufted) | Rugs define zones; quality shows |
| Art | $50 (framed prints, Etsy/Minted) | $400 (original art or large-scale photography) | Splurge on scale, not necessarily origin |
The ROI Rule: Splurge on pieces you touch or see daily (sofa, bed, dining chairs). Save on pieces that are purely visual (vases, books, decorative objects).
Pro Tip: Use the “Cost Per Use” calculator. A $2,000 sofa you sit on for 3 hours daily for 10 years = $0.18 per use. A $200 decorative bowl you never touch = infinite cost per use.
You’ll Also Like: 23 Living Room Corner Ideas That Transform Wasted Space Into Stunning Design Features
VI. Advanced Planning Techniques
This section covers the technical nuances that separate amateur decorating plans from professional-grade execution: undertone mastery, durability for real life, and style differentiation.
Can’t Change Your Floors/Walls? How to Plan Around Fixed Elements
Renters and budget-conscious homeowners face unique constraints. You can’t rip out the 1990s oak floors or paint the landlord’s beige walls. Here’s how to work with fixed elements:
Strategy 1: The “Neutralize and Layer” Approach
- Use large area rugs to cover 80% of problematic flooring
- Add removable wallpaper or large-scale art to minimize wall color impact
- Choose furniture and textiles that complement (not fight) existing tones
Strategy 2: The “Embrace and Enhance” Approach
- If you have warm oak floors, lean into warm neutrals and brass accents
- If you have cool gray walls, embrace a Scandi or modern industrial vibe
What NOT to do: Don’t try to “hide” fixed elements with clashing choices. A cool-toned gray sofa on golden oak floors will always look wrong.
Living with Your Plan: Maintenance & Durability Tips
Your decorating plan needs to survive real life. Here’s the truth about popular materials:
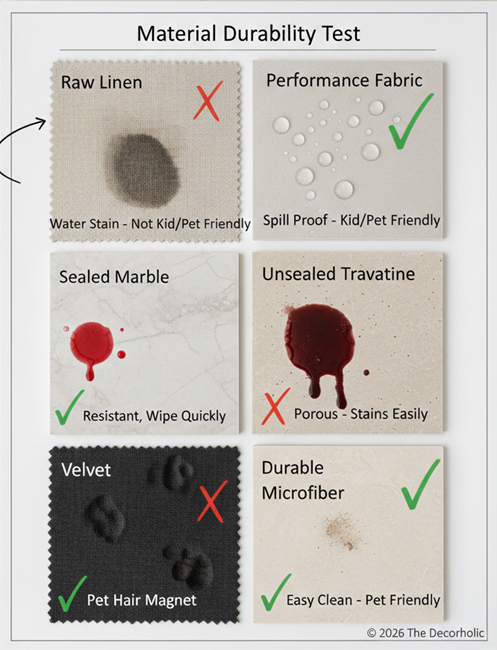
Performance Ratings for Popular Materials:
| Material | Aesthetic Appeal | Durability (Kids/Pets) | Maintenance | Best Use |
| Raw Linen | 5/5 | 2/5 (stains easily) | High (frequent spot cleaning) | Low-traffic areas, adults-only homes |
| Performance Fabric | 4/5 | 5/5 (stain-resistant) | Low (wipe clean) | Family rooms, dining chairs |
| Leather | 5/5 | 4/5 (scratches patina) | Medium (condition annually) | Sofas, accent chairs |
| Unsealed Travertine | 5/5 | 2/5 (stains, etches) | High (reseal annually) | Decorative use only |
| Sealed Marble | 5/5 | 4/5 (durable when sealed) | Medium (reseal every 2 years) | Countertops, coffee tables |
The Hybrid Solution: Use raw, beautiful materials in low-traffic zones (bedroom, home office). Use performance materials in high-traffic zones (family room, kitchen seating).
Future-Proofing Your Decorating Plan: The 80/20 Timeless Rule
Trends change. Your plan shouldn’t require a complete overhaul in three years. Here’s how to build timeless plans:
The 80/20 Rule:
- 80% of your investment should be in timeless foundations (neutral walls, classic furniture shapes, natural materials)
- 20% can be trendy accents (pillows, art, small decor)
Timeless Foundations:
- Neutral paint colors (whites, grays, warm beiges)
- Classic furniture silhouettes (Chesterfield sofa, parsons table, wingback chairs)
- Natural materials (wood, stone, linen, cotton)
Trendy Accents:
- Seasonal pillow covers
- Swappable art
- Decorative objects
This way, when the “coastal grandmother” trend dies and “dark academia” takes over, you swap $200 in pillows – not $2,000 in furniture.
In Case You Missed It: The 7 Best RH Cloud Couch Dupes of 2026: Luxury Looks for Thousands Less
VII. Tools & Resources to Simplify Your Decorating Plan

These tools bridge the gap between planning and execution by providing measurement accuracy, visualization capabilities, and material sampling that prevent costly mistakes.
Digital Tools:
- SketchUp Free (Layout Planning): Create accurate floor plans and furniture arrangements. Learning curve: moderate. Value: prevents furniture-doesn’t-fit crises.
- Coolors.co (Color Palette Generator): Input your inspiration image, and it extracts the exact hex codes for your palette.
- Canva: Create your mood board with ideas and inspiration.
Physical Tools:
- Bosch GLM 50 C Laser Measure: Stop guessing if that sofa will fit. One-click precision measurement. ($70 on Amazon)
- Samplize Paint Samples: Peel-and-stick 12×12″ paint samples you can move around your room. No painting test squares. ($6.99 per sample)
- Material Sample Boxes: Order fabric swatches from online retailers (West Elm, CB2, Havenly) to see textures in your actual lighting. Most are free with refundable deposits.
Planning Templates:
Download printable decorating plan worksheets from Etsy ($5-15) that include:
- Room measurement grids
- Material palette organizers
- Budget trackers
- Timeline calendars
Pro Tip: Create a “Decorating Plan Binder” – one physical place for all samples, measurements, receipts, and notes. When you’re shopping and wonder “what undertone was my paint again?” you’ll have the answer in hand.
You’ll Also Like: How To Style Coffee Table Books That Transform Your Space
VIII. Common Decorating Plan Mistakes (And How to Avoid Them)
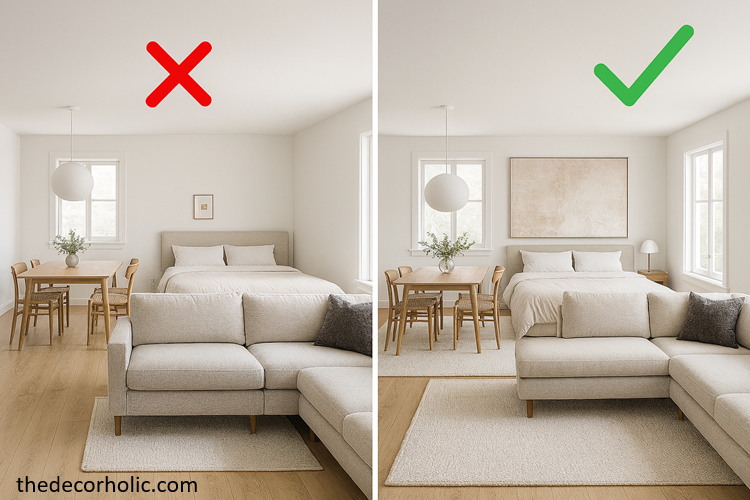
The five critical errors that derail even well-intentioned decorating plans are: ignoring scale, rushing the process, skipping the material test phase, over-decorating, and neglecting lighting layers. As seen in the scale comparison above, a 5×7 rug makes a room feel disjointed, while a 9×12 rug anchors the sectional and creates a professional ‘Decorating Plan’ look.
Mistake #1: Ignoring Scale & Proportion
The Problem: Buying furniture that’s too small for the space (8×10 rug in a 15×20 room) or too large (oversized sectional in a 10×12 living room).
The Fix: Measure your room and use the 2/3 rule. Rugs should cover 2/3 of the floor space. Art should fill 2/3 to 3/4 of the wall space above furniture.
Mistake #2: The “I’ll Figure It Out as I Go” Trap
The Problem: Buying impulsively without a complete plan because you’re excited to see progress.
The Fix: Finish Phase 1 and 2 completely before you buy anything in Phase 3. The two weeks you spend planning will save you months of regret.
Mistake #3: Skipping the Sample Stage
The Problem: Buying paint, fabric, or materials based on tiny swatches or online photos.
The Fix: Order large samples. Test in your space. Live with them for 48 hours minimum. Yes, it’s slower. It’s also cheaper than repainting or returning a $1,500 sofa.
Mistake #4: Over-Decorating (The “More Is More” Syndrome)
The Problem: Filling every surface, covering every wall, cramming in too much furniture because you think “decorated” means “full.”
The Fix: Embrace negative space. Your decorating plan should include intentional emptiness. Rooms need to breathe.
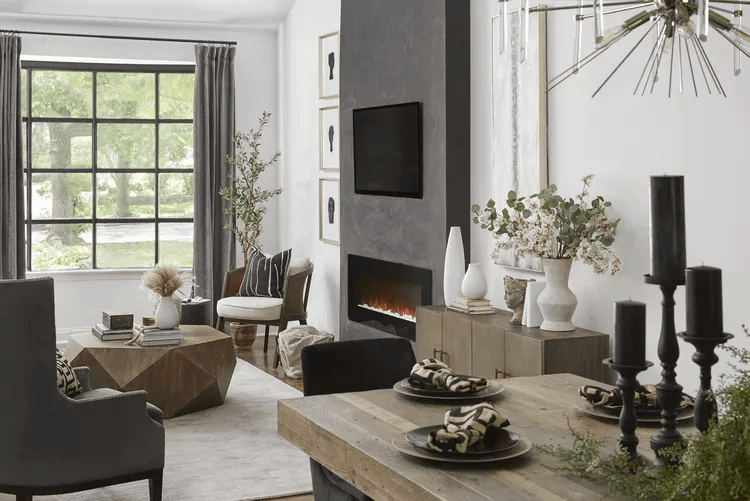
Mistake #5: Why Your Room Feels Flat – The Missing Lighting Layer
The Problem: Relying on one overhead fixture. Your room looks one-dimensional and uninviting.
The Three-Layer Lighting Formula:
- Ambient: Overall illumination (ceiling fixture, recessed lights)
- Task: Focused light for activities (reading lamp, under-cabinet lights)
- Accent: Decorative/mood lighting (picture lights, candles, decorative lamps)
The Fix: Every room needs all three layers. Budget for at least 3-4 light sources per room.
Most Popular Post:
Interior Design Style Quiz
Timeless Paint Colors That Never Go Out of Style
Create Your Perfect Ergonomic Home Office: A Complete Guide
Must-Have Accessories for Guys: The Secret to a Stylish Space
Modular Sofas for Small Spaces: Brilliant Solutions for Compact Living
IX. Conclusion: Your Next Steps – From Plan to Reality
You now have the framework and understand the three phases. You know the mistakes to avoid and the tools that simplify execution.
Here’s what happens if you don’t implement this:
Another six months pass. You’ve bought more random pieces that don’t work together. You’re still embarrassed to post your living room on Instagram. You’ve spent another $800 on returns and regrets. Your home still doesn’t feel like yours.
Here’s what happens if you do:
In 10 hours of focused planning, you’ll have a complete decorating plan. In 8-12 weeks, you’ll have a room (or home) that looks intentional, cohesive, and unmistakably yours. You’ll make purchasing decisions with confidence and stop second-guessing. You’ll finally live in a space that restores you instead of stressing you out.
Your next step is simple: Block two hours on your calendar this week. Start Phase 1. Audit your space. Define your style in three words. That’s it. Don’t overthink it. Don’t Pinterest-spiral for six more months.
You’ve got this. You don’t need a designer’s budget or a designer’s degree. You just need a plan.
Start planning today. Start living in your dream space tomorrow.
Disclaimer: This post may contain affiliate links. I earn a commission on qualifying purchases at no additional cost to you.
Frequently Asked Questions (Your Decorating Plan Questions Answered)
Q: How long does it take to create a decorating plan?
A: Phase 1 (Audit + Style Definition): 2-4 hours. Phase 2 (Material Palette + Layout): 4-6 hours. Phase 3 (Purchasing + Implementation): 8-12 weeks depending on room size and budget. Total planning time before buying: 6-10 hours. This investment saves 20+ hours of returns, regret, and do-overs.
Q: Do I need to hire a professional designer, or can I DIY my decorating plan?
A: You can absolutely DIY if you follow a structured framework (like Prep → Design → Execute). Hire a designer if: (1) Your budget is $15K+, (2) You’re doing structural changes (knocking down walls, custom millwork), or (3) You’ve tried DIY and feel paralyzed. For most rooms, a solid plan and patience are enough.
Q: What if my partner and I have completely different styles?
A: Run Phase 1B together. You each choose 3 inspiration images independently, then find the overlap. Example: One person loves modern minimalism, the other loves cozy traditional. The overlap might be “Warm Minimalist” or “Organic Modern” – neutral base with natural textures. The non-negotiables conversation is critical here.
Q: Can I create a decorating plan on a tight budget ($500 or less)?
A: Yes. Focus Phase 3 on paint and lighting first (maximum impact for minimum spend). Use your existing furniture and save for quality upgrade pieces one at a time. A $500 plan might take 12 months to fully execute vs. 3 months for a $5K plan – but it’s still a plan.
Q: How do I know if I should keep or replace existing furniture?
A: Use the Keep/Kill/Upgrade Matrix. Ask: (1) Is it structurally sound? (2) Does it fit my defined style? (3) Is it the right scale for the space? If yes to all three, keep it. If no to #1, kill it. If no to #2 or #3 but yes to #1, budget to upgrade/replace later.
Q: What’s the difference between Modern Organic vs. Japandi vs. Scandi?
A: Scandi = Bright whites, light woods, minimalist, cool-toned. Japandi = Scandi + Japanese wabi-sabi, darker woods, handmade ceramics, warmer neutrals. Modern Organic = Sculptural furniture, natural textures (linen, stone, jute), warm neutrals, less minimal than Scandi. All three share natural materials, but the feeling differs (Scandi is airy, Japandi is serene, Modern Organic is grounded).
CATCH THE LATEST IN HOME DECOR TRENDS:
Steal These 16 Expert-Approved Decorating Secrets

How To Accessorize Your Living Room
Small Space? 10 Ways To Make A Room Appear Bigger
Make Your space Look Expensive
GET CAUGHT UP ON ALL THE INSPIRING DECOR TIPS
18 Fresh Decorating Ideas To Update Your Fireplace
How to Make a Gallery Wall: The Complete Step-by-Step Guide (Even If You’ve Never Hung a Picture)

How To Decorate a Living Room With White Walls

